はじめに
2022 年 11 月にサポートされた CloudFront の Continuous deployment (継続的デプロイ) を検証する機会がありましたので紹介します。
また、この機能を利用してステージングディストリビューションへアクセスする際、Requestly という Chrome 拡張が便利だったのでこちらについても併せて紹介します。
CloudFront continuous deployment とは
まず Continuous deployment がどのようなものかをざっくり確認します。概ね以下のような機能でした。
- 本番ディストリビューションをコピーしてステージングディストビューションを作成する
- ステージングディストリビューションは本番ディストリビューションの設定をベースにオリジンやビヘイビアを変更できる
- 本番ディストリビューションとステージングディストリビューションは同じ代替ドメイン名でアクセスできる (DNS レコードを変更する必要がない)
- リクエストのルーティングは Weight-based と Header-based いずれかで制御できる
- 本番ディストリビューションにステージングの設定を上書きすることでリリースする (Promote と表現する)
- Promote はダウンタイムなしで実行される
これまで CloudFront の移行で厄介だった代替ドメイン名の衝突を気にする必要がないため、使いこなせば非常に有用な機能であることがわかります。
Weight-based はいわゆるカナリアリリースで、ログをモニタリングしながら一部のリクエストのみをステージング側に誘導し、問題なさそうなら Promote するような方式です。
一方で Header-based は Viewer Request に特定のカスタムヘッダーがある場合はステージングに誘導します。これは開発者だけがテストのためにステージングディストリビューションにアクセスしたい場合に便利です。テストが OK となったら Promote することで Blue/Green 的に切り替えることができます。今回はこちらを想定しています。
前準備
まず検証用の CloudFront ディストリビューションを CDK で作ります。S3 オリジンのパスは v1 としています。少々長いので読み飛ばしてください。
cloudfront-stack.ts
import {
  Duration,
  RemovalPolicy,
  Stack,
  StackProps,
  aws_certificatemanager as acm,
  aws_cloudfront as cloudfront,
  aws_cloudfront_origins as cloudfront_origins,
  aws_iam as iam,
  aws_logs as logs,
  aws_route53 as route53,
  aws_route53_targets as route53_targets,
  aws_s3 as s3,
  aws_s3_deployment as s3deploy,
} from "aws-cdk-lib";
import { Construct } from "constructs";

const serviceName = "cfcd-sample";
const hostedZoneName = "your-domain.com";
const domainName = `${serviceName}.${hostedZoneName}`;

export class CloudFrontSampleStack extends Stack {
  constructor(scope: Construct, id: string, props?: StackProps) {
    super(scope, id, props);

    const hostedZone = route53.HostedZone.fromLookup(this, "HostedZone", {
      domainName: hostedZoneName,
    });

    const certificate = new acm.DnsValidatedCertificate(this, "Certificate", {
      certificateName: `${serviceName}-certificate`,
      domainName: domainName,
      subjectAlternativeNames: [`*.${domainName}`],
      region: "us-east-1",
      validation: acm.CertificateValidation.fromDns(),
      cleanupRoute53Records: false,
      hostedZone: hostedZone,
    });

    // Create CloudFront accesslog bucket
    const cloudfrontLogBucket = new s3.Bucket(this, "CloudFrontLogBucket", {
      bucketName: `${serviceName}-cloudfront-log`,
      blockPublicAccess: s3.BlockPublicAccess.BLOCK_ALL,
      publicReadAccess: false,
      encryption: s3.BucketEncryption.S3_MANAGED,
      enforceSSL: true,
      removalPolicy: RemovalPolicy.DESTROY,
      autoDeleteObjects: true,
      versioned: false,
      objectOwnership: s3.ObjectOwnership.BUCKET_OWNER_PREFERRED, // required in cloudfront accesslog bucket
    });

    // Create hosting bucket
    const hostingBucket = new s3.Bucket(this, "HostingBucket", {
      bucketName: `${serviceName}-website`,
      blockPublicAccess: s3.BlockPublicAccess.BLOCK_ALL,
      publicReadAccess: false,
      encryption: s3.BucketEncryption.S3_MANAGED,
      enforceSSL: false,
      removalPolicy: RemovalPolicy.DESTROY,
      autoDeleteObjects: true,
      versioned: false,
      //websiteIndexDocument: "index.html", // error if this is present
      //websiteErrorDocument: "index.html", // same as above
      cors: [
        {
          allowedHeaders: ["*"],
          allowedMethods: [s3.HttpMethods.GET, s3.HttpMethods.HEAD],
          allowedOrigins: [`https://${domainName}`, `https://*.${domainName}`],
          exposedHeaders: [],
          maxAge: 3000,
        },
      ],
    });

    // Create OriginAccessControl
    const hostingOac = new cloudfront.CfnOriginAccessControl(this, "HostingOac", {
      originAccessControlConfig: {
        name: hostingBucket.bucketDomainName,
        originAccessControlOriginType: "s3",
        signingBehavior: "always",
        signingProtocol: "sigv4",
        description: hostingBucket.bucketDomainName,
      },
    });

    // Create CloudFront distribution
    // NOTE: CloudFront continuous deployment does not support HTTP3
    const distributionName = `${serviceName}-distribution`;
    const indexPage = "index.html";
    const distribution = new cloudfront.Distribution(this, "Distribution", {
      enabled: true,
      comment: distributionName,
      domainNames: [domainName],
      defaultRootObject: indexPage,
      priceClass: cloudfront.PriceClass.PRICE_CLASS_ALL,
      httpVersion: cloudfront.HttpVersion.HTTP2,
      certificate: certificate,
      minimumProtocolVersion: cloudfront.SecurityPolicyProtocol.TLS_V1_2_2021,
      enableIpv6: false,
      enableLogging: true,
      logBucket: cloudfrontLogBucket,
      logFilePrefix: distributionName,
      logIncludesCookies: true,
      //webAclId: webAclArn,
      errorResponses: [
        {
          ttl: Duration.seconds(0),
          httpStatus: 403,
          responseHttpStatus: 200,
          responsePagePath: `/${indexPage}`,
        },
        {
          ttl: Duration.seconds(0),
          httpStatus: 404,
          responseHttpStatus: 200,
          responsePagePath: `/${indexPage}`,
        },
      ],
      defaultBehavior: {
        origin: new cloudfront_origins.S3Origin(hostingBucket, {
          originPath: "/v1",
          connectionAttempts: 3,
          connectionTimeout: Duration.seconds(10),
        }),
        compress: true,
        allowedMethods: cloudfront.AllowedMethods.ALLOW_GET_HEAD,
        cachedMethods: cloudfront.CachedMethods.CACHE_GET_HEAD,
        viewerProtocolPolicy: cloudfront.ViewerProtocolPolicy.REDIRECT_TO_HTTPS,
        //cachePolicy: cloudfront.CachePolicy.CACHING_OPTIMIZED,
        cachePolicy: cloudfront.CachePolicy.CACHING_DISABLED, // cache disabling for test
        originRequestPolicy: cloudfront.OriginRequestPolicy.ALL_VIEWER_EXCEPT_HOST_HEADER,
        responseHeadersPolicy:
          cloudfront.ResponseHeadersPolicy.CORS_ALLOW_ALL_ORIGINS_WITH_PREFLIGHT_AND_SECURITY_HEADERS,
        smoothStreaming: false,
      },
      //additionalBehaviors,
    });

    // Override L1 properties
    const cfnDistribution = distribution.node.defaultChild as cloudfront.CfnDistribution;
    cfnDistribution.addPropertyOverride("DistributionConfig.Origins.0.Id", "hosting-bucket");
    cfnDistribution.addPropertyOverride("DistributionConfig.DefaultCacheBehavior.TargetOriginId", "hosting-bucket");
    cfnDistribution.addPropertyOverride("DistributionConfig.Origins.0.S3OriginConfig.OriginAccessIdentity", "");
    cfnDistribution.addPropertyOverride("DistributionConfig.Origins.0.OriginAccessControlId", hostingOac.attrId);

    // Create policy for hosting bucket
    const hostingBucketPolicyStatement = new iam.PolicyStatement({
      principals: [new iam.ServicePrincipal("cloudfront.amazonaws.com")],
      effect: iam.Effect.ALLOW,
      resources: [`${hostingBucket.bucketArn}/*`],
      actions: ["s3:GetObject"],
    });
    hostingBucketPolicyStatement.addCondition("StringEquals", {
      "AWS:SourceAccount": this.account,
    });

    // Add bucket policy to hosting bucket
    hostingBucket.addToResourcePolicy(hostingBucketPolicyStatement);

    // Deploy default items for website hosting bucket
    new s3deploy.BucketDeployment(this, "HostingBucketDeployment", {
      sources: [s3deploy.Source.asset("src/s3/hosting/sample-html/")],
      destinationBucket: hostingBucket,
      distribution: distribution,
      distributionPaths: ["/*"],
      prune: true,
      logRetention: logs.RetentionDays.THREE_DAYS,
    });

    // Alias record for cloudfront
    const distributionArecord = new route53.ARecord(this, "DistributionArecord", {
      recordName: domainName,
      target: route53.RecordTarget.fromAlias(new route53_targets.CloudFrontTarget(distribution)),
      zone: hostedZone,
    });
    distributionArecord.node.addDependency(distribution);
  }
}
s3deploy.BucketDeployment() でバケットの中身も一緒にデプロイしています。cdk deploy するディレクトリを基準に src/s3/hosting/sample-html 配下がデプロイされます (ディレクトリが無駄に深いのは気にしないでください)
Continuous Deployment を試す際、本番ディストリビューションのオリジンパスを v1、ステージングディストリビューションのオリジンパスを v2 としてそれぞれの HTML が正しく表示されるかを検証したいため、v1, v2 サブディレクトリを同時にデプロイしています。
src
└── s3
    └── hosting
        └── sample-html
            ├── v1
            │   └── index.html
            └── v2
                └── index.html
v1/index.html
<html>
  <head>
    <title>test</title>
  </head>
  <body>
    <h1>Version 1</h1>
  </body>
</html>
v2/index.html
<html>
  <head>
    <title>test</title>
  </head>
  <body>
    <h1>Version 2</h1>
  </body>
</html>
cdk deploy 後、S3 バケットに v1, v2 のサブディレクトリができていることを確認します。
$ aws s3 ls cfcd-sample-test-bucket
                           PRE v1/
                           PRE v2/
当然デプロイ直後は v1 のみにリクエストがルーティングされます。
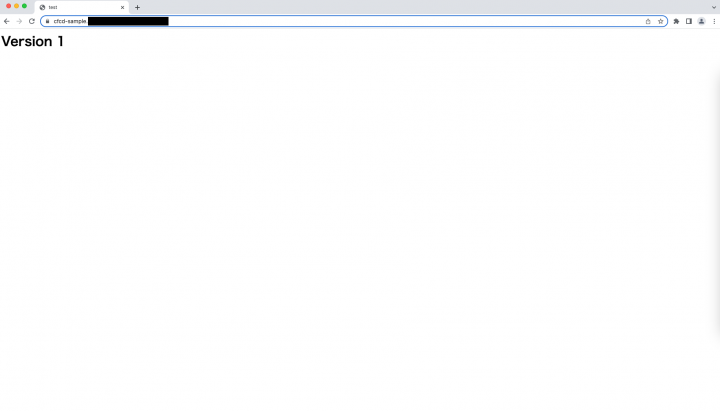
$ curl https://cfcd-sample.your-domain.com/
<html>
  <head>
    <title>test</title>
  </head>
  <body>
    <h1>Version 1</h1>
  </body>
</html>
Continuous deployment の設定
マネジメントコンソールで、作成したディストリビューションの画面に移動します。一番下に Continuous deployment があるので、[Create staging distribution] をクリックします。

こんな画面になるので、確認して [次へ] をクリックします。余談ですがこの時点でブラウザの別タブでディストリビューション一覧画面をみると、ステージングディストリビューションがすでに作成されています。裏で CopyDistribution API がコールされているらしいことがわかります。

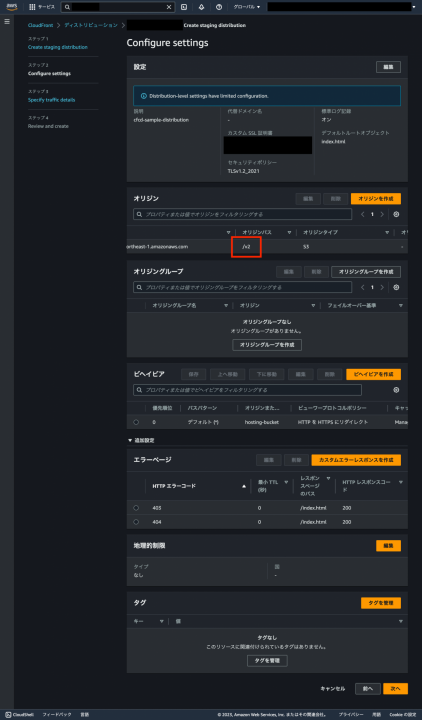
オリジンやビヘイビアを設定する画面に遷移します。今回はオリジンのパスを v2 に編集します。そのほかは変更せずに [次へ] をクリックします。
ここで Continuous deployment policy の設定画面に遷移します。これは前述のトラフィックルーティング設定のことです。Type は Header-based を選択し、以下のヘッダーを設定してください。なおこのカスタムヘッダーはプレフィックスに aws-cf-cd- を設定しなければならない制限があります。

| Header | Value |
|---|---|
| aws-cf-cd-staging | true |
enabled のまま [次へ] をクリックします。遷移先の Review 画面で設定を確認し [Create staging distribution] をクリックすると、ステージングディストリビューションがデプロイされます。

内部で Continuous deployment policy が作成され、本番ディストリビューションとステージングディストリビューションに紐づけられます。ポリシー一覧は ListContinuousDeploymentPolicies API で確認できます。

ステージングされたコンテンツの確認
以下のように curl コマンドでヘッダーを指定すれば、ステージングディストリビューションにリクエストがルーティングされるのを確認できます。
$ curl -H "aws-cf-cd-staging: true" https://cfcd-sample.your-domain.com/
<html>
  <head>
    <title>test</title>
  </head>
  <body>
    <h1>Version 2</h1>
  </body>
</html>
ただ、S3 バケットに Single page application をホストしている場合などは、ステージングされたアプリケーションの動作をブラウザで確認する必要があるかと思います。
その際、リクエストに対して手軽にカスタムヘッダーを付与できるツールとして Requestly が便利でした。デスクトップアプリもあるようですが、より手軽な Chrome 拡張版を使ってブラウザ越しに確認してみます。
Chrome 拡張をインストール後、アドレスバー右側のアイコンをクリックし、ポップアップした画面の [Open app] をクリックします。

Sign in しなくても使えるので、Sign in せずに [Create your first rule] をクリックし、ルール一覧から [Modify Headers] を選択し、[Create Rule] をクリックします。

この画面でカスタムヘッダーを付与する条件を定義します。

- ルール名を設定
- カスタムヘッダーを付与する条件を指定
- [URL|Host|Path] のうちどの部分に対して条件を適用するかを指定
- [Equals|Contains|Matched(RegEx)|Matches(WildCard)] で条件を設定
- [+ Add Request Header] を選択し、Continuous deployment policy で定義したカスタムヘッダーと同じものを入力
- [Create rule] をクリックし、ルールを作成
また、ルールはトグルスイッチひとつで有効化/無効化できます。
ルール無効の場合
ルール有効の場合

Promote (昇格)
ブラウザ越しの確認でテスト OK となった場合、Promote (昇格) することでステージングディストリビューションの設定が本番ディストリビューションに上書きされます。今回のケースだと、オリジンパスが v2 に上書きされます。この動作はダウンタイムなしで実行されます。

不要となったステージングディストリビューションは削除できます。注意点として、Promote での変更がエッジロケーションに伝播しきっていない状態だとエラーで削除できません。本番ディストリビューションのステータスが InProgress から Deployed になってから削除してください。
おわりに
CloudFront continuous deployment の実行手順を、Requestly の使い方なども交えて紹介しました。ただ、本来やりたいのは Continuous deployment をパイプライン化することで、本記事ではその前段としてマネジメントコンソールでの操作手順を取り上げました。パイプライン化については別記事で紹介したいと思います (CLI での手順はこちらに記載があります)