はじめに
くどうです。
今回はAzureでのACS Engine について解説していきます。
また、2つのAdvent Calenderにエントリーしてます。
Microsoft Azure Advent Calendar 2017
https://qiita.com/advent-calendar/2017/azure
Kubernetes2 Advent Calendar 2017
https://qiita.com/advent-calendar/2017/kubernetes2
ACS Engineとは何でしょう。Azure Container Service Engineの略です。
AzureにはACS、AKSがありますが、まぁその大元のデプロイツールみたいなもので、テンプレート作成エンジンです。最終的に出来上がるモノは機能的にほぼ変わりませんが、様々なカスタマイズが可能です。
そもそもコードがオープンなので書き換えれば何でもできる(?)かもしれません。
ACS Engine
https://github.com/Azure/acs-engine
オーケストレーションツール
- swarm
- kubernetes
- DC/OS
コンテナー
- Docker
ベースは一緒です。
さてここからが本題です。
ただ、、、いまさらkubernetes(以下k8s)以外の選択する理由がさほど思い浮かばないないのでk8sで解説を進めます。
なぜACS Engine ?
なぜ、ACSやAKSではなく、ACS Engineでデプロイする必要があるのか?
個人的に以下の2つの機能が欲しかったためです。
1、Nodeの配置のカスタマイズ
- 任意のVNETへの配置が行える
- 1200Nodeのクラスタ構築が行える
2、Nodeのオートスケール
- Podの展開数に応じてオートスケールする
以上の理由によりACS Engineである必要がありました。
Service Fabricでも良いのでは?とも考えましたがなんかコンテナ展開するの面倒そうだったの却下(それだけじゃないですけど)
ACS Engineの展開
ではここからは実際に、ACS Engineでk8sを展開していきます。
手始めとして、任意のVNETへ展開していきます。
VNET、Subnetは既に作成されていることが前提です。
展開するリソースは以下です。
- リソースグループ
名前:acsengine
リージョン:eastus
- VNET
名前:acsengine-vnet
CIDR:172.16.0.0/16
- サブネット
名前:acsengine-subnet1
CIDR:172.16.0.0/24
ACSのダウンロード
バイナリで配布されています。
OSに合わせてダウンロードし、Pathを通しましょう。
今回はLinuxでしています。
v0.10.0
https://github.com/Azure/acs-engine/releases/tag/v0.10.0
また、下記のサイトよりソースをダウンロードします。
https://github.com/Azure/acs-engine
jun@kudo3:~/ACS$ git clone https://github.com/Azure/acs-engine.git
Cloning into 'acs-engine'...
remote: Counting objects: 33003, done.
remote: Compressing objects: 100% (63/63), done.
remote: Total 33003 (delta 43), reused 32 (delta 17), pack-reused 32923
Receiving objects: 100% (33003/33003), 45.81 MiB | 3.63 MiB/s, done.
Resolving deltas: 100% (18013/18013), done.
Checking connectivity... done.
Checking out files: 100% (9507/9507), done.
以上で準備完了です。
任意のVNETへ展開する方法
examplesのディレクトリ内にあるサンプルテンプレートを編集します。
jun@kudo3:~/ACS/acs-engine$
jun@kudo3:~/ACS/acs-engine$ vi examples/kubernetes.json
masterProfileに追記します。
- dnsPrefix → dnsPrefixを指定
- vnetSubnetId → 展開するサブネットIDを指定
- FirstConsecutiveStaticIP → マスターノードを展開する最初のIPを指定
agentPoolProfilesに追記します。
- vnetSubnetId → 展開するサブネットIDを指定
{
  "apiVersion": "vlabs",
  "properties": {
    "orchestratorProfile": {
      "orchestratorType": "Kubernetes"
    },
    "masterProfile": {
      "count": 1,
      "dnsPrefix": "acsengin",
      "vmSize": "Standard_D2_v2",
      "vnetSubnetId": "/subscriptions/{サブスクリプションID}/resourceGroups/acsengine/providers/Microsoft.Network/virtualNetworks/acsengine-vnet/subnets/acsengine-subnet1",
      "FirstConsecutiveStaticIP": "172.16.0.100"
    },
    "agentPoolProfiles": [
      {
        "name": "agentpool1",
        "count": 3,
        "vmSize": "Standard_D2_v2",
        "availabilityProfile": "AvailabilitySet",
        "vnetSubnetId": "/subscriptions/{サブスクリプションID}/resourceGroups/acsengine/providers/Microsoft.Network/virtualNetworks/acsengine-vnet/subnets/acsengine-subnet1"
      }
    ],
    "linuxProfile": {
      "adminUsername": "azureuser",
      "ssh": {
        "publicKeys": [
          {
            "keyData": ""
          }
        ]
      }
    },
    "servicePrincipalProfile": {
      "clientId": "",
      "secret": ""
    }
  }
}
以上で展開の準備が完了です。
デプロイする
acs-engineを利用して展開します。
jun@kudo3:~/ACS/acs-engine$ acs-engine deploy --subscription-id {サブスクリプションID} --resource-group acsengine --location eastus --auto-suffix --api-model examples/kubernetes.json
WARN[0007] apimodel: ServicePrincipalProfile was missing or empty, creating application...
WARN[0009] created application with applicationID (xxxxxxxx-xxxx-xxxx-xxxx-xxxxxxxxxxx) and servicePrincipalObjectID (xxxxxxxx-xxxx-xxxx-xxxx-xxxxxxxxxxx).
WARN[0009] apimodel: ServicePrincipalProfile was empty, assigning role to application...
didn't find EtcdDiskSizeGB
INFO[0039] Starting ARM Deployment (acsengine-1414093469). This will take some time...
INFO[0472] Finished ARM Deployment (acsengine-1414093469).
アカウント情報がない場合はログインをログインを求められます。
自動的に、サービスプリンシパルとNodeにログインするためのKeyが作成されます。
テンプレートやKeyは_output内にdnsPrefix名で作成されます。
jun@kudo3:~/ACS/acs-engine$ ls -l _output/acsengine/
合計 212
-rw------- 1 jun jun  26352 12月  9 23:59 apimodel.json
-rw------- 1 jun jun   4304 12月  9 23:59 apiserver.crt
-rw------- 1 jun jun   3243 12月  9 23:59 apiserver.key
-rw------- 1 jun jun 109974 12月  9 23:59 azuredeploy.json
-rw------- 1 jun jun  36321 12月  9 23:59 azuredeploy.parameters.json
-rw------- 1 jun jun   3243 12月  9 23:58 azureuser_rsa
-rw------- 1 jun jun   1720 12月  9 23:59 ca.crt
-rw------- 1 jun jun   3247 12月  9 23:59 ca.key
-rw------- 1 jun jun   1781 12月  9 23:59 client.crt
-rw------- 1 jun jun   3243 12月  9 23:59 client.key
drwx------ 0 jun jun    512 12月  9 23:59 kubeconfig
-rw------- 1 jun jun   1781 12月  9 23:59 kubectlClient.crt
-rw------- 1 jun jun   3243 12月  9 23:59 kubectlClient.key
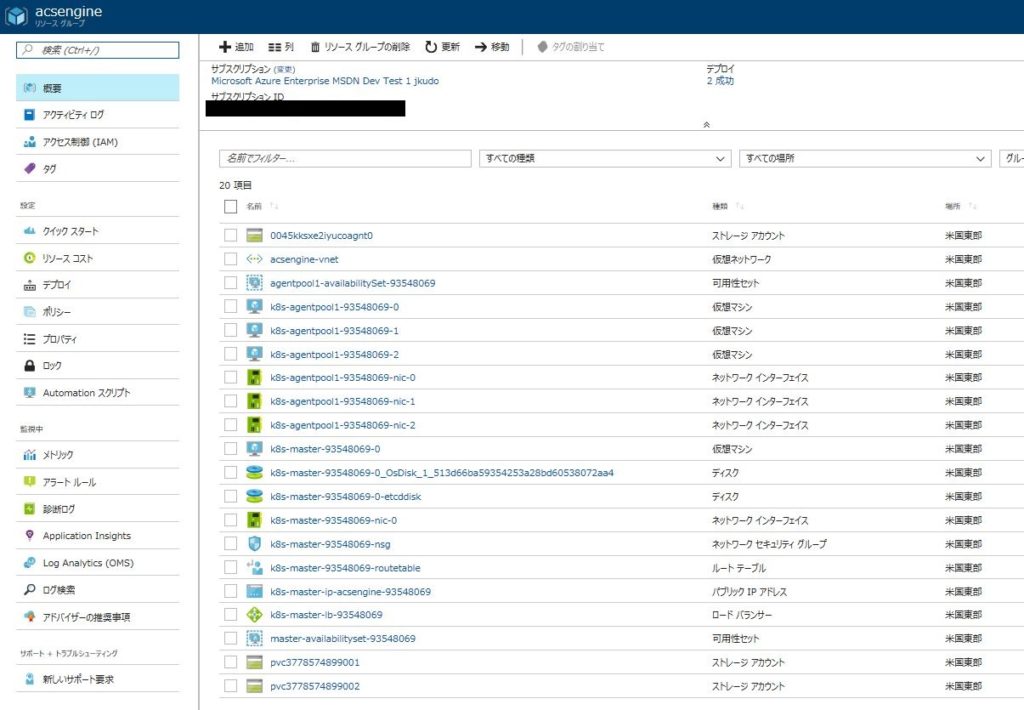
デプロイ後色々と展開されます。
まぁそこは確認してください。

サブネットに適用しているルートテーブルの変更します。
これを行わない場合、正しくNodeへの通信が行えません。
jun@kudo3:~/ACS/acs-engine$ rt=$(az network route-table list -g acsengine | jq -r '.[].id')
jun@kudo3:~/ACS/acs-engine$ az network vnet subnet update -n acsengine-subnet1 -g acsengine --vnet-name acsengine-vnet --route-table $rt
{
  "addressPrefix": "172.16.0.0/24",
  "etag": "W/\"xxxxxxxx-xxxx-xxxx-xxxx-xxxxxxxxxx\"",
  "id": "/subscriptions/xxxxxxxx-xxxx-xxxx-xxxx-xxxxxxxxxxx/resourceGroups/acsengine/providers/Microsoft.Network/virtualNetworks/acsengine-vnet/subnets/acsengine-subnet1",
  "ipConfigurations": [
    {
      "etag": null,
・・・
ログインしてみる
マスターノードのIPは各自、Portalなどから確認してください。
デフォルト設定ではユーザー名はazureuserです。
ユーザー名_rsaのkeyファイルです。
jun@kudo3:~/ACS/acs-engine/_output/acsengine$ ssh -i azureuser_rsa azureuser@52.191.194.23
The authenticity of host '52.191.194.23 (52.191.194.23)' can't be established.
ECDSA key fingerprint is SHA256:FJulgboLg+8EMeYGHprh2TuN3rxlD7ABfQO7h1zJTk0.
Are you sure you want to continue connecting (yes/no)? yes
Warning: Permanently added '52.191.194.23' (ECDSA) to the list of known hosts.
Welcome to Ubuntu 16.04.3 LTS (GNU/Linux 4.11.0-1013-azure x86_64)

 * Documentation:  https://help.ubuntu.com
 * Management:     https://landscape.canonical.com
 * Support:        https://ubuntu.com/advantage

  Get cloud support with Ubuntu Advantage Cloud Guest:
    http://www.ubuntu.com/business/services/cloud

49 packages can be updated.
0 updates are security updates.


*** System restart required ***

The programs included with the Ubuntu system are free software;
the exact distribution terms for each program are described in the
individual files in /usr/share/doc/*/copyright.

Ubuntu comes with ABSOLUTELY NO WARRANTY, to the extent permitted by
applicable law.

To run a command as administrator (user "root"), use "sudo ".
See "man sudo_root" for details.

azureuser@k8s-master-93548069-0:~$
あとは、k8sの利用方法と同じです。
nodeをスケールする場合は以下のコマンドで行えます。
以下では3から5に増やしています。
jun@kudo3:~/ACS/acs-engine$ acs-engine scale --subscription-id xxxxxxxx-xxxx-xxxx-xxxx-xxxxxxxxxxx --resource-group acsengine --location eastus --deployment-dir _output/acsengine --new-node
-count 5 --node-pool agentpool1 --master-FQDN acsengine.eastus.cloudapp.azure.com
INFO[0000] validating...
INFO[0006] Name suffix: 93548069
INFO[0006] Starting ARM Deployment (acsengine-1960058367). This will take some time...
INFO[0223] Finished ARM Deployment (acsengine-1960058367).
サンプルとしてnginxを展開しますnginx.yml作成します。
apiVersion: v1
kind: Service
metadata:
    name: nginx-service
    annotations:
        service.beta.kubernetes.io/azure-load-balancer-internal: "true"
spec:
    type: LoadBalancer
    ports:
    - name: http
      port: 80
      targetPort: nginx-http
      protocol: TCP
    selector:
        app: nginx
---
apiVersion: apps/v1beta1
kind: Deployment
metadata:
  name: nginx-deploy
spec:
  replicas: 1
  template:
    metadata:
      labels:
        app: nginx
    spec:
      containers:
      - name: nginx
        image: nginx
        ports:
        - name: nginx-http
          containerPort: 80
        resources:
          requests:
            cpu: 200m
AzureでInternal LoadBalancerを利用するには以下の指定が必要となります。
External LoadBalancerの場合はannotationsの指定は必要ありません。
metadata:
  ・・・
    annotations:
        service.beta.kubernetes.io/azure-load-balancer-internal: "true"
spec:
    type: LoadBalancer
azureuser@k8s-master-93548069-0:~$ kubectl create -f nginx.yml
2017-12-09 15:54:26.841483 I | proto: duplicate proto type registered: google.protobuf.Any
2017-12-09 15:54:26.841531 I | proto: duplicate proto type registered: google.protobuf.Duration
2017-12-09 15:54:26.841543 I | proto: duplicate proto type registered: google.protobuf.Timestamp
service "nginx-service" created
deployment "nginx-deploy" created
azureuser@k8s-master-93548069-0:~$ kubectl get po
2017-12-09 16:00:59.015164 I | proto: duplicate proto type registered: google.protobuf.Any
2017-12-09 16:00:59.015210 I | proto: duplicate proto type registered: google.protobuf.Duration
2017-12-09 16:00:59.015222 I | proto: duplicate proto type registered: google.protobuf.Timestamp
NAME                            READY     STATUS    RESTARTS   AGE
nginx-deploy-2978454550-wp50m   1/1       Running   0          7s
azureuser@k8s-master-93548069-0:~$ kubectl get svc
2017-12-09 16:01:44.758885 I | proto: duplicate proto type registered: google.protobuf.Any
2017-12-09 16:01:44.758929 I | proto: duplicate proto type registered: google.protobuf.Duration
2017-12-09 16:01:44.758946 I | proto: duplicate proto type registered: google.protobuf.Timestamp
NAME            CLUSTER-IP    EXTERNAL-IP   PORT(S)        AGE
kubernetes      10.0.0.1      <none>       443/TCP        58m
nginx-service   10.0.243.49   172.16.0.9    80:30817/TCP   7m
Serviceを確認するとプライベートIPが作成EXTERNAL-IPが指定されています。
テスト用のVMを立てて確認してみましょう。
azureuser@test1:~$ curl 172.16.0.9
<!DOCTYPE html>
<html>
<head>
<title>Welcome to nginx!</title>
<style>
    body {
        width: 35em;
        margin: 0 auto;
・・・
大体これで完了です。
あとはご自由にk8sを操ってください。
オートスケール
Podのオートスケールはkubanetesの機能に組み込まれていますが、Node単位でも可能です。
以下のKubernetes-acs-engine-autoscalerを利用します。
https://github.com/wbuchwalter/Kubernetes-acs-engine-autoscaler
Podがスケールするとnodeに展開できるpod数を超えるとnodeがオートスケールする仕組みです。
おまけ
ダッシュボードはbugのようなものがあります。
http://blog.shibayan.jp/entry/20171114/1510669620
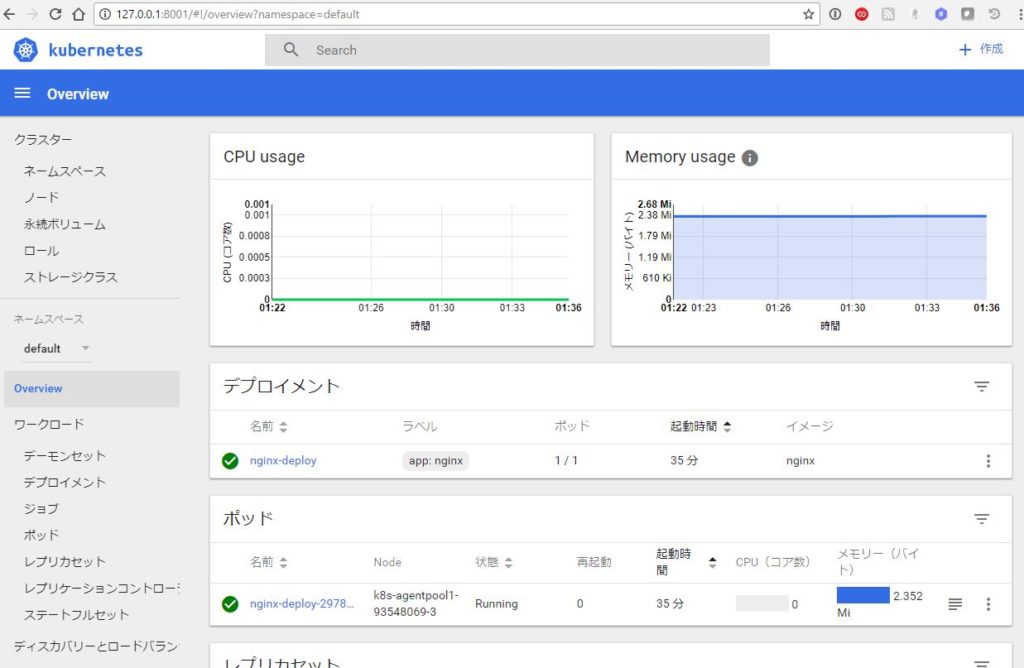
また、起動時すでに利用できるようになっていますがCPUなどの情報が表示されません。
対応策としてdashboardのpodを一旦削除し、Deployされるのを待ちます。
azureuser@k8s-master-93548069-0:~$ kubectl get --namespace kube-system po |grep dashboard
2017-12-09 16:27:13.322334 I | proto: duplicate proto type registered: google.protobuf.Any
2017-12-09 16:27:13.322377 I | proto: duplicate proto type registered: google.protobuf.Duration
2017-12-09 16:27:13.322387 I | proto: duplicate proto type registered: google.protobuf.Timestamp
kubernetes-dashboard-3432808331-mt1wt           1/1       Running   0          1h
azureuser@k8s-master-93548069-0:~$ kubectl delete po --namespace kube-system kubernetes-dashboard-3432808331-mt1wt
2017-12-09 16:28:00.220370 I | proto: duplicate proto type registered: google.protobuf.Any
2017-12-09 16:28:00.220425 I | proto: duplicate proto type registered: google.protobuf.Duration
2017-12-09 16:28:00.220446 I | proto: duplicate proto type registered: google.protobuf.Timestamp
pod "kubernetes-dashboard-3432808331-mt1wt" deleted
azureuser@k8s-master-93548069-0:~$ kubectl get --namespace kube-system po |grep dashboard
2017-12-09 16:28:26.639064 I | proto: duplicate proto type registered: google.protobuf.Any
2017-12-09 16:28:26.639109 I | proto: duplicate proto type registered: google.protobuf.Duration
2017-12-09 16:28:26.639120 I | proto: duplicate proto type registered: google.protobuf.Timestamp
kubernetes-dashboard-3432808331-c1lkz           1/1       Running   0          26s
あとは接続するためにForwardingします。
azureuser@k8s-master-93548069-0:~$ kubectl --namespace kube-system port-forward kubernetes-dashboard-3432808331-c1lkz 8001:9090
2017-12-09 16:30:23.645857 I | proto: duplicate proto type registered: google.protobuf.Any
2017-12-09 16:30:23.645902 I | proto: duplicate proto type registered: google.protobuf.Duration
2017-12-09 16:30:23.645912 I | proto: duplicate proto type registered: google.protobuf.Timestamp
Forwarding from 127.0.0.1:8001 -> 9090
Forwarding from [::1]:8001 -> 9090
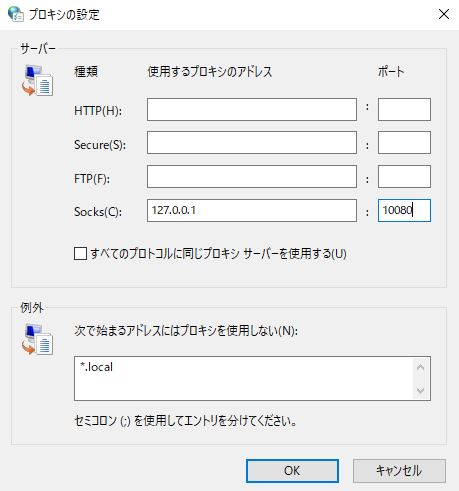
クライアント側からアクセスできるようするようSSLでトンネルを掘ります。
ssh -v -N -D 10080 azureuser@52.191.194.23 -i _output/acsengine/azureuser_rsa -f
Proxyの設定をブラウザで指定します。

以下にアクセスします。
http://127.0.0.1/8001
これでGUIでの確認が行えます。

削除する場合は丸っとリソースグループごと消しちゃいましょう。
まとめ
ACS Engineは難しくはないです。また今後も進化を遂げるでしょう、Node単位でのオートスケールにも対応していくようです。
ACS、AKSを利用するよりも現実的な提案が行えるかと思います。簡単ですが以上です。


