下記のテンプレートでスタックを作成すると
- DBサブネットグループの作成
- RDSインスタンスの作成
- "Route 53"の"Hosted Zone"を作成
- RDSのDNS名を"Route 53"に登録(CNAME)
が実行されます。
※事前にVPC、サブネット、セキュリティグループが作成済みであり、
そのIDをスタック作成時にパラメータとして渡すことを前提としています。
{
    "AWSTemplateFormatVersion": "2010-09-09",
    "Parameters": {
        "ProjectName": {
            "Type": "String",
            "Default": "suzlab"
        },
        "VpcId": {
            "Type": "AWS::EC2::VPC::Id",
            "Default": "vpc-aaaaaaaa"
        },
        "Az1SubnetId": {
            "Type": "AWS::EC2::Subnet::Id",
            "Default": "subnet-bbbbbbbb"
        },
        "Az2SubnetId": {
            "Type": "AWS::EC2::Subnet::Id",
            "Default": "subnet-cccccccc"
        },
        "VpcSecurityGroup": {
            "Type": "AWS::EC2::SecurityGroup::Id",
            "Default": "sg-dddddddd"
        }
    },
    "Resources": {
        "DbSubnetGroup": {
            "Type": "AWS::RDS::DBSubnetGroup",
            "Properties": {
                "DBSubnetGroupDescription": { "Ref": "ProjectName" },
                "SubnetIds": [
                    { "Ref": "Az1SubnetId" },
                    { "Ref": "Az2SubnetId" }
                ]
            }
        },
        "DbInstance": {
            "Type": "AWS::RDS::DBInstance",
            "Properties": {
                "Engine": "MySQL",
                "DBSubnetGroupName": { "Ref": "DbSubnetGroup" },
                "AllocatedStorage": "5",
                "DBInstanceClass": "db.t2.micro",
                "DBInstanceIdentifier": { "Ref": "ProjectName" },
                "MasterUsername": { "Ref": "ProjectName" },
                "MasterUserPassword":  { "Fn::Join" : [ "", [
                    { "Ref": "ProjectName" },
                    "!Z3"
                ] ] },
                "VPCSecurityGroups": [ { "Ref": "VpcSecurityGroup"} ]
            }
        },
        "HostedZone": {
            "Type": "AWS::Route53::HostedZone",
            "Properties": {
                "Name":   { "Fn::Join" : [ "", [
                    { "Ref": "ProjectName" },
                    ".local"
                ] ] },
                "VPCs": [ {
                    "VPCId": { "Ref": "VpcId" },
                    "VPCRegion": { "Ref": "AWS::Region" }
                } ]
            }
        },
        "RdsRecordSet": {
            "Type": "AWS::Route53::RecordSet",
            "Properties": {
                "HostedZoneId": { "Ref": "HostedZone" },
                "Name": { "Fn::Join" : [ "", [
                    "rds.",
                    { "Ref": "ProjectName" },
                    ".local."
                ] ] },
                "Type": "CNAME",
                "TTL": "60",
                "ResourceRecords": [
                    { "Fn::GetAtt": [ "DbInstance", "Endpoint.Address" ] }
                ]
            }
        }
    }
}
RDS作成時の注意点として、
- DBサブネットグループはAZが違う二つ以上のサブネットを登録
- RDSのユーザー名にハイフンが使えない(suz-lab:×, suzlab:◯)
があります。(何度も作成しなおしました…)
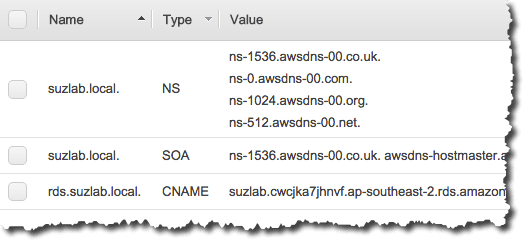
“Route 53″の状態をマネジメントコンソールで確認すると、無事、
RDSのエンドポイントのCNAMEである”rds.suzlab.local”が
登録されていることを確認することができます。
実際に上記のVPC内の適当なEC2から”rds.suzlab.local”に下記のように
接続できることも確認できます。
# mysql -h rds.suzlab.local -u suzlab -p
Enter password:
Welcome to the MySQL monitor.  Commands end with ; or g.
Your MySQL connection id is 19
Server version: 5.6.22-log MySQL Community Server (GPL)

Copyright (c) 2000, 2015, Oracle and/or its affiliates. All rights reserved.

Oracle is a registered trademark of Oracle Corporation and/or its
affiliates. Other names may be trademarks of their respective
owners.

Type 'help;' or 'h' for help. Type 'c' to clear the current input statement.

mysql>
ちなみに上記はCentOS7で実行したのですが、”MySQL Client”のインストールは
次のように実施しています。
rpm -Uvh http://dev.mysql.com/get/mysql-community-release-el7-5.noarch.rpm
yum -y install mysql-community-client
元記事はこちら
RDSのエンドポイントを”Route 53″の”Private DNS”にCNAMEで別名として定義するCloudFormationのテンプレートを作ってみた


