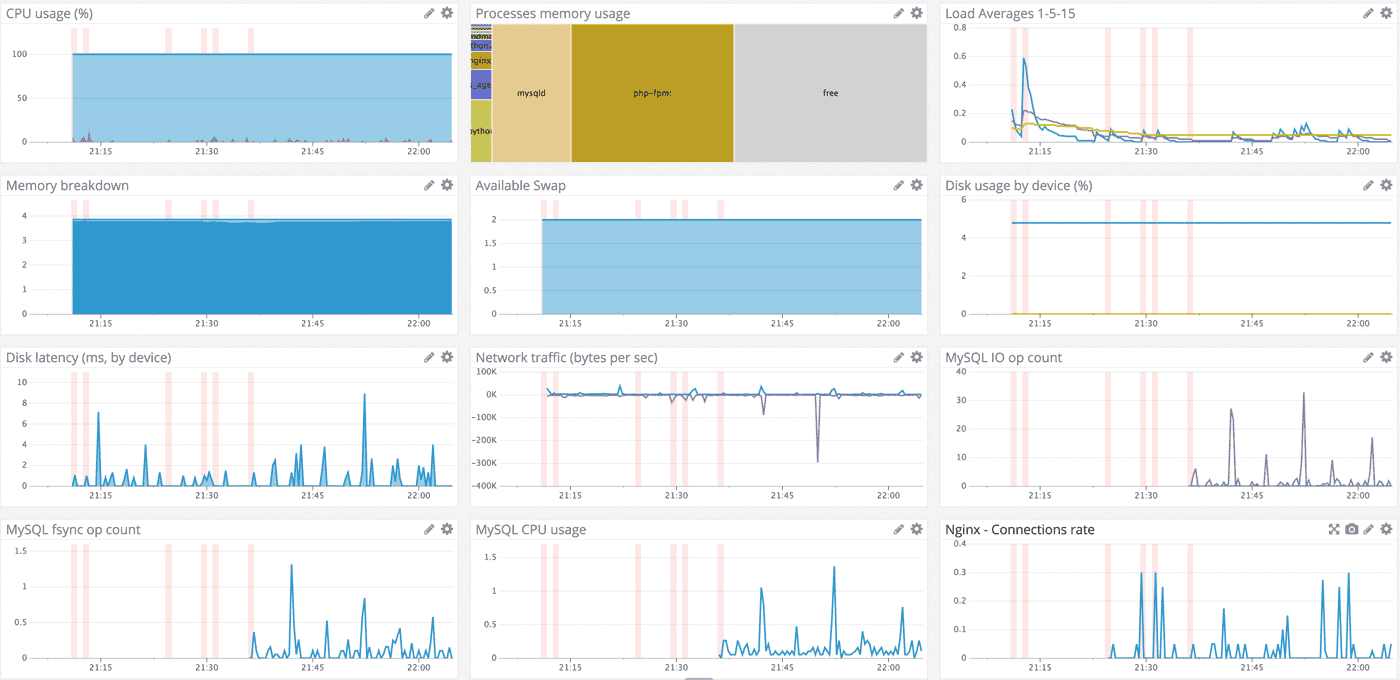
シンジです。すだちくんブログはAWSのAMIMOTO-AMIを使ってWordpressをさくっと構築しているのですが、せっかくなのでDatadogを使ってサーバーの監視をしてみたいと思います。今回はエージェント以外にもnginxやmysqlのインテグレーションも入れて、複数のメトリクスを取得出来るようにしました。うまくいけば、上の画像のようにいっぱいデータが取れて楽しい気持ちになれます。
※コード内のURLにリンクが張られる問題が起きてますが、謎過ぎてよく分からんので、解決するまで適宜置き換えてコピペしてください。
DatadogのWebサイトからAPIキーを拾ってくる
DD_API_KEY=xxxxxxxxxxxxxxxxxxxxxxxxxx bash -c "$(curl -L https://raw.githubusercontent.com/DataDog/dd-agent/master/packaging/datadog-agent/source/install_agent.sh)"
エージェントのインストールは超楽勝です。これだけです。
せっかくなので、nginxとmysqlのメトリクスも取得出来るようにしてみましょう。
nginxの状態を編集する
sudo vi /etc/nginx/conf.d/default.conf
下の方にこれを入れてやります
# nginx_status
  location /nginx_status {
      stub_status on;
      access_log  off;
      allow 127.0.0.1;
      deny  all;
  }
nginxを再起動します
sudo service nginx restart
nginx を停止中:                                            [  OK  ]
nginx を起動中:                                            [  OK  ]
nginxの値が取れているか確認します
curl http://localhost/nginx_status

Active connections: 7
server accepts handled requests
 371 371 646
Reading: 0 Writing: 1 Waiting: 6
nginxのデータをdatadogに投げてやる
sudo cp -p /etc/dd-agent/conf.d/nginx.yaml.example /etc/dd-agent/conf.d/nginx.yaml
コピーしてリネームしてやるだけで動きます。
datadogを再起動
sudo service datadog-agent restart
Stopping Datadog Agent (using killproc on supervisord):    [  OK  ]
Starting Datadog Agent (using supervisord):                [  OK  ]
nginxの値がdatadogに飛んでるか確認します。
sudo service datadog-agent info =================== Collector (v 5.6.3) =================== Status date: 2015-12-15 21:24:59 (11s ago) Pid: 32459 Platform: Linux-4.1.10-16.27.amzn1.x86_64-x86_64-with-glibc2.3 Python Version: 2.7.10 Logs:, /var/log/datadog/collector.log, syslog:/dev/log Clocks ====== NTP offset: 0.0014 s System UTC time: 2015-12-15 12:25:12.255720 Paths ===== conf.d: /etc/dd-agent/conf.d checks.d: /opt/datadog-agent/agent/checks.d Hostnames ========= ec2-hostname: ip-172-31-13-76.ap-northeast-1.compute.internal local-ipv4: 172.31.13.76 local-hostname: ip-172-31-13-76.ap-northeast-1.compute.internal socket-hostname: ip-172-31-13-76 public-hostname: ec2-52-192-77-94.ap-northeast-1.compute.amazonaws.com hostname: i-581678fd instance-id: i-581678fd public-ipv4: 52.192.77.94 socket-fqdn: ip-172-31-13-76.ap-northeast-1.compute.internal Checks ====== nginx ----- - instance #0 [OK] - Collected 4 metrics, 0 events & 2 service checks disk ---- - instance #0 [OK] - Collected 24 metrics, 0 events & 1 service check network ------- - instance #0 [OK] - Collected 0 metrics, 0 events & 1 service check ntp --- - instance #0 [OK] - Collected 1 metric, 0 events & 2 service checks Emitters ======== - http_emitter [OK] =================== Dogstatsd (v 5.6.3) =================== Status date: 2015-12-15 21:25:05 (6s ago) Pid: 32457 Platform: Linux-4.1.10-16.27.amzn1.x86_64-x86_64-with-glibc2.3 Python Version: 2.7.10 Logs: , /var/log/datadog/dogstatsd.log, syslog:/dev/log Flush count: 1 Packet Count: 0 Packets per second: 0.0 Metric count: 0 Event count: 0 Service check count: 0 =================== Forwarder (v 5.6.3) =================== Status date: 2015-12-15 21:25:10 (2s ago) Pid: 32458 Platform: Linux-4.1.10-16.27.amzn1.x86_64-x86_64-with-glibc2.3 Python Version: 2.7.10 Logs: , /var/log/datadog/forwarder.log, syslog:/dev/log Queue Size: 0 bytes Queue Length: 0 Flush Count: 4 Transactions received: 1 Transactions flushed: 1
nginxのところがOKになっていれば完璧。
mysqlいってみよー
datadogのインテグレーションの画面でパスワード生成まで出来るので、その通りやっちゃいます。
udo mysql -e "CREATE USER 'datadog'@'localhost' IDENTIFIED BY 'xxxxxxxxxxxxxxxxxxxxxxxxxxxx';"
sudo mysql -e "GRANT REPLICATION CLIENT ON *.* TO 'datadog'@'localhost' WITH MAX_USER_CONNECTIONS 5;"
sudo cp -p /etc/dd-agent/conf.d/mysql.yaml.example /etc/dd-agent/conf.d/mysql.yaml
sudo vi /etc/dd-agent/conf.d/mysql.yaml
以下のようにします
init_config:

instances:
  - server: localhost
    user: datadog
    pass: xxxxxxxxxxxxxxxxxxxxxxxxxxx
    tags:
        - optional_tag1
        - optional_tag2
    options:
        replication: 0
        galera_cluster: 1
datadogを再起動しましょう
sudo service datadog-agent restart
Stopping Datadog Agent (using killproc on supervisord):    [  OK  ]
Starting Datadog Agent (using supervisord):                [  OK  ]
datadogで値が取れているかもっかい確認してみよー
sudo service datadog-agent info =================== Collector (v 5.6.3) =================== Status date: 2015-12-15 21:35:55 (8s ago) Pid: 709 Platform: Linux-4.1.10-16.27.amzn1.x86_64-x86_64-with-glibc2.3 Python Version: 2.7.10 Logs:, /var/log/datadog/collector.log, syslog:/dev/log Clocks ====== NTP offset: 0.0011 s System UTC time: 2015-12-15 12:36:04.441778 Paths ===== conf.d: /etc/dd-agent/conf.d checks.d: /opt/datadog-agent/agent/checks.d Hostnames ========= ec2-hostname: ip-172-31-13-76.ap-northeast-1.compute.internal local-ipv4: 172.31.13.76 local-hostname: ip-172-31-13-76.ap-northeast-1.compute.internal socket-hostname: ip-172-31-13-76 public-hostname: ec2-52-192-77-94.ap-northeast-1.compute.amazonaws.com hostname: i-581678fd instance-id: i-581678fd public-ipv4: 52.192.77.94 socket-fqdn: ip-172-31-13-76.ap-northeast-1.compute.internal Checks ====== network ------- - instance #0 [OK] - Collected 0 metrics, 0 events & 1 service check ntp --- - instance #0 [OK] - Collected 1 metric, 0 events & 2 service checks nginx ----- - instance #0 [OK] - Collected 4 metrics, 0 events & 2 service checks mysql ----- - instance #0 [OK] - Collected 12 metrics, 0 events & 2 service checks disk ---- - instance #0 [OK] - Collected 24 metrics, 0 events & 1 service check Emitters ======== - http_emitter [OK] =================== Dogstatsd (v 5.6.3) =================== Status date: 2015-12-15 21:36:01 (3s ago) Pid: 707 Platform: Linux-4.1.10-16.27.amzn1.x86_64-x86_64-with-glibc2.3 Python Version: 2.7.10 Logs: , /var/log/datadog/dogstatsd.log, syslog:/dev/log Flush count: 1 Packet Count: 0 Packets per second: 0.0 Metric count: 0 Event count: 0 Service check count: 0 =================== Forwarder (v 5.6.3) =================== Status date: 2015-12-15 21:36:01 (4s ago) Pid: 708 Platform: Linux-4.1.10-16.27.amzn1.x86_64-x86_64-with-glibc2.3 Python Version: 2.7.10 Logs: , /var/log/datadog/forwarder.log, syslog:/dev/log Queue Size: 0 bytes Queue Length: 0 Flush Count: 3 Transactions received: 1 Transactions flushed: 1
mysqlのところがOKになっていれば完璧
DatadogでAppsに追加されていればOK

AMIMOTO最高だしDatadogも最高だし
使いやすくて便利だな〜いい時代だな〜


