ども、 cloudpack の かっぱ (@inokara) です。
はじめに
terraform を独りハンズオンしてみたのでメモ。
terraform とは
参考
- Introduction – Terraform by HashiCorp
- Terraform簡易チュートリアル on AWS – Qiita
- Infrastructure as 脳筋のためのterraform tips | cloudpack.media
- Terraform + GitHub + CircleCI + Atlasを利用してAWSの操作を自動化した – Glide Note – グライドノート
- TerraformでCoreOSクラスタを構築する | SOTA
自分なりの terraform
- インフラの構築・変更・バージョン管理を安全かつ効率的に行うための hashicorp 謹製ツール
- 各種クラウドプロバイダに対応している
- コードを使って(独自のDSL:※ JSON でも書ける)インフラの構成を記述することが出来る
- 設定ファイルを実行する前に実行計画(plan)にて設定ファイルの事前の動作確認、適用(Apply)、実行結果の確認(show)を行うことが出来る
- Provisioners を利用することで任意の構築手順(Chef/Ansible/Shell etc…)を利用して一気通貫で環境を構築することが出来る
で、何が出来るのか?
- Terraform を使えば各種クラウド環境の構成をコードで管理することが出来るようになる!(はず)
- クラウドベンダに依存しない環境(複数のクラウド環境を跨いだ環境)を管理出来るようになる!(はず)
俺の terraform イメージ
とりあえず自分の中での terraform のイメージを絵にしてみた。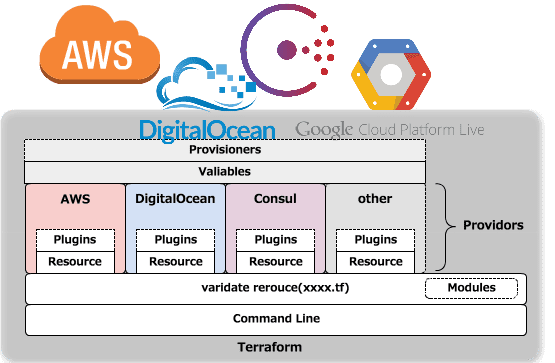
多分、上図のような感じだと思ふ。
さて、ハンズオン
課題
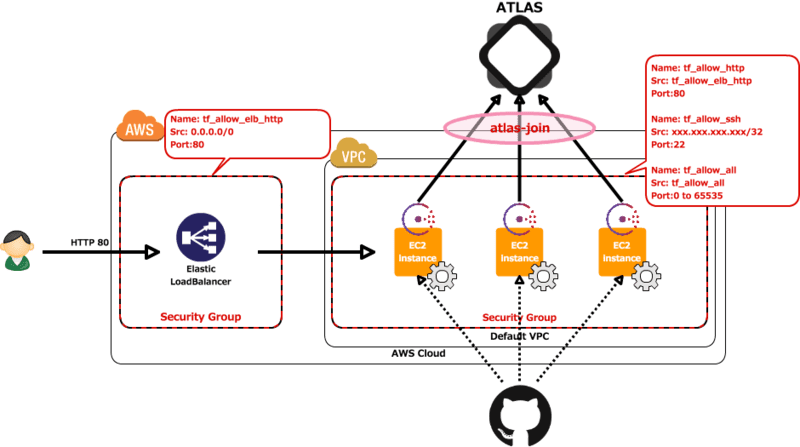
- Security Group を 4 つ作成
- Default VPC 内に EC2 を 3 台構築する
- ELB を作成
- EC2 には Apache と Consul をインストール
- Apache を起動して ELB にぶら下げて外部からのアクセスを確認する
- consul を起動して Atlas を利用してクラスタを構成する
terraform のインストール
バイナリパッケージのダウンロード
MacOS X 用のバイナリが配布されているのでダウンロード。
cd ~/bin/
wget https://dl.bintray.com/mitchellh/terraform/terraform_0.3.7_darwin_amd64.zip
展開
適当なディレクトリに展開する。
cd ~/bin/
unzip terraform_0.3.7_darwin_amd64.zip
パスを通す
MacOS X の場合であれば /User/${user}/bin には既にパスが通っているはずなので特に設定を行わない。但し、任意のパスに展開した場合にはパスを通す必要がある。
初めての Terraform
% terraform version
Terraform v0.3.7
ついでに help も確認。
% terraform help usage: terraform [--version] [--help][ ] Available commands are: apply Builds or changes infrastructure destroy Destroy Terraform-managed infrastructure get Download and install modules for the configuration graph Create a visual graph of Terraform resources init Initializes Terraform configuration from a module output Read an output from a state file plan Generate and show an execution plan pull Refreshes the local state copy from the remote server push Uploads the the local state to the remote server refresh Update local state file against real resources remote Configures remote state management show Inspect Terraform state or plan version Prints the Terraform version
準備が出来たところで…。
サンプルコード
以下にアップした。
inokappa/oreno-terraform
上記をもし利用するなら適宜 git clone する。
terraform.tfvars の修正
terraform.tfvars.example を terraform.tfvars にリネームして環境に応じて適宜修正する。
access_key    = "AKxxxxxxxxxxxxxxxxxxxxxxxxxxx"
secret_key    = "xxxxxxxxxxxxxxxxxxxxxxxxxxxxxxxxxxxxxxxx"
ssh_key_name  = "your_ssh_key"
ssh_allow_ip  = "xxx.xxx.xxx.xxx/32"
key_file_path = "/path/to/your_ssh_key.pem"
build_script  = "your_remote_script_endpoint/build.sh"
access_key と secret_key 等の情報は事前に作成しておく。また、terraform.tfvars ファイルには認証情報等の公に出来ない情報を記載しておいて .gitignore に登録してリポジトリでは管理しないようにしておく。
少しコードを見てみる
main.tf の冒頭、以下は Providor として AWS を使いまっせと宣言している。
provider "aws" {
    access_key = "${var.access_key}"
    secret_key = "${var.secret_key}"
    region = "${var.region}"
}
続いて…
resource "aws_security_group" "tf_allow_all" {
  name = "tf_allow_all"
    description = "tf_allow_all"
上記では aws_security_group リソースを利用して Security Group の作成を宣言している。このように terraform では Provider の各コンポーネントをリソースと呼んでおりこのリソースを定義していくことで環境を構築することになる。
各種 Provider 及びリソースに関しては以下を確認する。
Providor やリソースについては独自に作成、拡張することが出来るとのことなので機会があれば試してみたいけど…(Go Lang の知識が必要そうなので個人的には無理かもしれない…orz)
また、以下は provisioner "remote-exec" を用いて起動した EC2 インスタンス内でスクリプトを実行してミドルウェア等の設定を行っている。
  provisioner "remote-exec" {
    inline = [
      "sudo yum -y install wget",
      "sleep 1",
      "wget ${var.build_script} && chmod 755 ./build.sh",
      "sudo ./build.sh",
    ]
    connection {
      user = "ec2-user"
      key_file = "${var.key_file_path}"
    }
  }
inline を使ってコマンドの羅列を行っている。また、connection にてインスタンスにアクセスするユーザー名、SSH 鍵ファイルを指定している。
terraform plan
早速、環境を構築!…その前に terraform plan を実行してどのように構築されるかを確認する。
% terraform plan
Refreshing Terraform state prior to plan...


The Terraform execution plan has been generated and is shown below.
Resources are shown in alphabetical order for quick scanning. Green resources
will be created (or destroyed and then created if an existing resource
exists), yellow resources are being changed in-place, and red resources
will be destroyed.

Note: You didn't specify an "-out" parameter to save this plan, so when
"apply" is called, Terraform can't guarantee this is what will execute.

+ aws_elb.oreno_tf_test
    availability_zones.#:                        "" => ""
    dns_name:                                    "" => ""
    health_check.#:                              "" => "1"
    health_check.1986875447.healthy_threshold:   "" => "3"
    health_check.1986875447.interval:            "" => "60"
    health_check.1986875447.target:              "" => "HTTP:80/"
    health_check.1986875447.timeout:             "" => "5"
    health_check.1986875447.unhealthy_threshold: "" => "3"
    instances.#:                                 "" => ""
    internal:                                    "" => ""
    listener.#:                                  "" => "1"
    listener.3057123346.instance_port:           "" => "80"
    listener.3057123346.instance_protocol:       "" => "http"
    listener.3057123346.lb_port:                 "" => "80"
    listener.3057123346.lb_protocol:             "" => "http"
    listener.3057123346.ssl_certificate_id:      "" => ""
    name:                                        "" => "tf-test-elb"
    security_groups.#:                           "" => ""
    subnets.#:                                   "" => ""

+ aws_instance.oreno_tf_test.0
    ami:                        "" => "ami-18869819"

(略)
上記のように出力される。
terraform apply
それでは terraform apply を実行して環境を構築する。
terraform apply
以下のように出力される。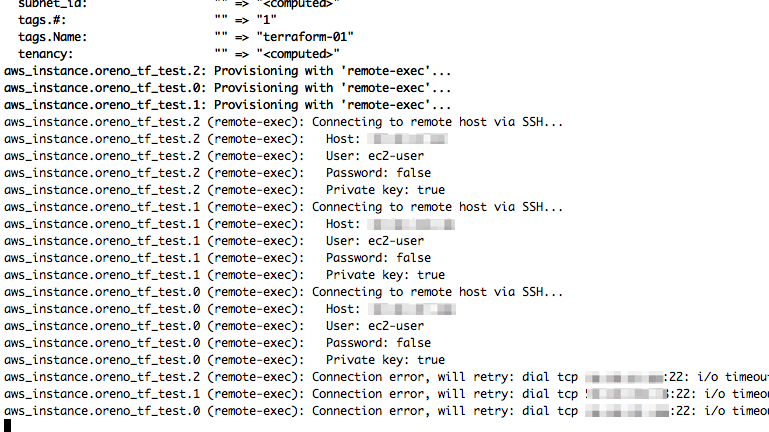
さらに暫くすると以下のように出力されて構築完了となる。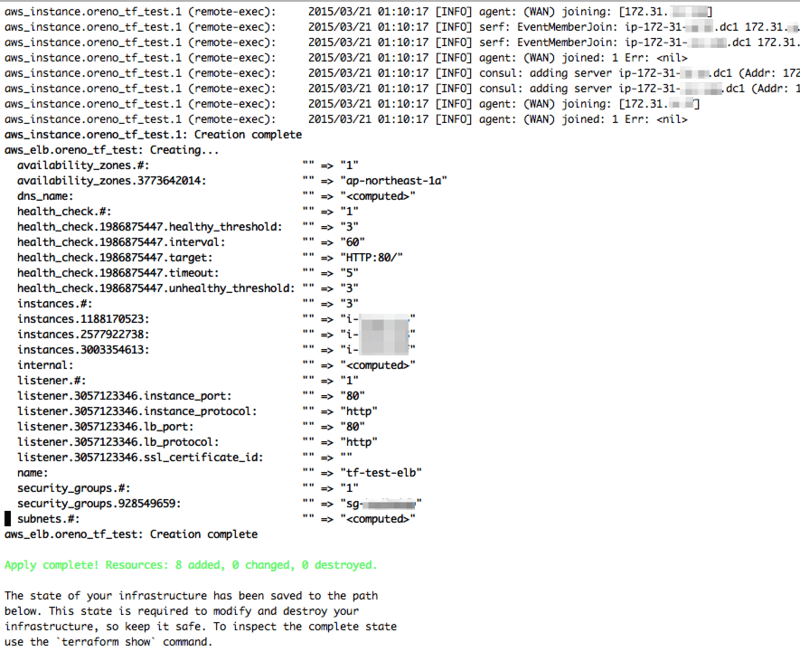
三台のインスタンスの起動、セットアップで 5 分も掛らないスピードにビックリ。
terraform show
terraform show を実行して構築した内容を改めて確認してみる。
% terraform show                                                                                                                                                                                 [~/git/myrepo/oreno-atlas]
aws_elb.oreno_tf_test:
  id = tf-test-elb
  availability_zones.# = 1
  availability_zones.3773642014 = ap-northeast-1a
  dns_name = tf-test-elb-xxxxxxxxxxx.ap-northeast-1.elb.amazonaws.com
  health_check.# = 1
  health_check.1986875447.healthy_threshold = 3
  health_check.1986875447.interval = 60
  health_check.1986875447.target = HTTP:80/
  health_check.1986875447.timeout = 5
  health_check.1986875447.unhealthy_threshold = 3
  instances.# = 3
  instances.1188170523 = i-xxxxxxxx
  instances.2577922738 = i-yyyyyyyyy
  instances.3003354613 = i-zzzzzzzz
  internal = false
  listener.# = 1
  listener.3057123346.instance_port = 80
  listener.3057123346.instance_protocol = http
  listener.3057123346.lb_port = 80
  listener.3057123346.lb_protocol = http
  listener.3057123346.ssl_certificate_id =
  name = tf-test-elb
  security_groups.# = 1
  security_groups.928549659 = sg-xxxxxxxx
  subnets.# = 1
  subnets.1735695288 = subnet-xxxxxxxx
aws_instance.oreno_tf_test.0:
  id = i-xxxxxxxx
  ami = ami-18869819
  availability_zone = ap-northeast-1a
  block_device.# = 0
  instance_type = t2.micro
  key_name = xxxxxxxxxxxxxxx
  private_dns = ip-172-31-xxx-xxx.ap-northeast-1.compute.internal
  private_ip = 172.31.xxx.xxx
  public_dns = ec2-xxx-xxx-xxx-xxx.ap-northeast-1.compute.amazonaws.com
  public_ip = xxx.xxx.xxx.xxx

(略)
おお、インスタンスも ELB もセキュリティグループも作られているっぽい。
ELB へのアクセス、consul クラスタの確認
環境構築は出来たので ELB のエンドポイントにアクセスしてみる。
$ http HEAD tf-test-elb-xxxxxxxxxx.ap-northeast-1.elb.amazonaws.com
HTTP/1.1 200 OK
Accept-Ranges: bytes
Content-Type: text/html; charset=UTF-8
Date: Sat, 21 Mar 2015 01:25:04 GMT
ETag: "401ac-0-511c2176dc1d7"
Last-Modified: Sat, 21 Mar 2015 01:09:57 GMT
Server: Apache/2.2.29 (Amazon)
Connection: keep-alive
美しい、全て InService や。
次に consul クラスタの状態を Atlas のコンソールから確認してみる。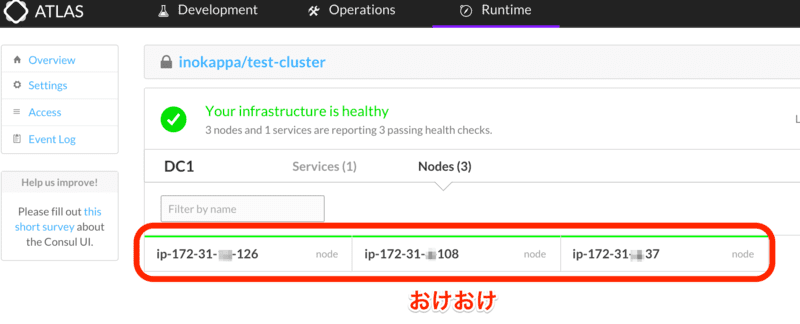
ちゃんとジョインされておりクラスタが構成されている。 念の為にメンバーの一台にログインしてリーダーノード等を確認してみる。
メンツを確認。
$ consul members
Node              Address             Status  Type    Build  Protocol
ip-172-31-xx-126  172.31.xx.126:8301  alive   server  0.5.0  2
ip-172-31-xx-37    172.31.xx.37:8301    alive   server  0.5.0  2
ip-172-31-xx-108   172.31.xx.108:8301   alive   server  0.5.0  2
リーダーを確認。
$ curl localhost:8500/v1/status/leader
"172.31.xx.126:8300"
よしきた。満足、満足。
terraform destroy で後片付け
そこそこ満足したので terraform destroy を実行して環境を丸っと削除してしまう。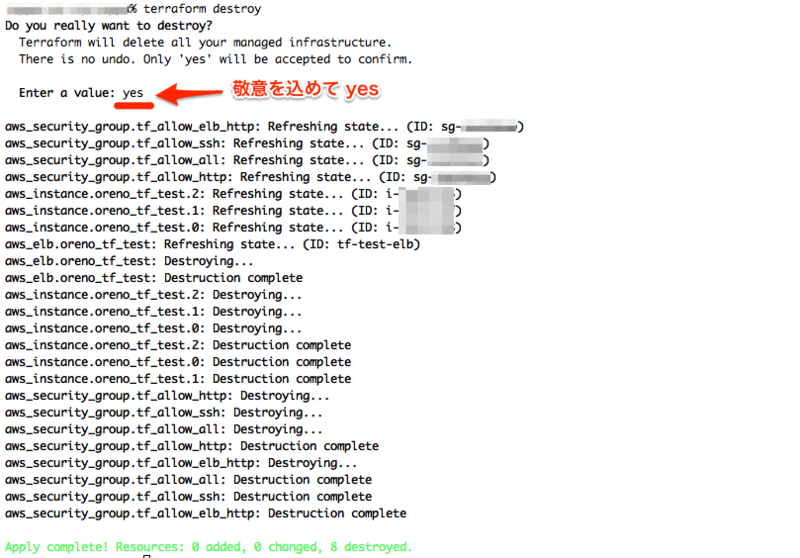
有難うございました。
おつかれさまでした
簡単な構成を terraform を使って構築してみた感想。
- 何よりもコードになっているのがとても良い(ELB や SG を含めて活字になっているのは嬉しい)
- 速い(今回の構成で 3 分程度)
- 構築した環境を一気通貫で削除も出来るのがなにげに嬉しい
- 独自 DSL だが簡単なので学習コストは低いと思う
- DSL 以外に各クラウドサービスの仕様についてはもちろん把握しておく必要がある
- たまによくわらかないエラーに遭遇する(二回目実行すると成功する…とか)
今後やってみたいこと。
- AWS 以外のクラウドサービスとの合わせ技
ということで、インフラ構築、運用の悩みを解決していこうとすると気づいたら Hashicorp に辿り着いていた感じなので consul や Atlas を含めて terraform は勉強していきたいなー。
元記事はこちらです。
「terraform 独りハンズオン(1)」


