はじめに
Amazon WorkSpacesのセキュリティを強化したい環境では、多要素認証(MFA)の導入が挙がるかと思います。
しかし、既存の情報はAmazon Linux 2(AL2)での手順が多く、Amazon Linux 2023(AL2023)環境での構築記事は意外と少ないように思いました。
そこで本記事では、AL2023にオープンソースで広く使われているFreeRADIUS + Google Authenticatorを導入し、WorkSpacesで利用可能なMFA認証サーバーを構築する手順を、検証したので解説します。
環境前提
WorkSpacesとADは作成済みとします。
- AWS WorkSpaces / MSAD
- EC2:Al2023
- M/W:FreeRADIUS + Google Authenticator
1.環境構築とパッケージのインストール
このセクションで、必要なパッケージのインストールと基本的な準備を行います。
1-1.ホスト名の変更
Google Authenticator で登録した際の表示名になるため設定すると判別しやすくなります。
sudo hostnamectl set-hostname {ホスト名}
1.2. パッケージのインストール
FreeRADIUS、認証ユーティリティ、Google Authenticatorモジュールをインストールします。
今回はユーザデータで実施しました。
#!/bin/bash
# Update repositories
dnf upgrade -y
# radiusインストール
dnf install -y freeradius freeradius-utils google-authenticator qrencode
1.3. 認証グループの作成
RADIUS認証を許可するユーザーを管理するための専用Linuxグループを作成します。
sudo groupadd radius-enabled
2. FreeRADIUSサーバーの基本設定
FreeRADIUSがPAM(Pluggable Authentication Modules)を通じてGoogle Authenticatorを利用できるようにするための設定です。
2.1.プロセス実行ユーザーの変更
PAMモジュールを使用するため、FreeRADIUSデーモンをroot権限で起動するように設定ファイルを修正します。
ファイル:/etc/raddb/radiusd.conf
(set numberで行数表示しています。)

543 user = radiusd
544 group = radiusd
↓
543 user = root
544 group = root
2.2. PAMモジュールの有効化
FreeRADIUSが認証処理にPAMを利用するように設定します。
ファイル:/etc/raddb/users

#末尾に追記
DEFAULT Group != "radius-enabled", Auth-Type := Reject
Reply-Message = "Your account has been disabled."
DEFAULT Auth-Type := PAM
2.3.PAMモジュールのシンボリックリンクを作成
FreeRADIUSがモジュールを認識できるようにします。
sudo ln -s /etc/raddb/mods-available/pam /etc/raddb/mods-enabled/pam
2.4.RADIUSクライアントの設定
RADIUSサーバーに認証リクエストを送信するクライアントの情報(MSAD)を登録します。
ファイル名:/etc/raddb/clients.conf

lient dc1 {
ipaddr = {ADのDNS IP}
secret = {任意の値} # クライアントとサーバー間で共有する秘密鍵
shortname = MSAD-A
}
client dc2 {
ipaddr = {ADのDNS IP}
secret = {任意の値} # クライアントとサーバー間で共有する秘密鍵
shortname = MSAD-C
}
3.Google Authenticator(MFA)の連携設定
3.1. pam_google_authenticatorモジュールの設定
FreeRADIUSが利用するPAM設定ファイルにGoogle Authenticatorモジュールを組み込みます。
ファイル名:/etc/pam.d/radiusd

#%PAM-1.0
auth include password-auth
account required pam_nologin.so
account include password-auth
password include password-auth
session include password-auth
↓
#%PAM-1.0
#auth include password-auth
#account required pam_nologin.so
#account include password-auth
#password include password-auth
#session include password-auth
auth requisite pam_google_authenticator.so
account required pam_permit.so
session required pam_permit.so
Amazonlinux2ではここまで設定出来ればサービスが起動しましたが、Amazonlinux2023ではサービス起動に失敗します。
デバックしてエラー文言を調査すると、モジュールを初期化する際に必要なTLS/SSL証明書と秘密鍵ファイルを見つけられなかったため起動に失敗しているようです。
# /usr/sbin/radiusd -X
...
private_key_file = "/etc/raddb/certs/server.pem"
Unable to check file "/etc/raddb/certs/server.pem": No such file or directory
/etc/raddb/mods-enabled/eap[183]: Failed parsing configuration item "private_key_file"
rlm_eap_tls: Failed initializing SSL context
rlm_eap (EAP): Failed to initialise rlm_eap_tls
/etc/raddb/mods-enabled/eap[14]: Instantiation failed for module "eap"
対応策としては、一時的にダミー証明書を生成すれば良さそうですが
しかし、証明書には有効期限があり、運用上管理する必要性が出てきます。
今回の用途としては、WorkSpacesのMFA(PAP/PAM認証)であり、EAP認証は利用しないため、EAPを無効化出来ないか試しました。
4.EAP認証の回避対応
4.1./etc/raddb/sites-available/default内のEAPモジュールの読み込みを無効化
(set numberで行数表示しています。)
(1)コメントを外す。 (pamを利用出来るように有効化します。)

581 # pam
↓
581 pam
(2)以降はコメントアウトします。

419 # eap {
420 # ok = return
421 # updated = return
422 # }
(3)
602 # Allow EAP authentication.
603 # eap
(4)
974 Post-Auth-Type REJECT {
982 # eap
(5)
1117 post-proxy {
1139 # eap
4.2 /etc/raddb/sites-enabled/inner-tunnelのEAP読み込みを無効化
(set numberで行数表示しています。)
下記をコメントアウトします。

(1)
131 # eap {
132 # ok = return
133 # }
(2)
276 # Allow EAP authentication.
277 #eap
(3)
450 post-proxy {
472 #eap
4.3.EAP-TLSを無効化
# ディレクトリがあるか確認
ls -ld /etc/raddb/mods-disabled
# ディレクトリ作成
sudo mkdir /etc/raddb/mods-disabled
# eap モジュールを移動(=無効化)
sudo mv /etc/raddb/mods-enabled/eap /etc/raddb/mods-disabled/
5.FreeRADIUSサービスの起動
systemctl start radiusd.service
systemctl status radiusd.service
起動に失敗した場合はデバックコマンドでエラー出力を確認します。
/usr/sbin/radiusd -X
6.ADと同一のユーザー名でLinuxユーザーを作成し、radius-enabledグループに追加します。
sudo useradd -g radius-enabled {Name}
6.1.シークレットキー作成
sudo -u {Name} google-authenticator
6.2.5つの質問が表示されるためyes/noで回答
# sudo -u {ユーザ名} google-authenticator

Do you want authentication tokens to be time-based (y/n) y
Warning: pasting the following URL into your browser exposes the OTP secret to Google:
  https://www.google.com/chart?chs=200x200&chld=M|0&cht=qr&chl=otpauth://totp/{ユーザ名}@{ユーザ名}-test-1%3Fsecret%3DCI2HTPJYJDSVK4WTZWHVCLNVQA%26issuer%3D{ユーザ名}-test-1
{QRコード表示}
Your new secret key is:
Enter code from app (-1 to skip): -1
Code confirmation skipped
Your emergency scratch codes are:
Do you want me to update your "/home/{ユーザ名}/.google_authenticator" file? (y/n) y
(「/home/{ユーザ名}/.google_authenticator」ファイルを更新しますか?)


Do you want to disallow multiple uses of the same authentication
token? This restricts you to one login about every 30s, but it increases
your chances to notice or even prevent man-in-the-middle attacks (y/n) y
(同じ認証トークンの複数回使用を禁止しますか?これにより、約30秒ごとに1回のログインに制限されますが、中間者攻撃を検知したり、防止したりする可能性が高まります。)

By default, a new token is generated every 30 seconds by the mobile app.
In order to compensate for possible time-skew between the client and the server,
we allow an extra token before and after the current time. This allows for a
time skew of up to 30 seconds between authentication server and client. If you
experience problems with poor time synchronization, you can increase the window
from its default size of 3 permitted codes (one previous code, the current
code, the next code) to 17 permitted codes (the 8 previous codes, the current
code, and the 8 next codes). This will permit for a time skew of up to 4 minutes
between client and server.
Do you want to do so? (y/n) n
(デフォルトでは、モバイルアプリによって30秒ごとに新しいトークンが生成されます。
クライアントとサーバー間の時刻のずれを補正するため、現在時刻の前後に追加のトークンを許可しています。これにより、認証サーバーとクライアント間の時刻のずれは最大30秒まで許容されます。
時刻同期がうまくいかない場合は、ウィンドウサイズをデフォルトの3コード(前のコード1つ、現在のコード、次のコード)から17コード(前のコード8つ、現在のコード、次のコード8つ)に増やすことができます。これにより、クライアントとサーバー間の時刻のずれは最大4分まで許容されます。
これを実行しますか?)

If the computer that you are logging into isn't hardened against brute-force
login attempts, you can enable rate-limiting for the authentication module.
By default, this limits attackers to no more than 3 login attempts every 30s.
Do you want to enable rate-limiting? (y/n) y
(ログイン先のコンピューターがブルートフォース攻撃によるログイン試行に対して強化されていない場合は、認証モジュールのレート制限を有効にすることができます。
デフォルトでは、攻撃者によるログイン試行は30秒ごとに3回までに制限されます。レート制限を有効にしますか?)
#
6.3.QRコードが表示されるためデバイスでアプリを起動して、登録
登録後、6桁の数値が表示されます。

6.4.サーバから接続をテストします。
radtest {Name} {MFAコード} 127.0.0.1 1812 {共有シークレットキー}

# 投入後、Received Access-Accept と表示されれば接続成功です。
# radtest {ユーザ名} 768304 127.0.0.1 1812 {クライアントとサーバー間で共有する秘密鍵}
Sent Access-Request Id 157 from 0.0.0.0:45109 to 127.0.0.1:1812 length 77
        User-Name = "{ユーザ名}"
        User-Password = "768304"
        NAS-IP-Address = 10.80.17.95
        NAS-Port = 1812
        Message-Authenticator = 0x00
        Cleartext-Password = "768304"
Received Access-Accept Id 157 from 127.0.0.1:1812 to 127.0.0.1:45109 length 38
        Message-Authenticator = 0xaf453ab89edb519f49e5d75abcd1c1fb
#
“`
7.ADの設定でMFAを有効化します。
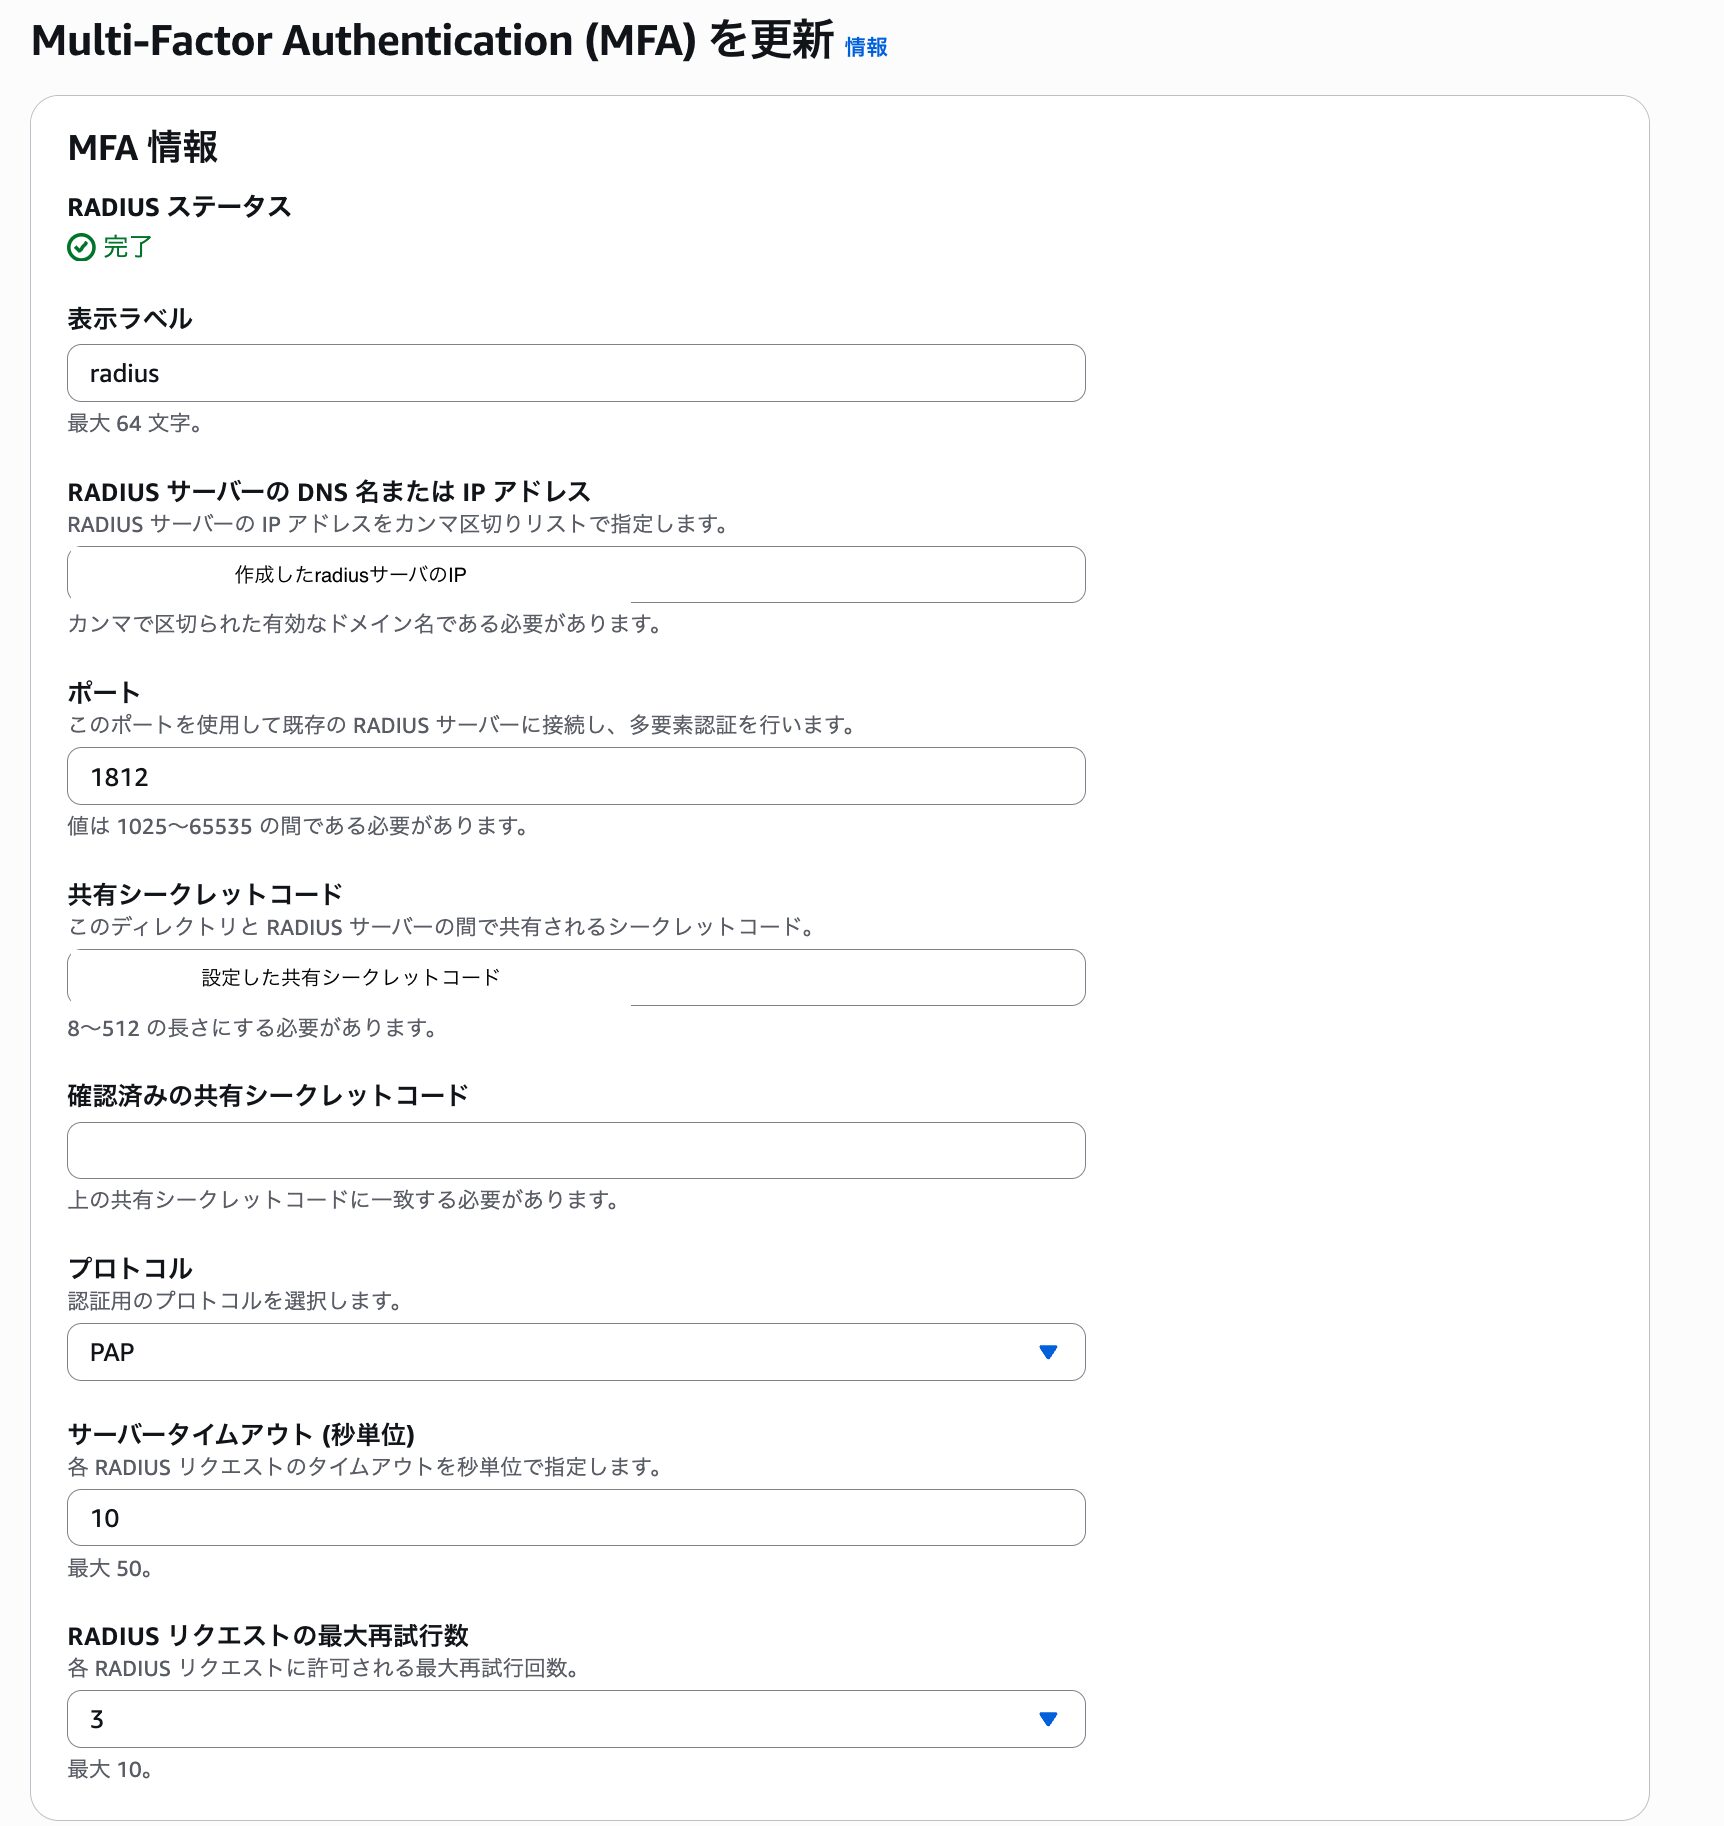
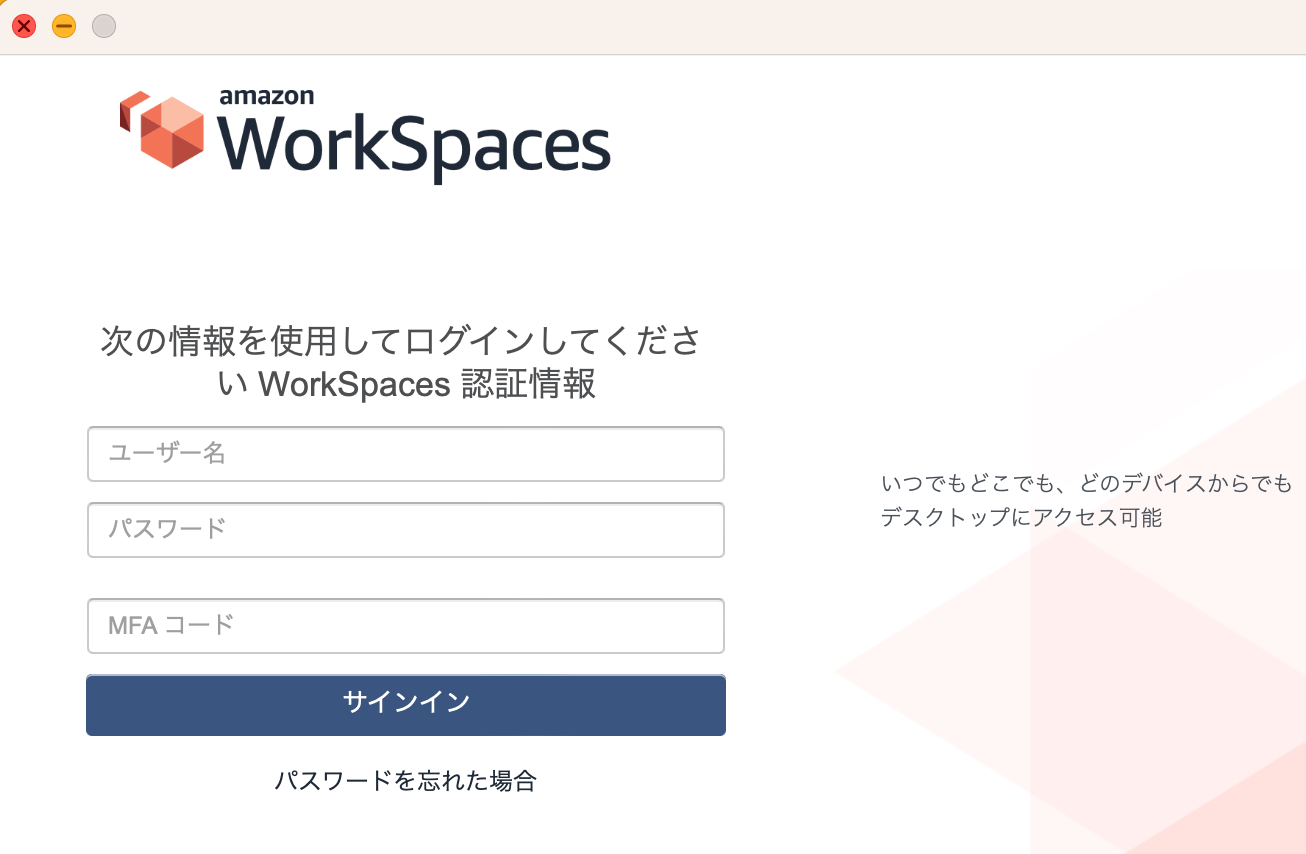
7.1.WorkSpacesクライアントにて接続して、問題なければ完了。
感想
Amazon Linux 2023ではFreeRADIUSの認証方式がデフォルトでEAP認証になっており、無効化するのに手間がかかりました。
なお、OSをRHEL9に変えて検証もしてみましたが、デフォルトでEAP認証になっている点は同様でした。