頻度は少ないのですが、OpenVPNを構築する機会があります。
しかし、頻度が少ないことから前回の作業を忘れてしまい毎回調べ直していました。
そこで効率化のため、本件をブログにまとめておくことにしました。
(1) インストールと準備
# yum -y install openvpn
...
# cd /usr/share/doc/openvpn-2.2.2/easy-rsa/2.0/
# ln -s openssl-1.0.0.cnf openssl.cnf
# ls -1 | grep -v ".cnf" | grep -v Makefile | grep -v README | grep -v keys | xargs chmod a+x
# source vars
NOTE: If you run ./clean-all, I will be doing a rm -rf on /usr/share/doc/openvpn-2.2.2/easy-rsa/2.0/keys
# ./clean-all
ポイントはsource varsをエラーなく実行するために、openssl.confのシンボリックと、各種スクリプトに実行権限を付与しているところです。
(2) CA(認証局)の鍵と証明書を作成
# ./build-ca
Generating a 1024 bit RSA private key
........................++++++
.++++++
writing new private key to 'ca.key'
-----
You are about to be asked to enter information that will be incorporated
into your certificate request.
What you are about to enter is what is called a Distinguished Name or a DN.
There are quite a few fields but you can leave some blank
For some fields there will be a default value,
If you enter '.', the field will be left blank.
-----
Country Name (2 letter code) [US]:
State or Province Name (full name) [CA]:
Locality Name (eg, city) [SanFrancisco]:
Organization Name (eg, company) [Fort-Funston]:
Organizational Unit Name (eg, section) [changeme]:
Common Name (eg, your name or your server's hostname) [changeme]:
Name [changeme]:
Email Address [mail@host.domain]:
上記のようにデフォルト設定のまま進めています。
そうすると下記のようなファイルが作成されます。
# ls -1 keys/
ca.crt
ca.key
index.txt
serial
鍵はca.keyで証明書はca.crtです。
(3) サーバの鍵と証明書を作成
# ./build-key-server server
Generating a 1024 bit RSA private key
..............++++++
.......++++++
writing new private key to 'server.key'
-----
You are about to be asked to enter information that will be incorporated
into your certificate request.
What you are about to enter is what is called a Distinguished Name or a DN.
There are quite a few fields but you can leave some blank
For some fields there will be a default value,
If you enter '.', the field will be left blank.
-----
Country Name (2 letter code) [US]:
State or Province Name (full name) [CA]:
Locality Name (eg, city) [SanFrancisco]:
Organization Name (eg, company) [Fort-Funston]:
Organizational Unit Name (eg, section) [changeme]:
Common Name (eg, your name or your server's hostname) [server]:
Name [changeme]:
Email Address [mail@host.domain]:

Please enter the following 'extra' attributes
to be sent with your certificate request
A challenge password []:
An optional company name []:
Using configuration from /usr/share/doc/openvpn-2.2.2/easy-rsa/2.0/openssl.cnf
Check that the request matches the signature
Signature ok
The Subject's Distinguished Name is as follows
countryName           :PRINTABLE:'US'
stateOrProvinceName   :PRINTABLE:'CA'
localityName          :PRINTABLE:'SanFrancisco'
organizationName      :PRINTABLE:'Fort-Funston'
organizationalUnitName:PRINTABLE:'changeme'
commonName            :PRINTABLE:'server'
name                  :PRINTABLE:'changeme'
emailAddress          :IA5STRING:'mail@host.domain'
Certificate is to be certified until Sep 25 16:47:52 2022 GMT (3650 days)
Sign the certificate? [y/n]:y


1 out of 1 certificate requests certified, commit? [y/n]y
Write out database with 1 new entries
Data Base Updated
こちらもデフォルト設定のまま進めています。
今度は、下記のようなファイルが追加されます。
# ls -1 keys/
01.pem
ca.crt
ca.key
index.txt
index.txt.attr
index.txt.old
serial
serial.old
server.crt
server.csr
server.key
鍵はserver.keyで証明書はserver.crtとなります。
(4) Diffie-Hellmanパラメータの作成
# ./build-dh
Generating DH parameters, 1024 bit long safe prime, generator 2
This is going to take a long time
.................................................................+....+..................++*++*++*
上記より、dh1024.pemが作成されます。
# ls -1 keys/
01.pem
ca.crt
ca.key
dh1024.pem
index.txt
index.txt.attr
index.txt.old
serial
serial.old
server.crt
server.csr
server.key
(5) 設定ファイルの配置
# cp keys/ca.crt keys/server.crt keys/server.key keys/dh1024.pem /etc/openvpn/
上記で作成した鍵や証明書等を配置します。
# cp /usr/share/doc/openvpn-2.2.2/sample-config-files/server.conf /etc/openvpn/
OpenVPN自体の設定ファイルもコピーします。
(6) OpenVPNの起動
# /etc/init.d/openvpn start
openvpn を起動中:                                          [  OK  ]
起動スクリプトが用意されています。
# ifconfig tun0
tun0      Link encap:UNSPEC  HWaddr 00-00-00-00-00-00-00-00-00-00-00-00-00-00-00-00
inet addr:10.8.0.1  P-t-P:10.8.0.2  Mask:255.255.255.255
UP POINTOPOINT RUNNING NOARP MULTICAST  MTU:1500  Metric:1
RX packets:0 errors:0 dropped:0 overruns:0 frame:0
TX packets:0 errors:0 dropped:0 overruns:0 carrier:0
collisions:0 txqueuelen:100
RX bytes:0 (0.0 b)  TX bytes:0 (0.0 b)
トンネルインターフェース(tun0)が10.8.0.1で設定されていることがわかります。
# netstat -nr
Kernel IP routing table
Destination  Gateway   Genmask          Flags  MSS  Window  irtt  Iface
10.8.0.2     0.0.0.0   255.255.255.255  UH       0  0          0  tun0
10.0.0.0     0.0.0.0   255.255.255.0    U        0  0          0  eth0
10.8.0.0     10.8.0.2  255.255.255.0    UG       0  0          0  tun0
169.254.0.0  0.0.0.0   255.255.0.0      U        0  0          0  eth0
0.0.0.0      10.0.0.1  0.0.0.0          UG       0  0          0  eth0
ルーティング(10.8.0.0/24 → tun0)も設定されています。
# netstat -ulnp | grep openvpn
udp    0    0 0.0.0.0:1194    0.0.0.0:*    10487/openvpn
ポート(UDP 1194)もリッスンしています。
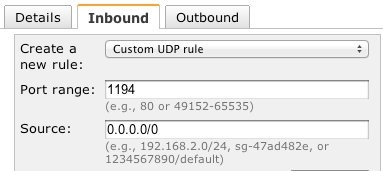
(7) UDPの1194ポートをセキュリティグループで許可
AWSコンソールから設定します。
当然、このEC2がインターネットアクセスできる必要があるため、EIPの付与と所属するサブネットの0.0.0.0/0へのルーティングが、インターネットゲートウェイに向いている必要があります。