
はじめに
みなさま、Google Cloudは触っておりますでしょうか。
今回はGoogle Cloud Storage(以下GCS)にCSVファイルを格納するとBigQueryにデータを書き込む機能について実装⼿順を紹介します。
実装イメージはこのような感じです。
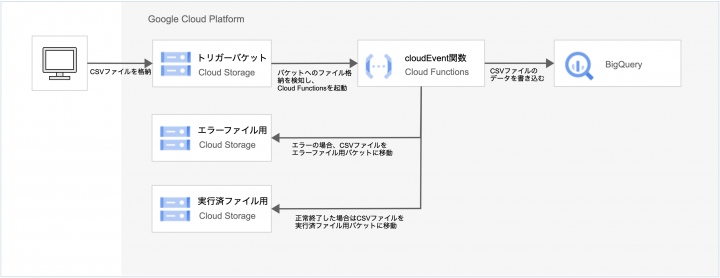
書き込み部分のCloud Functionsは第2世代(gen2)を使⽤しています。
Cloud Functions(第 1 世代)のソースでは動かない点にご注意下さい。
事前準備
実装⼿順ではあらかじめ必要なサービスの権限を割り当てたユーザーアカウント及びサービスアカウントを使⽤する想定で進めますので、以下を参考に権限を設定して下さい。
権限を割り当てているプリンシパルは以下の通りです。
| プリンシパル名 | 種別 | 備考 |
|---|---|---|
| xxxx@xxxx.co.jp | User Account | 開発者のGoogleアカウント |
| xxxxxxxxxxx-compute@developer.gserviceaccount.com | Service Account | Cloud Functions⽤のService Account(Compute Enging default) |
| プリンシパル名 | 種別 | 備考 |
|---|---|---|
| service-xxxxxxxxxxx@gs-project-accounts.iam.gserviceaccount.com | Service Account | Cloud Storage⽤のService Account |
【User Account】
| 種別 | 割当権限 |
|---|---|
| ロール | roles/cloudfunctions.developer(Cloud Functions開発者) |
| ロール | roles/bigquery.dataEditor(BigQueryデータ編集者) |
| ロール | roles/logging.viewer(ログ閲覧者) |
| カスタムロール | storage.buckets.create, storage.buckets.delete storage.buckets.get, storage.buckets.liststorage.buckets.update storage.objects.create, storage.objects.delete storage.objects.get, storage.objects.liststorage.objects.updatelogging. views.accesserrorreporting.groups.listresourcemanager.projects.getIamPolicy serviceusage.services.enable |
【Cloud Functions Service Account】
| 種別 | 割当権限 |
|---|---|
| ロール | roles/logging.logWriter(ログ書き込み) |
| ロール | roles/bigquery.jobUserBigQuery(ジョブユーザー) |
| ロール | roles/eventarc.eventReceiverEventarc(イベント受信者) |
| ロール | roles/storage.objectAdminStorage(Storage オブジェクト管理者) |
| カスタムロール | bigquery.datasets.get, bigquery.tables.getbigquery.tables.getData, bigquery.tables.updateData run.routes.invoke |
【Cloud Storage Service Account】
| 種別 | 割当権限 |
|---|---|
| ロール | roles/pubsub.publisher(Pub/Sub パブリッシャー) |
【Cloud Pub/Sub Service Account】
| 種別 | 割当権限 |
|---|---|
| ロール | roles/iam.serviceAccountTokenCreator(サービス アカウントトークン作成者) |
使⽤環境
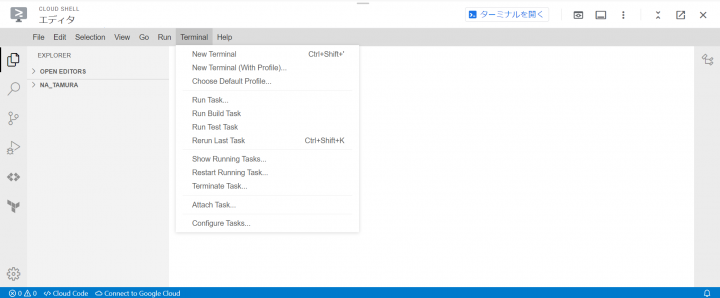
今回はブラウザ上でお⼿軽にターミナルを使える「Cloud Shell」を使って実装していきます。
まずGoogle Cloudコンソールの画⾯上部の検索バーから「CloudShell」を検索し画⾯を開きます。
続いて、「Terminal」タブから「New Terminal」を押下するとターミナルを開くことができます。
Cloud ShellのターミナルにはGoogle Cloud CLIやテキストエディタ、ビルド/パッケージツール、⾔語
(Python,PHP,Nodeなど)がプリインストールされているため簡単に利⽤開始ができます。
参考
・Cloud Shell を起動する
・Cloud Shell の仕組み
APIの有効化
Google CloudのAPIを有効化していない場合は以下コマンドで有効化してください。
gcloud services enable \
    artifactregistry.googleapis.com \
    cloudfunctions.googleapis.com \
    cloudbuild.googleapis.com \
    eventarc.googleapis.com \
    logging.googleapis.com \
    pubsub.googleapis.com \
    run.googleapis.com \
    storage.googleapis.com
参考:サービスの有効化と無効化
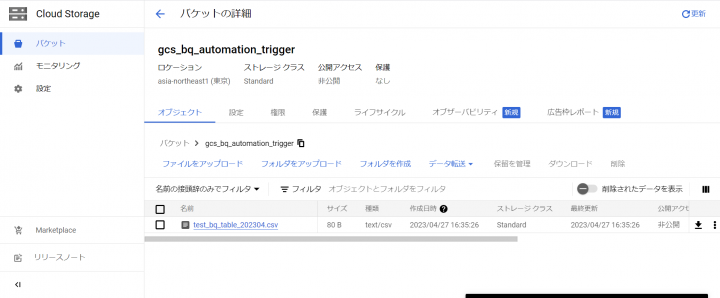
GCSバケットの作成
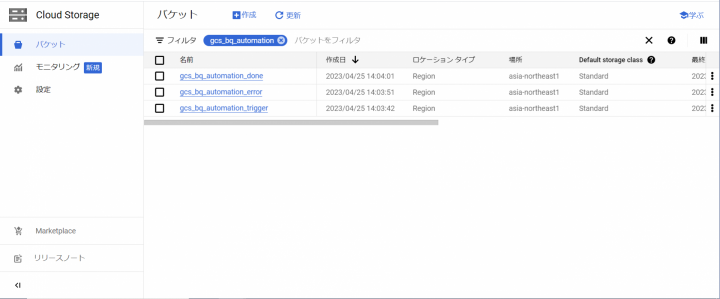
今回の⼿順では3つのバケットを使⽤します。
| No | バケット名 | 説明 |
|---|---|---|
| 1 | gcs_bq_automation_trigger | トリガー⽤のバケット |
| 2 | gcs_bq_automation_error | エラーファイル格納⽤バケット |
| 3 | gcs_bq_automation_done | 実⾏済みファイル格納⽤バケット |
以下コマンドをCloud Shellのターミナルで実⾏します。
は適宜置き換えて使⽤して下さい。(以下略)
gcloud storage buckets create gs://<バケット名> \
   --project=<プロジェクト名> \
   --default-storage-class=standard \
   --location=asia-northeast1 \
   --uniform-bucket-level-access
以下のように作成できていれば問題ありません。
参考
・Cloud Shell で gcloud コマンドを実⾏する
・バケットの作成
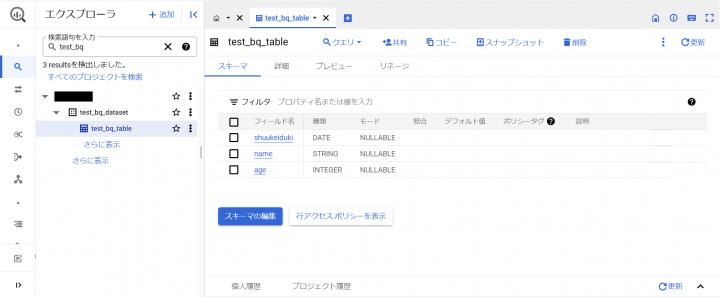
BigQueryのデータセットとテーブルの作成
データセット名: test_bq_dataset
テーブル名: test_bq_table
Cloud Shellターミナルでテーブル定義⽤のファイルを作成します。
ターミナルでコマンドを実⾏します。
$ touch schema.json
jsonファイルを開き、テーブル定義を記載していきます。
schema.json
   [
      {
         "mode": "NULLABLE",
         "name": "shuukeiduki",
         "type": "DATE"
      },
      {
         "mode": "NULLABLE",
         "name": "name",
         "type": "STRING"
      },
      {
         "mode": "NULLABLE",
         "name": "age",
        "type": "INTEGER"
      }
  ]
ターミナルで以下のコマンドをそれぞれ実⾏してください。
bq mk --data_location=asia-northeast1 <プロジェクト名>:<データセット名>

bq mk \
    --table \
    --schema ./schema.json \
    <プロジェクト名>:<データセット名>.<テーブル名>
以下のように作成されていれば問題ありません。
スクリプトの作成
まずプロジェクト⽤のフォルダを作成します。
$ mkdir MyProject
$ cd MyProject
次にスクリプトを作成します。
$ touch index.js
ソースコードを本記事の⼀番下に記載しているので張り付けてください。
注意点としてソースコードではテーブル名を変数allow_tablesの配列内で指定しているので適宜追加してください。
今回は便宜上ソースコード内でテーブル名を指定していますが、テーブルの増減でCloud Functionsの更新が必要になるため、環境変数経由でテーブル名を取得するようカスタマイズすると更新が楽になると思います。
続いてパッケージ管理ファイルを作成します。
$ npm init
⾊々聞かれますが、全てEnterで⼤丈夫です。
package.jsonファイルを開いて、以下を追記してください。
"scripts": {
    "start": "npx functions-framework --target=functions [--signaturetype=cloudevent]"
},
"dependencies": {
    "@google-cloud/bigquery": "^6.2.0",
    "@google-cloud/functions-framework": "^3.0.0",
    "@google-cloud/storage": "^6.9.5"
}
package.json
  {
     "name": "myproject",
     "version": "1.0.0",
     "description": "",
     "main": "index.js",
     "scripts": {
     "test": "echo \"Error: no test specified\" && exit 1",
     "start": "npx functions-framework --target=functions [--signaturetype=cloudevent]"
  },
  "dependencies": {
   "@google-cloud/bigquery": "^6.2.0",
   "@google-cloud/functions-framework": "^3.0.0",
   "@google-cloud/storage": "^6.9.5"
  },
  "author": "",
  "license": "ISC"
}
Cloud Functions関数のデプロイ
関数名:任意の名前(=Cloud Fucntionsにデプロイされる関数名になります)
エントリーポイント:index.js内のcloudEvent関数で定義した名前(=今回の例ではimportCSVToBQ)
以下コマンドを実⾏して下さい。
gcloud functions deploy <関数名> \
  --trigger-bucket=<バケット1> \
  --set-env-vars BUCKET_WATCHING=<バケット1> \
  --set-env-vars BUCKET_ERROR=<バケット2> \
   --set-env-vars BUCKET_DONE=<バケット3> \
   --set-env-vars BQ_DATASET=<データセット名> \
    --gen2 \
    --runtime=nodejs18 \
    --entry-point=<エントリーポイント> \
    --source=. \
    --region=asia-northeast1 \
    --trigger-location=asia-northeast1 \
    --memory=128Mi \
    --timeout=60 \
    --project=<プロジェクト名>
動作確認
テスト⽤のファイルを作成してバケットに格納してみます。
今回使⽤するソースコードはファイル名チェックを⼊れていますので、テストファイルを作成する際は「_YYYYMM.csv」で作成してください。
_yyyyMM.csv
集計年⽉⽇,名前,年齢
2020-1-1,鈴⽊⼀郎,23
2023-1-1,⽥中次郎,19
Cloud Storageのコンソールからファイルをアップロードしてみます。
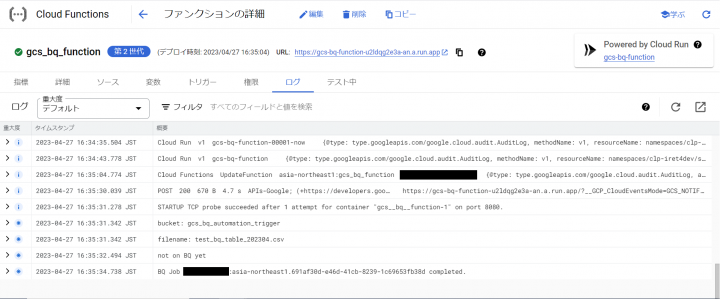
実⾏ログを確認します。
BigQueryでSQLを実⾏して確認します。
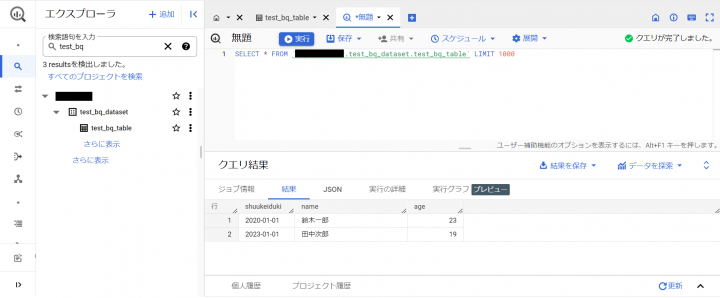
ちゃんと書込みが完了していますね。
最後に
いかがだったでしょうか。
Google CloudではGCS、Cloud Functions、BigQueryを組み合わせて⽐較的簡単にイベント駆動の処理を実装することができます。
これらはマネージドなサービスのためユーザ側でサーバ管理を⾏う必要がありませんし、低コストで運⽤していくことができます。
ぜひ、⾊々カスタマイズして使ってみて下さい。
ソースコード
index.js
// Import the Google Cloud client libraries
const functions = require('@google-cloud/functions-framework');
const {
    BigQuery
} = require('@google-cloud/bigquery');
const {
    Storage
} = require('@google-cloud/storage');

// Instantiate clients
const bigquery = new BigQuery();
const storage = new Storage();

// アップロード先⽤、エラー発⽣時⽤、処理完了⽤バケット設定(環境変数経由)
const BUCKET_WATCHING = process.env.BUCKET_WATCHING;
const BUCKET_ERROR = process.env.BUCKET_ERROR;
const BUCKET_DONE = process.env.BUCKET_DONE;
// インポート先データセット設定(環境変数経由)
const bq = bigquery.dataset(process.env.BQ_DATASET);
// インポート対象テーブル設定(新しいテーブル追加の際には先にテーブルを作成してからテーブル
名をここに追加してください)
const allow_tables = [
    'test_bq_table' // テスト専⽤テーブル
];
// エラーメッセージファイル名の末尾に付加される⽂字列
const err_file_suffix = '.error.txt';

/**
 * メーン処理
 */
functions.cloudEvent('importCSVToBQ', async cloudEvent => {
    /**
     * Imports a GCS file into a table and append
     * table data if table already exists.
     */

    const target_info = check_uploaded_cs_file(cloudEvent.data);
    if (!target_info) { return; }

    const check_done_bucket = await
storage.bucket(BUCKET_DONE).file(target_info.filename).exists();
    if (check_done_bucket[0]) {
        console.error('CS error: the file already exists in done bucket');
        process_error(
            target_info,
            cloudEvent.data,
           `既に完了済みバケットに同名のファイルが存在しており、データベースへの読み込み
が完了しているファイルです。`
        );
        return;
    }
    const duplicated = await is_bq_data_duplicated(target_info);
    if (duplicated) {
        console.error(`BQ error: there is already same duration data on
${target_info.table_name}: ${target_info.filename}`);
        process_error(
            target_info,
            cloudEvent.data,
           '既にその期間のデータはデータベース上に存在しています。'
        );
        return;
 } else if (duplicated === null) {
      process_error(
          target_info,
          cloudEvent.data,
         'BQへの問い合わせでエラーが発⽣しました。'
      );
      return;
 }
 console.log('not on BQ yet');

 const errors = await load_bq_from_cs(cloudEvent.data, target_info);
 if (errors && errors.length > 0) {
     console.error(`BQ errors: ${errors.join()}`)
     process_error(
         target_info,
         cloudEvent.data,
        `BQへのインポートでエラーが発⽣しました。\n${errors.join('\n')}`
     )
     return;
  }
  storage.bucket(BUCKET_WATCHING).file(target_info.filename)
     .move(storage.bucket(BUCKET_DONE));
  // if there are old error files, erase these files
  const err_file =
storage.bucket(BUCKET_ERROR).file(target_info.filename);
  err_file.exists().then(([is_it]) => { if (is_it) { err_file.delete(); }
});
  const err_msg_file =
storage.bucket(BUCKET_ERROR).file(target_info.filename + err_file_suffix);
 err_msg_file.exists().then(([is_it]) => { if (is_it) {
err_msg_file.delete(); } });
});

/**
* エラー処理
* @param {Object} target_info {filename:..., table_name:...}
* @param {cloudEvent.data} data cloudEvent呼び出し時のパラメータ
* @param {String} message エラーファイルを⽣成し、その内容として書き出すテキストメッ
セージ
*/
const process_error = async (target_info, data, message) => {

storage.bucket(BUCKET_WATCHING).file(target_info.filename).move(storage.bucket
    storage.bucket(BUCKET_ERROR).file(target_info.filename +
err_file_suffix)
        .save(message, {
            metadata: {
                contentEncoding: 'UTF-8',
                contentLanguage: 'Japanese'
            }
         });
}

/**
 * BQに既に登録済みのデータがないかファイル名の期間から検索する
 * @param {Object} target_info {filename:..., table_name:...}
 * @return {Boolean | null} 重複しているかどうかの結果、BQでエラーが発⽣した場合は
null
 */
const is_bq_data_duplicated = async (target_info) => {
    const sql = `SELECT COUNT(*)>0 AS duplicated FROM
${target_info.table_name}`
        + ` WHERE shuukeiduki >=
DATE('${target_info.duration.toISOString()}')`
        + ` AND shuukeiduki  {
    const metadata = {
        sourceFormat: 'CSV',
        skipLeadingRows: 1,
        autodetect: false,
        writeDisposition: 'WRITE_APPEND',
        location: 'asia-northeast1',
        fileDelimiter: ',',
        allowJaggedRows: false,
        ignoreUnknownValues: false,
        preserveAsciiControlCharacters: false,
        maxBadRecords: 0,
        createDisposition: 'CREATE_NEVER',
 };

 const [job] = await bq.table(target_info.table_name)
     .load(storage.bucket(data.bucket).file(data.name), metadata);
 console.log(`BQ Job ${job.id} completed.`);

 return job.status.hasOwnProperty('errors') ? job.status.errors : null;
}
/**
 * instant check for uploaded filename has proper format and been in the
table list
 * @param {cloudEvent.data} data cloudEvent呼び出し時のパラメータ
 * @return {Object | false} 成功時はファイルやテーブル等の属性情報を、エラー時はfalse
を返す
 */
const check_uploaded_cs_file = (data) => {
    console.log(`bucket: ${data.bucket}`);
    console.log(`filename: ${data.name}`);

    if (data.bucket != BUCKET_WATCHING) {
    console.log(`Illegal bucket name: ${data.bucket}`);
    return false;
 }
 const path_arr = data.name.split('/');
 if (path_arr.length > 1) {
     console.log(`Illegal file path: ${path_arr.join('/')}`);
     return false;
    }
 const filename = path_arr.slice(-1)[0];
 const name_arr = filename.split('_');
 const table_name = name_arr.slice(0, name_arr.length - 1).join('_');
 if (!allow_tables.includes(table_name)) {
     console.error(`Illegal table name: ${table_name}`);
     process_error({ filename: filename }, data, 'ファイル名のテーブル部分が
Cloud Functionsプログラムに登録されていません。');
        return false;
    }
    const duration_regex = new RegExp(/^20\d{4}$/);
    const duration_str = filename.slice(-10, -4);
    if (!duration_regex.test(duration_str)) {
        console.error(`Illegal duration: ${duration_str}`);
        process_error({ filename: filename }, data, 'ファイル名の年⽉部分が
yyyymm形式ではありません。');
        return false;
    }
 const duration = new Date([duration_str.slice(0, 4),
duration_str.slice(-2), '01'].join('-'));
    const ext = filename.slice(-3);
    if (ext !== 'csv') {
        console.error(`Illegal file extension: ${ext}`);
        process_error({ filename: filename }, data, 'ファイル名の拡張⼦がcsvでは
ありません。');
        return false;
 }
 return { filename: filename, table_name: table_name, duration: duration
};
}