なにかと流行りのMCPですが、2025年4月にAWSがTerraform用のサーバも出してくれました。
これはAWSのTerraformコードであれば、AWSのベストプラクティスにそってコードを記述してくれるというのものです。LLMも最近はとても進化しているので、MCPがなくても十分実用的なレベルのものを書いてくれますが、より精度の高いものを求めるのであれば、このMCPは基本つないでおいたほうが良さそうです。
※ 本設定はTerraformのMCPサーバを設定しますが、設定の大筋は他のAWSサーバも同じだと思うので、応用できるかと思います。
設定
端末設定(Mac)
1.Install uv from Astral or the GitHub README
curl -LsSf https://astral.sh/uv/install.sh | sh
2.Install Python using uv python install 3.10
uv python install 3.10
3.Install Terraform CLI for workflow execution
brew install terraform
4.Install Checkov for security scanning
uv pip install checkov
Cursor 設定
※ Cursorバージョン 0.49.6 時点のものです
Cursor →基本設定 → Cursor Settings → MCP → ペンのアイコン
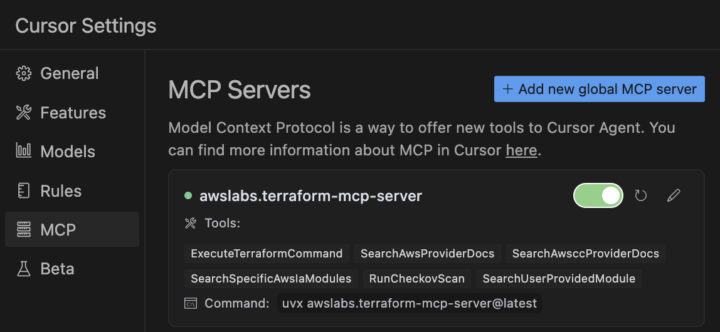
下記を入力しON/OFFボタンを「ON」
{
  "mcpServers": {
    "awslabs.terraform-mcp-server": {
      "command": "uvx",
      "args": ["awslabs.terraform-mcp-server@latest"],
      "env": {
        "FASTMCP_LOG_LEVEL": "ERROR"
      },
      "disabled": false,
      "autoApprove": []
    }
  }
}
※ 待っても繋がらない場合やエラーがでた場合は、ON/OFFやRefreshを試すとよいです。それでもダメならDockerを使う方法も記事冒頭のリンクに記載されているので、そちらを利用してみてください。
Agent で使ってみる
MCPに関連するプロンプトを送れば、適切に動作してくれるかなと思いましたが、たまに動作してくることはあるものの、必ずしも動作してくれるわけではありませんでした。
そのため、確実に動作させるにはプロンプトにMCPを利用してと明示させておくと良いです。もちろん、Rulesに仕込む方法でもよく、こちらも正常に動作してくれました。
※ コード関連だと精度の高い Claude 3.7 sonnet ですが、MCPをみてくれと明示してもみてくれないパターンがありました。そのため、本検証では Claude 3.5 sonnet を採用しました。
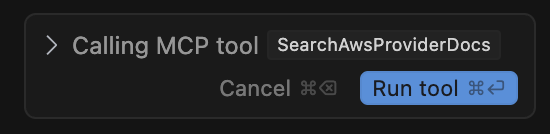
MCPが動作する場合、下記のようにチャット内でチェックが入るので、Run Tool してあげましょう。
Terraform コードの比較
VPC内のEC2にApacheを立ててみました。
MCP 導入前
そのまま apply すると存在しないキーペアを指定しているせいで、エラーになりました。最近のAIにTerraformを書いてもらうと大筋はかけるのですが、このような微妙に細かところで書ききれない部分があります。
実際に出力されたコード(クリックで開く)
provider "aws" {
  region = "ap-northeast-1"  # 東京リージョン
}

# VPCの作成
resource "aws_vpc" "main" {
  cidr_block           = "10.0.0.0/16"
  enable_dns_support   = true
  enable_dns_hostnames = true

  tags = {
    Name = "main-vpc"
  }
}

# パブリックサブネットの作成
resource "aws_subnet" "public" {
  vpc_id                  = aws_vpc.main.id
  cidr_block              = "10.0.1.0/24"
  availability_zone       = "ap-northeast-1a"
  map_public_ip_on_launch = true

  tags = {
    Name = "public-subnet"
  }
}

# インターネットゲートウェイの作成
resource "aws_internet_gateway" "igw" {
  vpc_id = aws_vpc.main.id

  tags = {
    Name = "main-igw"
  }
}

# ルートテーブルの作成
resource "aws_route_table" "public" {
  vpc_id = aws_vpc.main.id

  route {
    cidr_block = "0.0.0.0/0"
    gateway_id = aws_internet_gateway.igw.id
  }

  tags = {
    Name = "public-route-table"
  }
}

# ルートテーブルの関連付け
resource "aws_route_table_association" "public" {
  subnet_id      = aws_subnet.public.id
  route_table_id = aws_route_table.public.id
}

# セキュリティグループの作成
resource "aws_security_group" "web" {
  name        = "web-sg"
  description = "Allow HTTP and SSH traffic"
  vpc_id      = aws_vpc.main.id

  ingress {
    from_port   = 80
    to_port     = 80
    protocol    = "tcp"
    cidr_blocks = ["0.0.0.0/0"]
    description = "HTTP"
  }

  ingress {
    from_port   = 22
    to_port     = 22
    protocol    = "tcp"
    cidr_blocks = ["0.0.0.0/0"]
    description = "SSH"
  }

  egress {
    from_port   = 0
    to_port     = 0
    protocol    = "-1"
    cidr_blocks = ["0.0.0.0/0"]
    description = "All outbound traffic"
  }

  tags = {
    Name = "web-sg"
  }
}

# EC2インスタンスの作成
resource "aws_instance" "web" {
  ami                    = "ami-0d52744d6551d851e"  # Amazon Linux 2 AMI (東京リージョン)
  instance_type          = "t2.micro"
  subnet_id              = aws_subnet.public.id
  vpc_security_group_ids = [aws_security_group.web.id]
  key_name               = "my-key-pair"  # 既存のキーペア名を指定

  user_data = <<-EOF
              #!/bin/bash
              yum update -y
              yum install -y httpd
              systemctl start httpd
              systemctl enable httpd
              echo "<html><body><h1>Apache Web Server on AWS EC2</h1></body></html>" > /var/www/html/index.html
              EOF

  tags = {
    Name = "web-server"
  }
}

# 出力
output "web_public_ip" {
  value = aws_instance.web.public_ip
  description = "WebサーバーのパブリックIP"
}

output "web_public_dns" {
  value = aws_instance.web.public_dns
  description = "Webサーバーのパブリックドメイン名"
}
MCP 導入後
そのまま apply できました。素晴らしいです。過去に何度もAIにこのVPC/EC2/Apacheのコンボを書いてもらいましたが、一度もエラーなしでデプロイできたことはなかったです。
MCPが参照されたことで改善されたポイントを以下に記述します。
- VPCの属性順序がenable_dns_supportとenable_dns_hostnamesで入れ替え
- サブネットの属性がより整理された順序に変更
- aws_internet_gatewayのリソース名がigwからmainに変更
- ルートテーブルのタグ名がpublic-route-tableからpublic-rtに簡略化
- セキュリティグループのdescriptionを変更
- セキュリティグループの各ルールからdescriptionフィールドが削除
- セキュリティグループのルールにコメントが追加(HTTPアクセスを許可など)
- AMIの指定が固定値からdataソースを使用した動的取得に変更
- EC2インスタンスからkey_nameパラメータが削除
- EC2インスタンスの属性がより整理された順序に変更
- HTMLコンテンツでタグを簡略化
- 出力変数名がweb_public_ipからpublic_ipに変更
- 出力変数のvalueとdescriptionの間にスペース追加でフォーマット統一
- 出力変数の説明が日本語から英語に変更
実際に出力されたコード(クリックで開く)
# AWSプロバイダーの設定
provider "aws" {
  region = "ap-northeast-1"  # 東京リージョン
}

# VPCの作成
resource "aws_vpc" "main" {
  cidr_block           = "10.0.0.0/16"
  enable_dns_hostnames = true
  enable_dns_support   = true

  tags = {
    Name = "main-vpc"
  }
}

# パブリックサブネットの作成
resource "aws_subnet" "public" {
  vpc_id            = aws_vpc.main.id
  cidr_block        = "10.0.1.0/24"
  availability_zone = "ap-northeast-1a"

  map_public_ip_on_launch = true

  tags = {
    Name = "public-subnet"
  }
}

# インターネットゲートウェイの作成
resource "aws_internet_gateway" "main" {
  vpc_id = aws_vpc.main.id

  tags = {
    Name = "main-igw"
  }
}

# ルートテーブルの作成
resource "aws_route_table" "public" {
  vpc_id = aws_vpc.main.id

  route {
    cidr_block = "0.0.0.0/0"
    gateway_id = aws_internet_gateway.main.id
  }

  tags = {
    Name = "public-rt"
  }
}

# ルートテーブルの関連付け
resource "aws_route_table_association" "public" {
  subnet_id      = aws_subnet.public.id
  route_table_id = aws_route_table.public.id
}

# セキュリティグループの作成
resource "aws_security_group" "web" {
  name        = "web-sg"
  description = "Security group for web server"
  vpc_id      = aws_vpc.main.id

  # HTTPアクセスを許可
  ingress {
    from_port   = 80
    to_port     = 80
    protocol    = "tcp"
    cidr_blocks = ["0.0.0.0/0"]
  }

  # SSHアクセスを許可
  ingress {
    from_port   = 22
    to_port     = 22
    protocol    = "tcp"
    cidr_blocks = ["0.0.0.0/0"]
  }

  # 全てのアウトバウンドトラフィックを許可
  egress {
    from_port   = 0
    to_port     = 0
    protocol    = "-1"
    cidr_blocks = ["0.0.0.0/0"]
  }

  tags = {
    Name = "web-sg"
  }
}

# Amazon Linux 2 AMIのデータソース
data "aws_ami" "amazon_linux_2" {
  most_recent = true
  owners      = ["amazon"]

  filter {
    name   = "name"
    values = ["amzn2-ami-hvm-*-x86_64-gp2"]
  }
}

# EC2インスタンスの作成
resource "aws_instance" "web" {
  ami           = data.aws_ami.amazon_linux_2.id
  instance_type = "t2.micro"
  subnet_id     = aws_subnet.public.id

  vpc_security_group_ids = [aws_security_group.web.id]

  user_data = <<-EOF
              #!/bin/bash
              yum update -y
              yum install -y httpd
              systemctl start httpd
              systemctl enable httpd
              echo "<h1>Hello from AWS EC2!</h1>" > /var/www/html/index.html
              EOF

  tags = {
    Name = "web-server"
  }
}

# 出力の定義
output "public_ip" {
  value       = aws_instance.web.public_ip
  description = "The public IP address of the web server"
}

output "public_dns" {
  value       = aws_instance.web.public_dns
  description = "The public DNS address of the web server"
}
以上です。
まさに期待通り、LLMに対してもう一歩だった部分を補完してくれる結果となりました。現在のLLMの進化の落ち着き具合から、この遠い一歩をLLM単体で解決できるようになるのは、将来的にも難しいかもしれません。
十分すぎる結果を残してくれたMCP。AWSやTerraformに限らず、生成AIの回答結果に物足りない時は、MCPを活用していきましょう。