tl;dr
Elastic Beanstalk の Worker Tier と Worker Tier で Cron っぽいことを試してみたメモ。
参考
Worker Tier について
その前に Elastic Beanstalk について
- 読み方的には「エラスティック・ビーン・ストーク」で「ビーンズ・トーク」では無い(重要)
- PaaS(アプリケーション以下の環境は AWS がマネジメントしてくれる)
- 各種言語に対応
- ELB と AutoScaling や RDS だって利用可能
- Web Tier(今回は触れない) と Worker Tier がある
Worker Tier
- SQS キューに書き込むことができる AWS サービスのバックグラウンド処理タスクを実行する
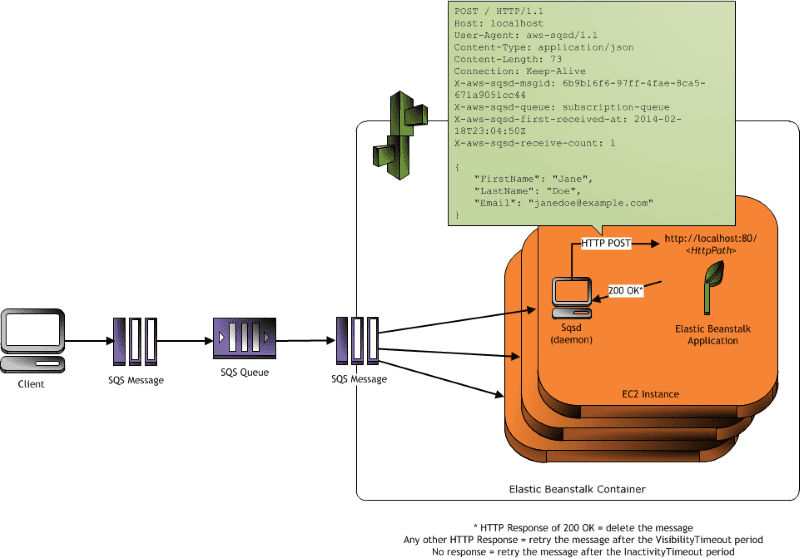
- aws-sqsd が SQS のキューを監視、キューにメッセージが届いたらローカルホストのアプリケーションにアクセスする(下図参照)

(出典:Worker Environments)
- Worker Tier を作成すると 2 つのキューが作成される(Worker Queue と DeadLetterr Queue)
- DeadLetterr Queue を設けることで正常に処理出来なかったキューを後から確認することが出来る
トライ
IAM role を作る
Worker Tier を利用する場合には EC2 から SQS 等の各種 AWS リソースにアクセスする為の IAM role を作成する必要があるので、今回はマネジメントコンソールから Worker Tier を作成した際に自動で作成してくれる以下の IAM role を流用する。
{
  "Version": "2012-10-17",
  "Statement": [
    {
      "Sid": "QueueAccess",
      "Action": [
        "sqs:ChangeMessageVisibility",
        "sqs:DeleteMessage",
        "sqs:ReceiveMessage",
        "sqs:SendMessage"
      ],
      "Effect": "Allow",
      "Resource": "*"
    },
    {
      "Sid": "MetricsAccess",
      "Action": [
        "cloudwatch:PutMetricData"
      ],
      "Effect": "Allow",
      "Resource": "*"
    },
    {
      "Sid": "BucketAccess",
      "Action": [
        "s3:Get*",
        "s3:List*",
        "s3:PutObject"
      ],
      "Effect": "Allow",
      "Resource": [
        "arn:aws:s3:::elasticbeanstalk-*-xxxxxxxxxxxx/*",
        "arn:aws:s3:::elasticbeanstalk-*-xxxxxxxxxxxx-*/*"
      ]
    },
    {
      "Sid": "DynamoPeriodicTasks",
      "Action": [
        "dynamodb:BatchGetItem",
        "dynamodb:BatchWriteItem",
        "dynamodb:DeleteItem",
        "dynamodb:GetItem",
        "dynamodb:PutItem",
        "dynamodb:Query",
        "dynamodb:Scan",
        "dynamodb:UpdateItem"
      ],
      "Effect": "Allow",
      "Resource": [
        "arn:aws:dynamodb:*:xxxxxxxxxxxx:table/*-stack-AWSEBWorkerCronLeaderRegistry*"
      ]
    }
  ]
}
この IAM role を aws-elasticbeanstalk-ec2-worker-role という名前で保存しておく。必要に応じて他の AWS リソースへのアクセスポリシーも適宜追加する。
ebcli で新しいアプリケーション
ebcli を利用して作業を進める。ebcli についてはこちらのドキュメントを参考に進める。
% eb init

Select a default region
1) us-east-1 : US East (N. Virginia)
2) us-west-1 : US West (N. California)
3) us-west-2 : US West (Oregon)
4) eu-west-1 : EU (Ireland)
5) eu-central-1 : EU (Frankfurt)
6) ap-southeast-1 : Asia Pacific (Singapore)
7) ap-southeast-2 : Asia Pacific (Sydney)
8) ap-northeast-1 : Asia Pacific (Tokyo)
9) sa-east-1 : South America (Sao Paulo)
10) cn-north-1 : China (Beijing)
(default is 3): 8

Select an application to use
1) oreno-worker
2) eb-sinatra
3) [ Create new Application ]
(default is 3): 3

Enter Application Name
(default is "oreno-eb-sinatra"): oreno-eb-sinatra-worker
Application oreno-eb-sinatra-worker has been created.

It appears you are using Ruby. Is this correct?
(y/n): y

Select a platform version.
1) Ruby 2.2 (Puma)
2) Ruby 2.1 (Puma)
3) Ruby 2.0 (Puma)
4) Ruby 2.2 (Passenger Standalone)
5) Ruby 2.1 (Passenger Standalone)
6) Ruby 2.0 (Passenger Standalone)
7) Ruby 1.9.3
(default is 1): 1
Do you want to set up SSH for your instances?
(y/n): y

Select a keypair.
1) key1
2) key2
3) key3
4) key4
5) [ Create new KeyPair ]
(default is 5): 3
雑な Worker アプリケーション
Sinatra を使って / に HTTP アクセスすると /tmp/sinatra.log に Hello World! とリクエストヘッダをダンプするだけの超簡単な Worker アプリケーションを作ってみる。
- Gemfile
source 'http://rubygems.org'
gem 'sinatra'
- config.ru
require './helloworld'
run Sinatra::Application
- helloworld.rb
require 'sinatra'
require 'logger'

logger = Logger.new('/tmp/sinatra.log')

post '/' do
  logger.info "Hello World!"
  http_headers = request.env.select { |k, v| k.start_with?('HTTP_')}
  logger.info http_headers
end
ebcli で Worker Tier を起動する
ebcli で Worker Tier を起動するには --tier worker オプションを利用する。また、合わせて --instance_profile で IAM role を指定する。
% eb create --tier worker --instance_profile aws-elasticbeanstalk-ec2-worker-role
Enter Environment Name
(default is oreno-eb-sinatra-worke): oreno-eb-sinatra-worker
WARNING: You have uncommitted changes.
Creating application version archive "app-52ef-151129_122719".
Uploading oreno-eb-sinatra-worker/app-52ef-151129_122719.zip to S3. This may take a while.
Upload Complete.
Environment details for: oreno-eb-sinatra-worker
  Application name: oreno-eb-sinatra-worker
  Region: ap-northeast-1
  Deployed Version: app-52ef-151129_122719
  Environment ID: e-xxxxxxxxxx
  Platform: 64bit Amazon Linux 2015.09 v2.0.4 running Ruby 2.2 (Puma)
  Tier: Worker-SQS/HTTP
  CNAME: UNKNOWN
  Updated: 2015-11-29 03:27:23.689000+00:00
Printing Status:
INFO: createEnvironment is starting.
INFO: Using elasticbeanstalk-ap-northeast-1-xxxxxxxxxxxx as Amazon S3 storage bucket for environment data.
INFO: Environment health has transitioned to Pending. There are no instances.
INFO: Created security group named: awseb-e-xxxxxxxxxx-stack-AWSEBSecurityGroup-XXXXXXXXXXXXXX
INFO: Created Auto Scaling launch configuration named: awseb-e-xxxxxxxxxx-stack-AWSEBAutoScalingLaunchConfiguration-XXXXXXXXXXXXXX
INFO: Added instance [i-xxxxxxx] to your environment.
INFO: Created Auto Scaling group named: awseb-e-xxxxxxxxxx-stack-AWSEBAutoScalingGroup-XXXXXXXXXXXXXX
INFO: Waiting for EC2 instances to launch. This may take a few minutes.
INFO: Created Auto Scaling group policy named: arn:aws:autoscaling:ap-northeast-1:xxxxxxxxxxxx:scalingPolicy:65f129b5-91f6-4ef7-afc6-ca0cc21cbad2:autoScalingGroupName/awseb-e-xxxxxxxxxx-stack-AWSEBAutoScalingGroup-XXXXXXXXXXXXXX:policyName/awseb-e-xxxxxxxxxx-stack-AWSEBAutoScalingScaleUpPolicy-XXXXXXXXXXXXXX
INFO: Created Auto Scaling group policy named: arn:aws:autoscaling:ap-northeast-1:xxxxxxxxxxxx:scalingPolicy:118024ed-e434-45a3-9aa2-cdda3d60aa11:autoScalingGroupName/awseb-e-xxxxxxxxxx-stack-AWSEBAutoScalingGroup-XXXXXXXXXXXXXX:policyName/awseb-e-xxxxxxxxxx-stack-AWSEBAutoScalingScaleDownPolicy-XXXXXXXXXXXXXX
INFO: Created CloudWatch alarm named: awseb-e-xxxxxxxxxx-stack-AWSEBCloudwatchAlarmHigh-XXXXXXXXXXXXXX
INFO: Created CloudWatch alarm named: awseb-e-xxxxxxxxxx-stack-AWSEBCloudwatchAlarmLow-XXXXXXXXXXXXXX
INFO: Successfully loaded 1 scheduled tasks from cron.yaml.
INFO: Environment health has transitioned from Pending to Ok.
INFO: Successfully launched environment: oreno-eb-sinatra-worker
Ctrl + c でプロンプトに戻ることが出来る。その間もインスタンスの作成等の環境構築が進行している。その確認は eb statsu で確認することが出来る。(以下の状態はインスタンスの起動中の為 status: Launching で Health: Grey となっている。また、Tier: Worker-SQS/HTTP となっており Worker として環境が起動していることが判る。 )
% eb status
Environment details for: oreno-eb-sinatra-worker
  Application name: oreno-eb-sinatra-worker
  Region: ap-northeast-1
  Deployed Version: None
  Environment ID: e-wruk4dmtq8
  Platform: 64bit Amazon Linux 2015.09 v2.0.4 running Ruby 2.2 (Puma)
  Tier: Worker-SQS/HTTP
  CNAME: UNKNOWN
  Updated: 2015-11-29 13:54:04.618000+00:00
  Status: Launching
  Health: Grey
暫くすると…以下のように Status と Health の状態が変わって必要な環境の構築が終了となる。
% eb status
Environment details for: oreno-eb-sinatra-worker
  Application name: oreno-eb-sinatra-worker
  Region: ap-northeast-1
  Deployed Version: app-52ef-151129_225352
  Environment ID: e-wruk4dmtq8
  Platform: 64bit Amazon Linux 2015.09 v2.0.4 running Ruby 2.2 (Puma)
  Tier: Worker-SQS/HTTP
  CNAME: UNKNOWN
  Updated: 2015-11-29 13:56:58.315000+00:00
  Status: Launching
  Health: Green
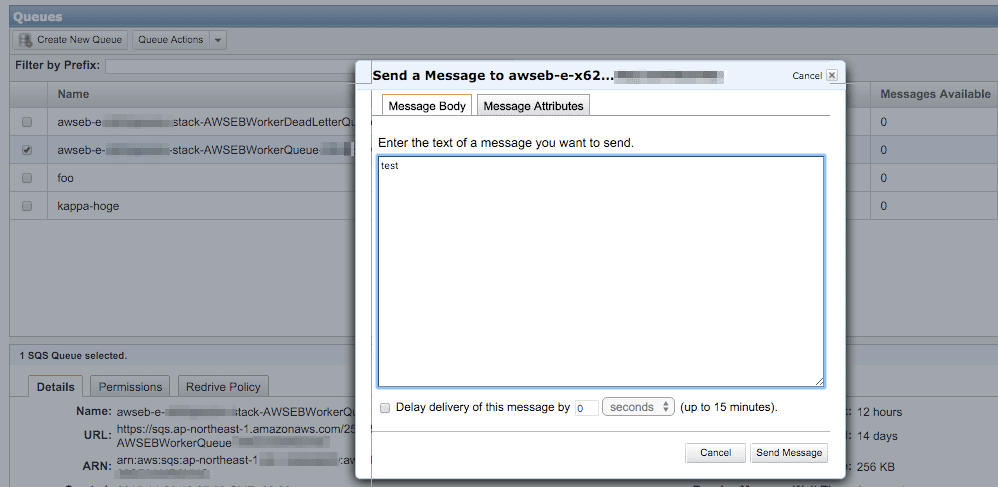
以下のように SQS のキューも作成されている。

おお。
eb ssh でインスタンスにログイン
% eb ssh
INFO: Attempting to open port 22.
INFO: SSH port 22 open.
Last login: Sun Nov 29 03:33:32 2015 from xxx.xxx.xxx.jp
 _____ _           _   _      ____                       _        _ _
| ____| | __ _ ___| |_(_) ___| __ )  ___  __ _ _ __  ___| |_ __ _| | | __
|  _| | |/ _` / __| __| |/ __|  _  / _ / _` | '_ / __| __/ _` | | |/ /
| |___| | (_| __  |_| | (__| |_) |  __/ (_| | | | __  || (_| | |   <
|_____|_|__,_|___/__|_|___|____/ ___|__,_|_| |_|___/____,_|_|_|_
                                       Amazon Linux AMI

This EC2 instance is managed by AWS Elastic Beanstalk. Changes made via SSH
WILL BE LOST if the instance is replaced by auto-scaling. For more information
on customizing your Elastic Beanstalk environment, see our documentation here:
http://docs.aws.amazon.com/elasticbeanstalk/latest/dg/customize-containers-ec2.html
-bash: warning: setlocale: LC_CTYPE: cannot change locale (UTF-8): No such file or directory
[ec2-user@ip-xx-xxx-xxx-xxx ~]$
手動でキューにメッセージを送る

以下のようにアプリケーションのログが出力されている。
$ cat /tmp/sinatra.log
# Logfile created on 2015-11-29 03:31:05 +0000 by logger.rb/47272
I, [2015-11-29T03:34:25.483217 #2023]  INFO -- : Hello World!
I, [2015-11-29T03:34:25.483344 #2023]  INFO -- : {"HTTP_VERSION"=>"HTTP/1.0", "HTTP_HOST"=>"localhost", "HTTP_X_FORWARDED_FOR"=>"127.0.0.1", "HTTP_CONNECTION"=>"close", "HTTP_USER_AGENT"=>"aws-sqsd/2.0", "HTTP_X_AWS_SQSD_MSGID"=>"ff89eb93-b3cc-46e2-860f-2b6a500b32b3", "HTTP_X_AWS_SQSD_RECEIVE_COUNT"=>"1", "HTTP_X_AWS_SQSD_FIRST_RECEIVED_AT"=>"2015-11-29T03:34:25Z", "HTTP_X_AWS_SQSD_SENT_AT"=>"2015-11-29T03:34:25Z", "HTTP_X_AWS_SQSD_QUEUE"=>"awseb-e-xxxxxxxxxx-stack-AWSEBWorkerQueue-XXXXXXXXXXXXXX", "HTTP_X_AWS_SQSD_PATH"=>"", "HTTP_X_AWS_SQSD_SENDER_ID"=>"xxxxxxxxxxxx"}
cron っぽいことをする
こちらやこちらを参考にして cron っぽいことをやってみたいので、アプリケーションのルートディレクトリに cron.yaml を以下のように作成する。
version: 1
cron:
 - name: "test"
   url: "/"
   schedule: "*/5 * * * *"
上記の設定で aws-sqsd が 5 分毎に / に HTTP アクセスする。
作成したらアプリケーションをデプロイする。
% ls -l
total 32
-rw-r--r--  1 kappa  staff   43 Nov 28 19:30 Gemfile
-rw-r--r--  1 kappa  staff   48 Nov 28 19:29 config.ru
-rw-r--r--  1 kappa  staff   72 Nov 29 11:42 cron.yaml
drwxr-xr-x  3 kappa  staff  102 Nov 29 11:43 elasticbeanstalk
-rw-r--r--  1 kappa  staff  218 Nov 29 01:13 helloworld.rb
% git add .
% git commit -m "add cron.yaml"
% eb deploy
WARNING: You have uncommitted changes.
Creating application version archive "app-52ef-151129_221803".
Uploading oreno-eb-sinatra-worker/app-52ef-151129_221803.zip to S3. This may take a while.
Upload Complete.
INFO: Environment update is starting.
INFO: Deploying new version to instance(s).
INFO: Successfully loaded 1 scheduled tasks from cron.yaml.
INFO: New application version was deployed to running EC2 instances.
INFO: Environment update completed successfully.
インスタンスにログインして確認する。
$ tail -f /tmp/sinatra.log
I, [2015-11-29T02:49:59.908826 #2708]  INFO -- : Hello World!
I, [2015-11-29T02:49:59.908955 #2708]  INFO -- : {"HTTP_VERSION"=>"HTTP/1.0", "HTTP_HOST"=>"localhost", "HTTP_X_FORWARDED_FOR"=>"127.0.0.1", "HTTP_CONNECTION"=>"close", "HTTP_USER_AGENT"=>"aws-sqsd/2.0", "HTTP_X_AWS_SQSD_MSGID"=>"3422e8f4-7023-4bf0-89e7-db882fdf9618", "HTTP_X_AWS_SQSD_RECEIVE_COUNT"=>"1", "HTTP_X_AWS_SQSD_FIRST_RECEIVED_AT"=>"2015-11-29T02:49:59Z", "HTTP_X_AWS_SQSD_SENT_AT"=>"2015-11-29T02:49:59Z", "HTTP_X_AWS_SQSD_QUEUE"=>"awseb-e-qmjp6upame-stack-AWSEBWorkerQueue-XXXXXXXXXXXXX", "HTTP_X_AWS_SQSD_PATH"=>"/", "HTTP_X_AWS_SQSD_SENDER_ID"=>"XXXXXXXXXXXXXXXXXXXXXX:i-xxxxxxxx", "HTTP_X_AWS_SQSD_SCHEDULED_AT"=>"2015-11-29T02:50:00Z", "HTTP_X_AWS_SQSD_TASKNAME"=>"test"}
I, [2015-11-29T02:54:59.878897 #2708]  INFO -- : Hello World!
I, [2015-11-29T02:54:59.879049 #2708]  INFO -- : {"HTTP_VERSION"=>"HTTP/1.0", "HTTP_HOST"=>"localhost", "HTTP_X_FORWARDED_FOR"=>"127.0.0.1", "HTTP_CONNECTION"=>"close", "HTTP_USER_AGENT"=>"aws-sqsd/2.0", "HTTP_X_AWS_SQSD_MSGID"=>"3fde7c59-7535-4ec0-9567-374a90a24eb7", "HTTP_X_AWS_SQSD_RECEIVE_COUNT"=>"1", "HTTP_X_AWS_SQSD_FIRST_RECEIVED_AT"=>"2015-11-29T02:54:59Z", "HTTP_X_AWS_SQSD_SENT_AT"=>"2015-11-29T02:54:59Z", "HTTP_X_AWS_SQSD_QUEUE"=>"awseb-e-qmjp6upame-stack-AWSEBWorkerQueue-XXXXXXXXXXXXX", "HTTP_X_AWS_SQSD_PATH"=>"/", "HTTP_X_AWS_SQSD_SENDER_ID"=>"XXXXXXXXXXXXXXXXXXXXXX:i-xxxxxxxx", "HTTP_X_AWS_SQSD_SCHEDULED_AT"=>"2015-11-29T02:55:00Z", "HTTP_X_AWS_SQSD_TASKNAME"=>"test"}
タイムスタンプを見ると 5 分ごとにアクセスが発生していることが判る。
あとかたづけ
EC2 や SQS もまとめてターミネート。
% eb terminate
The environment "oreno-eb-sinatra-worker" and all associated instances will be terminated.
To confirm, type the environment name: oreno-eb-sinatra-worker
INFO: terminateEnvironment is starting.
INFO: Deleted CloudWatch alarm named: awseb-e-xxxxxxxxxx-stack-AWSEBCloudwatchAlarmLow-XXXXXXXXXXXXX
INFO: Deleted CloudWatch alarm named: awseb-e-xxxxxxxxxx-stack-AWSEBCloudwatchAlarmHigh-XXXXXXXXXXXXX
INFO: Deleted Auto Scaling group policy named: arn:aws:autoscaling:ap-northeast-1:XXXXXXXXXXXX:scalingPolicy:65f129b5-91f6-4ef7-afc6-ca0cc21cbad2:autoScalingGroupName/awseb-e-xxxxxxxxxx-stack-AWSEBAutoScalingGroup-XXXXXXXXXXXXX:policyName/awseb-e-xxxxxxxxxx-stack-AWSEBAutoScalingScaleUpPolicy-XXXXXXXXXXXXX
INFO: Deleted Auto Scaling group policy named: arn:aws:autoscaling:ap-northeast-1:XXXXXXXXXXXX:scalingPolicy:118024ed-e434-45a3-9aa2-cdda3d60aa11:autoScalingGroupName/awseb-e-xxxxxxxxxx-stack-AWSEBAutoScalingGroup-XXXXXXXXXXXXX:policyName/awseb-e-xxxxxxxxxx-stack-AWSEBAutoScalingScaleDownPolicy-XXXXXXXXXXXXXINFO: Waiting for EC2 instances to terminate. This may take a few minutes.
INFO: Deleted Auto Scaling group named: awseb-e-xxxxxxxxxx-stack-AWSEBAutoScalingGroup-XXXXXXXXXXXXXINFO: Deleted Auto Scaling launch configuration named: awseb-e-xxxxxxxxxx-stack-AWSEBAutoScalingLaunchConfiguration-XXXXXXXXXXXXX
INFO: Deleted security group named: awseb-e-xxxxxxxxxx-stack-AWSEBSecurityGroup-XXXXXXXXXXXXX
INFO: Removed instance [i-xxxxxxxx] from your environment.
INFO: Deleting SNS topic for environment oreno-eb-sinatra-worker.
INFO: terminateEnvironment completed successfully.
以上
Elastic Beanstalk を使って Cron っぽい動作は cron.yaml を置くだけで簡単に実装出来ることが解った。Lambda と単純に比較出来るわけでもなく、サーバレスアーキテクチャでも無いが、既存のアプリケーションを手軽にバッチ処理として利用する面では Elastic Beanstalk の Worker Tier も選択肢の一つになると考えている。(※実際にプロダクション環境等で利用する場合にはアプリケーションのエラー処理、タイムアウト処理等を実装する必要がある)
以上。
元記事はこちら
「(超メモ)Elastic Beanstalk の Worker Tier について(cron っぽいことをやってみる)」


