
以前紹介した記事VPC上にOpenVPN(CentOS6)をインストールにてCentOS上にOpenVPNサーバを稼働させることが出来ました。
今回は、クライアントマシン(Mac)からそのサーバにVPN接続を試みてみます。
(1) [サーバ側作業] クライアントの鍵と証明書の作成準備
# cd /usr/share/doc/openvpn-2.2.2/easy-rsa/2.0/
# source ./vars
NOTE: If you run ./clean-all, I will be doing a rm -rf on /usr/share/doc/openvpn-2.2.2/easy-rsa/2.0/key
CA(認証局)やサーバの鍵と証明書を作成した場所と同じところで作成します。
(2) [サーバ側作業] クライアントの鍵と証明書の作成
# ./build-key client1
Generating a 1024 bit RSA private key
..++++++
..++++++
writing new private key to 'client1.key'
-----
You are about to be asked to enter information that will be incorporated
into your certificate request.
What you are about to enter is what is called a Distinguished Name or a DN.
There are quite a few fields but you can leave some blank
For some fields there will be a default value,
If you enter '.', the field will be left blank.
-----
Country Name (2 letter code) [US]:
State or Province Name (full name) [CA]:
Locality Name (eg, city) [SanFrancisco]:
Organization Name (eg, company) [Fort-Funston]:
Organizational Unit Name (eg, section) [changeme]:
Common Name (eg, your name or your server's hostname) [client1]:
Name [changeme]:
Email Address [mail@host.domain]:

Please enter the following 'extra' attributes
to be sent with your certificate request
A challenge password []:
An optional company name []:
Using configuration from /usr/share/doc/openvpn-2.2.2/easy-rsa/2.0/openssl.cnf
Check that the request matches the signature
Signature ok
The Subject's Distinguished Name is as follows
countryName           :PRINTABLE:'US'
stateOrProvinceName   :PRINTABLE:'CA'
localityName          :PRINTABLE:'SanFrancisco'
organizationName      :PRINTABLE:'Fort-Funston'
organizationalUnitName:PRINTABLE:'changeme'
commonName            :PRINTABLE:'client1'
name                  :PRINTABLE:'changeme'
emailAddress          :IA5STRING:'mail@host.domain'
Certificate is to be certified until Sep 25 18:24:58 2022 GMT (3650 days)
Sign the certificate? [y/n]:y


1 out of 1 certificate requests certified, commit? [y/n]y
Write out database with 1 new entries
Data Base Updated
デフォルト設定で作成すると、下記のようにクライアントに関するファイルが追加されます。
# ls -1 keys/
01.pem
02.pem
ca.crt
ca.key
client1.crt
client1.csr
client1.key
dh1024.pem
index.txt
index.txt.attr
index.txt.attr.old
index.txt.old
serial
serial.old
server.crt
server.csr
server.key
クライアントの鍵はclient1.keyで証明書はclient1.crtとなります。
(3) [クライアント側作業] Tunnelblick(Mac用OpenVPNクライアント)のインストール
Macで利用できるOpenVPNのGUIクライアント(tunnelblick)をインストールします。
tunnelblick – OpenVPN GUI for Mac OS X – Google Project Hosting

Stable版を利用しようとしたところ、10.8(Mountain Lion)には推奨しないとのことでした。

そこで、10.8(Mountain Lion)も対応と謳っている下記ベータ版を利用しました。

ダウンロードしてクリックすると下記画面からインストールすることができます。

(4) [クライアント側作業] 鍵と証明書ファイルの配置
$ cd
$ cd Library/openvpn/
$ ls
ca.crt  client1.crt client1.key
サーバ側で作成したクライアントの鍵(client1.key)と証明書(client1.crt)、そしてCA(認証局)の証明書(ca.crt)をユーザーのホームディレクトリLibrary/openvpn/に配置します。
(5) [クライアント側作業] OpenVPNの設定ファイルの配置と編集
サーバ側のファイル/usr/share/doc/openvpn-2.2.2/sample-config-files/client.confをclient1.confとし、鍵は証明書を配置したのと同じディレクトリ(ユーザーのホームディレクトリのLibrary/openvpn/)に配置します。
そして、下記の部分を変更します。
...
remote my-server-1 1194
...
cert client.crt
key client.key
...
変更後は、下記のようになります。
...
remote 54.249.30.190 1194
...
cert client1.crt
key client1.key
...
remoteはサーバのグローバルIPアドレス(EIP)に、クライアントの鍵と証明書は、上記で作成・配置したもの(client1.key/client1.crt)に変更します。
$ ls
ca.crt  client1.conf client1.crt client1.key
最終的に、ユーザーのホームディレクトリのLibrary/openvpn/配下は上記のようになります。
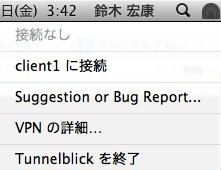
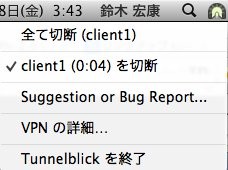
(6) [クライアント側作業] TunnelBlickの起動
client1に接続できるようになっているため、選択することでclient1の設定、つまりVPC上のサーバと
VPN接続することができます。
$ ifconfig tun0 tun0: flags=8851mtu 1500 inet 10.8.0.6 --> 10.8.0.5 netmask 0xffffffff open (pid 4218)
トンネルインターフェース(tun0)が10.8.0.6で設定されていることがわかります。
$ netstat -nr
Routing tables

Internet:
Destination     Gateway            Flags    Refs   Use  Netif  Expire
default         192.168.11.1       UGSc       30     0    en0
10.8.0.1/32     10.8.0.5           UGSc        0     0   tun0
10.8.0.5        10.8.0.6           UH          1     0   tun0
127             127.0.0.1          UCS         0     0    lo0
127.0.0.1       127.0.0.1          UH          5  7943    lo0
169.254         link#4             UCS         0     0    en0
192.168.11      link#4             UCS         3     0    en0
192.168.11.1    0:16:1:8b:a:f4     UHLWIir    31  1077    en0    1179
192.168.11.31   d0:23:db:45:5f:be  UHLWIi      0   145    en0     511
192.168.11.32   127.0.0.1          UHS         0     0    lo0
192.168.11.255  ff:ff:ff:ff:ff:ff  UHLWbI      0     5    en0
ルーティング(tun0)も設定されています。
(7) [クライアント側作業] サーバへの接続確認
pingコマンドにて確認すると、サーバ(10.8.0.1)に疎通ができているのが確認できます。
$ ping 10.8.0.1
PING 10.8.0.1 (10.8.0.1): 56 data bytes
64 bytes from 10.8.0.1: icmp_seq=0 ttl=64 time=14.487 ms
64 bytes from 10.8.0.1: icmp_seq=1 ttl=64 time=12.533 ms
64 bytes from 10.8.0.1: icmp_seq=2 ttl=64 time=13.144 ms
64 bytes from 10.8.0.1: icmp_seq=3 ttl=64 time=11.017 ms
64 bytes from 10.8.0.1: icmp_seq=4 ttl=64 time=12.979 ms
(8) [サーバ側作業] クライアントへの接続確認
pingコマンドにて確認すると、クライアント(10.8.0.6)に疎通ができているのが確認できます。
# ping 10.8.0.6
PING 10.8.0.6 (10.8.0.6) 56(84) bytes of data.
64 bytes from 10.8.0.6: icmp_seq=1 ttl=64 time=58.2 ms
64 bytes from 10.8.0.6: icmp_seq=2 ttl=64 time=80.5 ms
64 bytes from 10.8.0.6: icmp_seq=3 ttl=64 time=103 ms
64 bytes from 10.8.0.6: icmp_seq=4 ttl=64 time=10.9 ms
64 bytes from 10.8.0.6: icmp_seq=5 ttl=64 time=45.8 ms