目次
- 1.まえがき
- 2.AWS SAMとは?
- 3.Cloud9:初期セットアップ
- 4.Python 3.10.0をインストールする
- 5.AWS-CLIの最新化
- 6.SAM-CLIの最新化
- 7.Cloud9から、AWS SAMを使用してデプロイを試してみる
- 8.AWS SAMからLambda関数をデプロイする
- 9.AWS SAMでデプロイしたリソースを削除する。
- 10.まとめ
1.まえがき
この記事では、AWS Cloud9環境でPython 3.10.0とAWS SAM (Serverless Application Model) を使った開発を始めるための初期構築手順をご紹介します。
- OpenSSLのバージョン確認・更新方法
- Python 3.10.0とのインストール・設定。さらにAWS CLI(Ver2系へのアップデート)とAWS SAM CLIの最新化
- 簡単なハローワールドPythonアプリをコーディングしたLambda関数のデプロイ
AWS SAMは既に多くのプロジェクトで活用されており便利ですが、
さらに開発スピードを上げるため、Cloud9を実行環境として採用しデプロイを行うというタスクに挑戦しました。
Cloud9は開発環境の構築を簡単にし、私たち開発者の貴重な時間を節約してくれる便利なツールですが、初期設定方法などが少し複雑でした。
今回はその経験と知識を共有し、同じ問題に直面している皆さんのお力になれれば幸いです。
2.そもそもAWS SAMとは?
AWS サーバーレスアプリケーションモデル (AWS SAM) は、サーバーレスアプリケーション構築用のオープンソースフレームワークです。
https://pages.awscloud.com/rs/112-TZM-766/images/20190814_AWS-Blackbelt_SAM_rev.pdf
以下の特徴があります。
CloudFormationの拡張機能である。
AWS SAM は AWS CloudFormation の拡張であるため、リソースを記載する書式はCloudFormationと同様のYAMLとなります。
また、同一テンプレートファイルにCloudFormation及びSAM両方の構文を使用できます。
サーバレスアプリケーションを作成するためのリソース定義があり、CloudFormation で記述するよりも簡易に記載することが可能です。
AWSのサーバーレスアーキテクチャを少ないコード量で書ける。
AWS公式ドキュメントでは、通常CloudFormationで200 行以上を要するサーバーレスアーキテクチャをAWS SAMでは23行で表現していました。
AWS CDKとの比較
AWS SAMの話題となると「SAMとCDKは何が違うのか?」といった話によくなるかと思います。
実はCDKもCloudFormationを利用してAWSリソースをデプロイするためのIaCサービスです。
違いとしてはCDKはサーバレスアプリケーションに限らず、AWS のリソースをプログラミング言語で記載することが可能です。
そのため、例えば繰り返し処理にて複数リソースを作成すると言ったロジックを組み込むことや、
言語ごとのテストフレームワークを使って、定義したリソースのテストコードを記述することもできます。
CDKで使用が可能な言語はAWS公式のQ&Aにも記載があるように、一般公開されている言語としてJavaScript、TypeScript、Python、Java、C# 。開発者プレビューでは Go がサポートされています。
AWS Cloud Development Kit (CDK)とは
AWS CDKが採用されるユースケース
- AWSサーバレスリソースに限らずに、AWS リソースを利用する
- コードのテストを行いたい
- Lambda などのアプリケーションコードとプログラミング言語を揃えたい
- プログラミング経験が豊富
AWS SAMが採用されるユースケース
- AWSサーバレスリソースのみを利用する
- YAML記法 に抵抗がない
- CloudFormationの経験がある
- プログラミング経験がないor少ない
もしCDKとSAMで迷われている方は上記ユースケースで照らし合わせてみて、よりマッチするサービスを選定すると良いでしょう。
AWS SAMの実行環境
Cloud9をAWS SAMの実行環境として選びました。Cloud9の採用理由は次のとおりです。
IAMロールによる認証
Cloud9はEC2インスタンスに紐づいたIAMロールを使用してAWSサービスへアクセスが可能です。
通常ローカル環境からSAMを実行する場合は、AWSのアクセスキーやシークレットキーが必要ですが、
Cloud9を利用することにより、これらが不要となり、よりセキュアなアクセスが可能となります。
開発環境の統一化
Cloud9はクラウドベースの環境であり、異なるOSやハードウェアを使用する開発メンバー間でも開発環境を統一できます。
ython3.10.0をインストールす
Cloud9はAWSが管理するサービスであり、パッチの適用やソフトウェアのアップデートなど、煩雑な運用管理から解放されます。
低コスト
Cloud9は裏でEC2インスタンスを稼働させており、利用料金はその稼働時間に基づきます。
しかし、一定時間操作がない場合にはEC2が自動で停止し、コストを削減することが可能です。
AWS Cloud9 料金
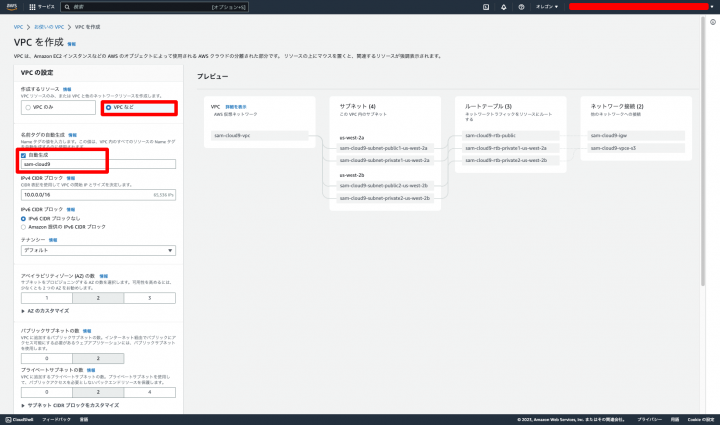
3.Cloud9:初期セットアップ
Cloud9構築用のVPCを作成する。(VPCがすでに存在している場合は、スキップで問題ありません。)
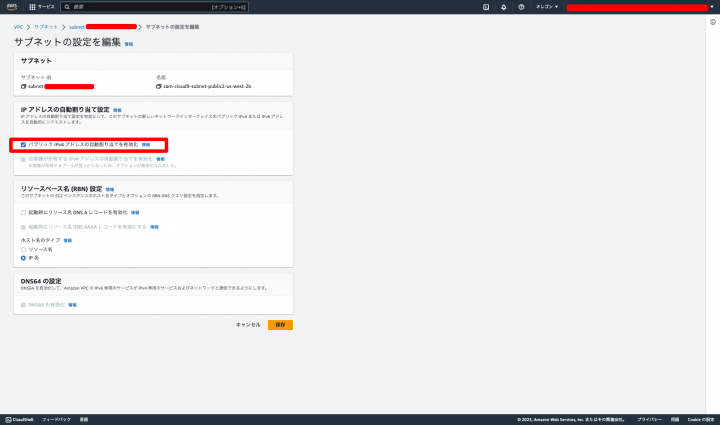
パブリックサブネットで自動パブリックIP付与をONにする(既存VPCでOFFの場合は、ONに再設定が必要です)
「VPC」サービス画面→左ペイン「サブネット」→VPCのパブリックサブネットをクリック→「アクション」→「サブネットの設定を編集」→「パブリック IPv4 アドレスの自動割り当てを有効化」に✔を入れる。
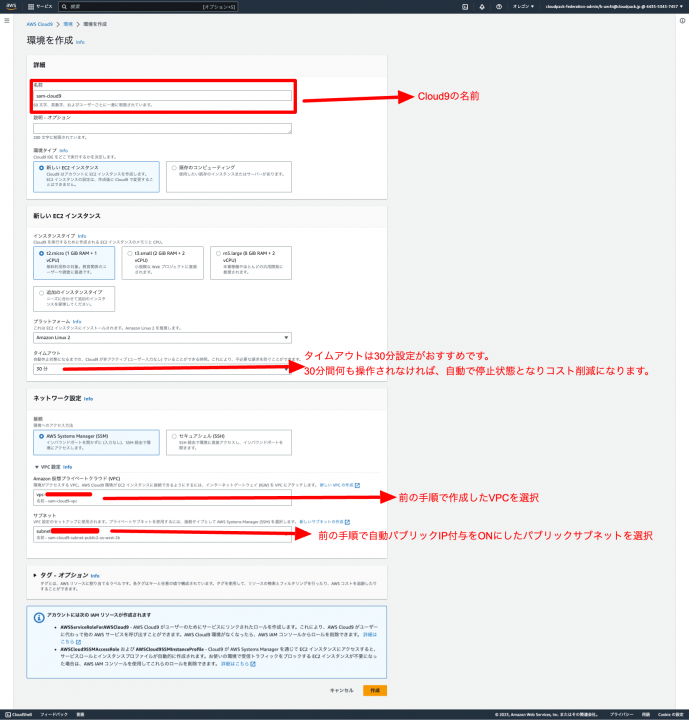
Cloud9からインスタンス新規作成し起動する
「Cloud9」サービス画面→「環境を作成」
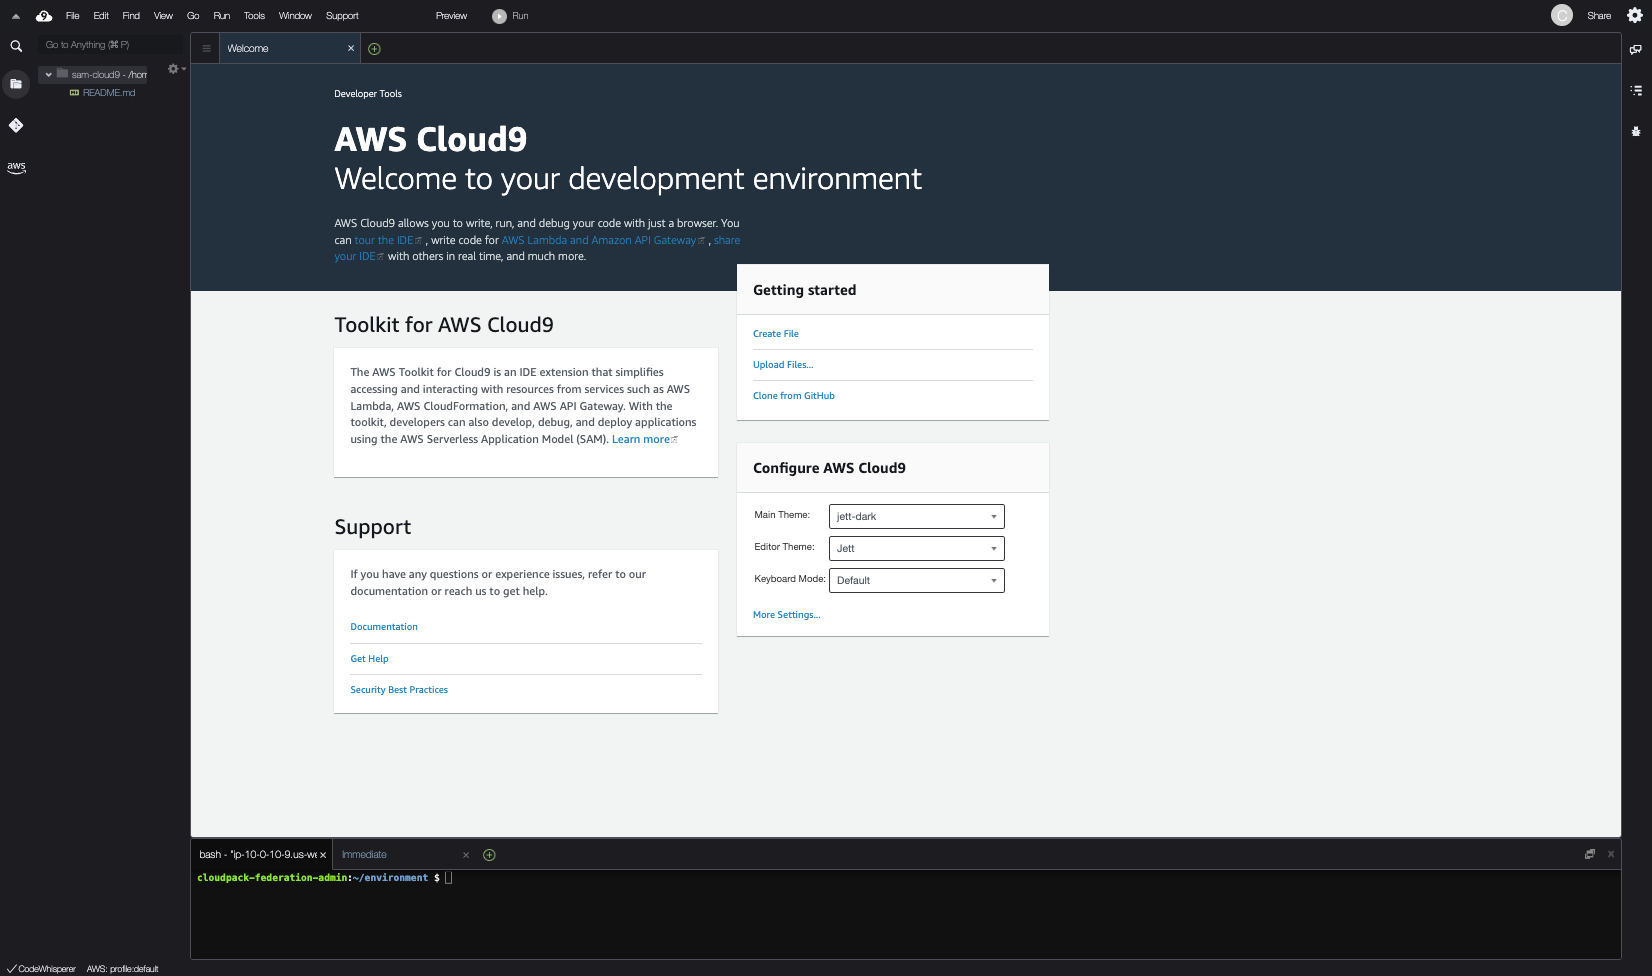
作成後、対象Cloud9の「開く」リンクをクリックして以下welcome画面が開かれることを確認する。
4.Python3.10.0をインストールする
2023/07/18時点でCloud9にインストールされているPythonは3.7.16のため、Lambdaの最新ランタイムでもある3.10.0にバージョンアップします。
注意事項として、※3.10.0以降はopensslが必要。
- 現在使用されているPython verを確認し、3.10.0以下であれば後続手順を踏んでアップデートする。
python --version
現時点(2023/07/20)では、Cloud9のPythonは3.7.16が使用されていました。
$ python --version
Python 3.7.16
- yumパッケージをアップデート
sudo yum update -y
実行結果
$ sudo yum update -y
Loaded plugins: extras_suggestions, langpacks, priorities, update-motd
244 packages excluded due to repository priority protections
No packages marked for update
- openssl-develがインストールされているか確認する。
sudo yum info openssl-devel
→Installed Packages(インストール済)
→Available Packages(未インストール)
もしこの時点で →Installed Packages(インストール済) が表示される場合は
削除コマンドを実施し、アンインストール対応が必要です。
sudo yum remove -y openssl-devel
実行結果
sudo yum info openssl-devel
Loaded plugins: extras_suggestions, langpacks, priorities, update-motd
244 packages excluded due to repository priority protections
Installed Packages
Name : openssl-devel
Arch : x86_64
Epoch : 1
Version : 1.0.2k
Release : 24.amzn2.0.7
Size : 3.1 M
Repo : installed
From repo : amzn2-core
Summary : Files for development of applications which will use OpenSSL
URL : http://www.openssl.org/
License : OpenSSL
Description : OpenSSL is a toolkit for supporting cryptography. The openssl-devel
: package contains include files needed to develop applications which
: support various cryptographic algorithms and protocols.
→Installed Packages(インストール済)が表示されているため、アンインストール対応を実行する。
実行結果
$ sudo yum remove -y openssl-devel
Loaded plugins: extras_suggestions, langpacks, priorities, update-motd
Resolving Dependencies
--> Running transaction check
---> Package openssl-devel.x86_64 1:1.0.2k-24.amzn2.0.7 will be erased
--> Finished Dependency Resolution
amzn2-core/2/x86_64 | 3.7 kB 00:00:00

Dependencies Resolved

==============================================================================================================================================================================================
Package Arch Version Repository Size
==============================================================================================================================================================================================
Removing:
openssl-devel x86_64 1:1.0.2k-24.amzn2.0.7 @amzn2-core 3.1 M

Transaction Summary
==============================================================================================================================================================================================
Remove 1 Package

Installed size: 3.1 M
Downloading packages:
Running transaction check
Running transaction test
Transaction test succeeded
Running transaction
Erasing : 1:openssl-devel-1.0.2k-24.amzn2.0.7.x86_64 1/1
Verifying : 1:openssl-devel-1.0.2k-24.amzn2.0.7.x86_64 1/1

Removed:
openssl-devel.x86_64 1:1.0.2k-24.amzn2.0.7

Complete!
- opensslのverを確認する。OpenSSL 1.1.1未満ではエラーとなるため、その場合は後続手順実施する。
openssl version
実行結果
openssl version
OpenSSL 1.0.2k-fips 26 Jan 2017
- opensslの更新
sudo yum install -y openssl11 openssl11-devel
もしこの時点で Error: openssl11-devel conflicts with 1:openssl-devel-1.0.2k-24.amzn2.0.2.x86_64 が出力される場合は
削除コマンドを実施し、アンインストール対応が必要です。その後再度「opensslの更新」を実施する。
sudo yum remove -y openssl-devel
実行結果
$ sudo yum install -y openssl11 openssl11-devel
Loaded plugins: extras_suggestions, langpacks, priorities, update-motd
244 packages excluded due to repository priority protections
Package 1:openssl11-1.1.1g-12.amzn2.0.15.x86_64 already installed and latest version
Resolving Dependencies
--> Running transaction check
---> Package openssl11-devel.x86_64 1:1.1.1g-12.amzn2.0.15 will be installed
--> Finished Dependency Resolution

Dependencies Resolved

==============================================================================================================================================================================================
Package Arch Version Repository Size
==============================================================================================================================================================================================
Installing:
openssl11-devel x86_64 1:1.1.1g-12.amzn2.0.15 amzn2-core 464 k

Transaction Summary
==============================================================================================================================================================================================
Install 1 Package

Total download size: 464 k
Installed size: 1.9 M
Downloading packages:
openssl11-devel-1.1.1g-12.amzn2.0.15.x86_64.rpm | 464 kB 00:00:00
Running transaction check
Running transaction test
Transaction test succeeded
Running transaction
Installing : 1:openssl11-devel-1.1.1g-12.amzn2.0.15.x86_64 1/1
Verifying : 1:openssl11-devel-1.1.1g-12.amzn2.0.15.x86_64 1/1

Installed:
openssl11-devel.x86_64 1:1.1.1g-12.amzn2.0.15

Complete!
- openssl11のverを確認する。
openssl11 version
実行結果
openssl11 version
OpenSSL 1.1.1g FIPS 21 Apr 2020
- Python3.10.0のインストールに必要なパッケージをインストール
sudo yum install -y bzip2-devel xz-devel
実行結果
$ sudo yum install -y bzip2-devel xz-devel
Loaded plugins: extras_suggestions, langpacks, priorities, update-motd
244 packages excluded due to repository priority protections
Resolving Dependencies
--> Running transaction check
---> Package bzip2-devel.x86_64 0:1.0.6-13.amzn2.0.3 will be installed
---> Package xz-devel.x86_64 0:5.2.2-1.amzn2.0.3 will be installed
--> Finished Dependency Resolution

Dependencies Resolved

==============================================================================================================================================================================================
Package Arch Version Repository Size
==============================================================================================================================================================================================
Installing:
bzip2-devel x86_64 1.0.6-13.amzn2.0.3 amzn2-core 218 k
xz-devel x86_64 5.2.2-1.amzn2.0.3 amzn2-core 46 k

Transaction Summary
==============================================================================================================================================================================================
Install 2 Packages

Total download size: 265 k
Installed size: 547 k
Downloading packages:
(1/2): xz-devel-5.2.2-1.amzn2.0.3.x86_64.rpm | 46 kB 00:00:00
(2/2): bzip2-devel-1.0.6-13.amzn2.0.3.x86_64.rpm | 218 kB 00:00:00
----------------------------------------------------------------------------------------------------------------------------------------------------------------------------------------------
Total 1.9 MB/s | 265 kB 00:00:00
Running transaction check
Running transaction test
Transaction test succeeded
Running transaction
Installing : xz-devel-5.2.2-1.amzn2.0.3.x86_64 1/2
Installing : bzip2-devel-1.0.6-13.amzn2.0.3.x86_64 2/2
Verifying : bzip2-devel-1.0.6-13.amzn2.0.3.x86_64 1/2
Verifying : xz-devel-5.2.2-1.amzn2.0.3.x86_64 2/2

Installed:
bzip2-devel.x86_64 0:1.0.6-13.amzn2.0.3 xz-devel.x86_64 0:5.2.2-1.amzn2.0.3

Complete!
- pyenvのインストール
git clone https://github.com/pyenv/pyenv.git ~/.pyenv
実行結果
$ git clone https://github.com/pyenv/pyenv.git ~/.pyenv
Cloning into '/home/ec2-user/.pyenv'...
remote: Enumerating objects: 23271, done.
remote: Counting objects: 100% (23271/23271), done.
remote: Compressing objects: 100% (6085/6085), done.
remote: Total 23271 (delta 15818), reused 23156 (delta 15777), pack-reused 0
Receiving objects: 100% (23271/23271), 4.60 MiB | 21.80 MiB/s, done.
Resolving deltas: 100% (15818/15818), done.
- .bash_profileへ追記し、ファイル読み込みする。
echo 'export PYENV_ROOT="$HOME/.pyenv"' >> ~/.bash_profile
echo 'export PATH="$PYENV_ROOT/bin:$PATH"' >> ~/.bash_profile
echo 'eval "$(pyenv init -)"' >> ~/.bash_profile
source ~/.bash_profile
ファイル読み込み時にエラーが出力されなければ正常に実行できています。
実行結果
$ echo 'export PYENV_ROOT="$HOME/.pyenv"' >> ~/.bash_profile
$ echo 'export PATH="$PYENV_ROOT/bin:$PATH"' >> ~/.bash_profile
$ echo 'eval "$(pyenv init -)"' >> ~/.bash_profile
$ source ~/.bash_profile
- Python3.10.0がインストール可能なことを確認する。
pyenv install --list | grep 3.10.0
※3.10.0が返ってくることを確認する。
実行結果
$ pyenv install --list | grep 3.10.0
3.10.0
- Python3.10.0をインストールする。
pyenv install 3.10.0
実行結果
$ pyenv install 3.10.0
Downloading Python-3.10.0.tar.xz...
-> https://www.python.org/ftp/python/3.10.0/Python-3.10.0.tar.xz
Installing Python-3.10.0...
patching file aclocal.m4
patching file configure
Hunk #5 succeeded at 10537 (offset -15 lines).
patching file Misc/NEWS.d/next/Build/2021-10-11-16-27-38.bpo-45405.iSfdW5.rst
patching file configure
patching file configure.ac
Installed Python-3.10.0 to /home/ec2-user/.pyenv/versions/3.10.0
- Python3.10.0を設定する。
pyenv global 3.10.0
実行結果
$ pyenv global 3.10.0
- 設定が反映され、Python3.10.0が使用されていることを確認する。
python --version
実行結果
$ python --version
Python 3.10.0
5.AWS-CLIの最新化(Ver2系)
- ver確認し、1系なら更新
aws --version
実行結果
$ aws --version
aws-cli/1.19.112 Python/2.7.18 Linux/4.14.318-241.531.amzn2.x86_64 botocore/1.20.112
- ver1を削除
sudo yum remove awscli -y
実行結果
$ sudo yum remove awscli -y
Loaded plugins: extras_suggestions, langpacks, priorities, update-motd
Resolving Dependencies
--> Running transaction check
---> Package awscli.noarch 0:1.18.147-1.amzn2.0.2 will be erased
--> Finished Dependency Resolution

Dependencies Resolved

==============================================================================================================================================================================================
Package Arch Version Repository Size
==============================================================================================================================================================================================
Removing:
awscli noarch 1.18.147-1.amzn2.0.2 installed 7.9 M

Transaction Summary
==============================================================================================================================================================================================
Remove 1 Package

Installed size: 7.9 M
Downloading packages:
Running transaction check
Running transaction test
Transaction test succeeded
Running transaction
Erasing : awscli-1.18.147-1.amzn2.0.2.noarch 1/1
<<ログ部分省略>>
1/1

Removed:
awscli.noarch 0:1.18.147-1.amzn2.0.2

Complete!
- awscli ver2のインストール
curl "https://awscli.amazonaws.com/awscli-exe-linux-x86_64.zip" -o "awscliv2.zip"
実行結果
$ curl "https://awscli.amazonaws.com/awscli-exe-linux-x86_64.zip" -o "awscliv2.zip"
% Total % Received % Xferd Average Speed Time Time Time Current
Dload Upload Total Spent Left Speed
100 55.4M 100 55.4M 0 0 245M 0 --:--:-- --:--:-- --:--:-- 246M
- awscli 解凍
unzip awscliv2.zip
実行結果(長文ログのため一部省略)
creating: aws/
creating: aws/dist/
inflating: aws/README.md
inflating: aws/install
inflating: aws/THIRD_PARTY_LICENSES
creating: aws/dist/awscli/
creating: aws/dist/cryptography/
creating: aws/dist/docutils/
creating: aws/dist/lib-dynload/
inflating: aws/dist/aws
inflating: aws/dist/aws_completer
inflating: aws/dist/libpython3.11.so.1.0
inflating: aws/dist/_awscrt.cpython-311-x86_64-linux-gnu.so
inflating: aws/dist/_cffi_backend.cpython-311-x86_64-linux-gnu.so
inflating: aws/dist/_ruamel_yaml.cpython-311-x86_64-linux-gnu.so
〜〜
- aws-cliのインストール
sudo ./aws/install
実行結果
$ sudo ./aws/install
You can now run: /usr/local/bin/aws --version
- .bash_profile読込
source ~/.bash_profile
実行結果
$ source ~/.bash_profile
- ver2系であることを確認
aws --version
実行結果
$ aws --version
aws-cli/2.13.2 Python/3.11.4 Linux/4.14.318-241.531.amzn2.x86_64 exe/x86_64.amzn.2 prompt/off
- 不要なファイル削除
rm -rf aws awscliv2.zip
実行結果
$ rm -rf aws awscliv2.zip
6.SAM-CLIの最新化
- sam cliのverを確認
sam --version
実行結果
$ sam --version
SAM CLI, version 1.72.0
sam cliのverを最新に更新する。
もしこちらの→Githubに記載の最新verがすでに適用されている場合は、対応不要です。
- sam cliの最新パッケージをダウンロード
wget https://github.com/aws/aws-sam-cli/releases/latest/download/aws-sam-cli-linux-x86_64.zip
実行結果
$ wget https://github.com/aws/aws-sam-cli/releases/latest/download/aws-sam-cli-linux-x86_64.zip
--2023-07-20 08:11:53-- https://github.com/aws/aws-sam-cli/releases/latest/download/aws-sam-cli-linux-x86_64.zip
Resolving github.com (github.com)... 192.30.255.112
Connecting to github.com (github.com)|192.30.255.112|:443... connected.
HTTP request sent, awaiting response... 302 Found
Location: https://github.com/aws/aws-sam-cli/releases/download/v1.92.0/aws-sam-cli-linux-x86_64.zip [following]
--2023-07-20 08:11:53-- https://github.com/aws/aws-sam-cli/releases/download/v1.92.0/aws-sam-cli-linux-x86_64.zip
Reusing existing connection to github.com:443.
HTTP request sent, awaiting response... 302 Found
Location: https://objects.githubusercontent.com/github-production-release-asset-2e65be/92205085/95be3cb7-acc3-4eef-8ca7-628375ae1630?X-Amz-Algorithm=AWS4-HMAC-SHA256&X-Amz-Credential=AKIAIWNJYAX4CSVEH53A%2F20230720%2Fus-east-1%2Fs3%2Faws4_request&X-Amz-Date=20230720T081154Z&X-Amz-Expires=300&X-Amz-Signature=5e47c20b7b840cdb92d7343259dc0e63f2d9f1b032a0c2e5ebe01645d3c91749&X-Amz-SignedHeaders=host&actor_id=0&key_id=0&repo_id=92205085&response-content-disposition=attachment%3B%20filename%3Daws-sam-cli-linux-x86_64.zip&response-content-type=application%2Foctet-stream [following]
--2023-07-20 08:11:54-- https://objects.githubusercontent.com/github-production-release-asset-2e65be/92205085/95be3cb7-acc3-4eef-8ca7-628375ae1630?X-Amz-Algorithm=AWS4-HMAC-SHA256&X-Amz-Credential=AKIAIWNJYAX4CSVEH53A%2F20230720%2Fus-east-1%2Fs3%2Faws4_request&X-Amz-Date=20230720T081154Z&X-Amz-Expires=300&X-Amz-Signature=5e47c20b7b840cdb92d7343259dc0e63f2d9f1b032a0c2e5ebe01645d3c91749&X-Amz-SignedHeaders=host&actor_id=0&key_id=0&repo_id=92205085&response-content-disposition=attachment%3B%20filename%3Daws-sam-cli-linux-x86_64.zip&response-content-type=application%2Foctet-stream
Resolving objects.githubusercontent.com (objects.githubusercontent.com)... 185.199.109.133, 185.199.110.133, 185.199.111.133, ...
Connecting to objects.githubusercontent.com (objects.githubusercontent.com)|185.199.109.133|:443... connected.
HTTP request sent, awaiting response... 200 OK
Length: 76035203 (73M) [application/octet-stream]
Saving to: ‘aws-sam-cli-linux-x86_64.zip’

100%[====================================================================================================================================================>] 76,035,203 247MB/s in 0.3s

2023-07-20 08:11:54 (247 MB/s) - ‘aws-sam-cli-linux-x86_64.zip’ saved [76035203/76035203]
- sam cliパッケージの解凍
unzip aws-sam-cli-linux-x86_64.zip -d sam-installation
実行結果(長文ログのため一部省略)
Archive: aws-sam-cli-linux-x86_64.zip
creating: sam-installation/dist/
inflating: sam-installation/dist/sam
creating: sam-installation/dist/lib-dynload/
inflating: sam-installation/dist/lib-dynload/_struct.cpython-311-x86_64-linux-gnu.so
inflating: sam-installation/dist/lib-dynload/zlib.cpython-311-x86_64-linux-gnu.so
inflating: sam-installation/dist/lib-dynload/_typing.cpython-311-x86_64-linux-gnu.so
inflating: sam-installation/dist/lib-dynload/_statistics.cpython-311-x86_64-linux-gnu.so
inflating: sam-installation/dist/lib-dynload/_contextvars.cpython-311-x86_64-linux-gnu.so
inflating: sam-installation/dist/lib-dynload/_decimal.cpython-311-x86_64-linux-gnu.so
inflating: sam-installation/dist/lib-dynload/grp.cpython-311-x86_64-linux-gnu.so
inflating: sam-installation/dist/lib-dynload/_bz2.cpython-311-x86_64-linux-gnu.so
inflating: sam-installation/dist/lib-dynload/_opcode.cpython-311-x86_64-linux-gnu.so
- sam cliのインストール
sudo ./sam-installation/install --update
実行結果
$ sudo ./sam-installation/install --update
You can now run: /usr/local/bin/sam --version
- sam cli更新の適用を確認
sam --version
実行結果
$ sam --version
SAM CLI, version 1.92.0
- 不要なファイルを削除
rm -rf aws-sam-cli-linux-x86_64.zip sam-installation
実行結果
$ rm -rf aws-sam-cli-linux-x86_64.zip sam-installation
7.Cloud9から、AWS SAMを使用してデプロイを試してみる。
AWS SAMを使用して、簡単なhello-worldと出力するだけのPythonアプリをLambda関数にデプロイします。
8.AWS SAMからLambda関数をデプロイする。
- treeコマンドをインストールする。
※treeコマンドは、ディレクトリ構造を階層を指定して出力することが可能なコマンドです。
sudo yum install tree -y
実行結果
$ sudo yum install tree -y
Loaded plugins: extras_suggestions, langpacks, priorities, update-motd
amzn2-core | 3.7 kB 00:00:00
244 packages excluded due to repository priority protections
Resolving Dependencies
--> Running transaction check
---> Package tree.x86_64 0:1.6.0-10.amzn2.0.1 will be installed
--> Finished Dependency Resolution

Dependencies Resolved

==============================================================================================================================================================================================
Package Arch Version Repository Size
==============================================================================================================================================================================================
Installing:
tree x86_64 1.6.0-10.amzn2.0.1 amzn2-core 47 k

Transaction Summary
==============================================================================================================================================================================================
Install 1 Package

Total download size: 47 k
Installed size: 83 k
Downloading packages:
tree-1.6.0-10.amzn2.0.1.x86_64.rpm | 47 kB 00:00:00
Running transaction check
Running transaction test
Transaction test succeeded
Running transaction
Installing : tree-1.6.0-10.amzn2.0.1.x86_64 1/1
Verifying : tree-1.6.0-10.amzn2.0.1.x86_64 1/1

Installed:
tree.x86_64 0:1.6.0-10.amzn2.0.1

Complete!
- 現在のディレクトリ構成を確認
tree -L 2
配下にREADME.mdファイルしか存在しないことを確認する。
実行結果
.
└── README.md

0 directories, 1 file
- ディレクトリとデプロイ用のLambda関数ファイルを作成する(ランタイムPython3.10を想定)
mkdir -p hello-world/src && touch hello-world/src/hello-world.py
- template.yamlとsamconfig.tomlファイルを作成する
touch hello-world/template.yaml
- 現在のディレクトリ構成を確認
tree -L 2
作成したファイルが存在することを確認
.
├── hello-world
│   ├── samconfig.toml
│   ├── src
│   └── template.yaml
└── README.md

2 directories, 3 files
- cloud9上でtemplate.yamlを以下のように記述する。
AWSTemplateFormatVersion: '2010-09-09'
Transform: AWS::Serverless-2016-10-31
Description: hello-world-test

Resources:
HelloWorldFunction:
Type: AWS::Serverless::Function
Properties:
CodeUri: src/
Handler: hello-world.lambda_handler
Runtime: python3.10
FunctionName: "hello-world-function"
Architectures:
- x86_64
- cloud9上でsrc/hello-world.pyを以下のように記述する。
def lambda_handler(event, context):
print('hello-world')
return {
'statusCode': 200,
'body': 'hello world!!!!!!'
}
- AWS SAMでデプロイするためにディレクトリ移動する
cd hello-world
- AWS SAMでデプロイする。
sam deploy --guided
※-guidedオプションとは?
sam deployはCloudFormationスタックを作成または更新してアプリケーションをデプロイしますが、--guidedオプションを付けることで、デプロイプロセスが対話式(インタラクティブ)になり、ユーザーに各設定の入力を求める形になります。
以下入力例と説明です。
<br />$ sam deploy --guided

Configuring SAM deploy
======================

Looking for config file [samconfig.toml] : Not found

Setting default arguments for 'sam deploy'
=========================================
Stack Name [sam-app]: sam-cloud9-hello-world-cfn  →  ※CloudFormationで作成されるリソース名
AWS Region [us-west-2]: us-west-2  →  ※AWSリソースがデプロイされるリージョン
#Shows you resources changes to be deployed and require a 'Y' to initiate deploy
Confirm changes before deploy [y/N]: N →  ※SAM CLIがCloudFormationスタックをデプロイ(作成または更新)する前に、変更を確認
#SAM needs permission to be able to create roles to connect to the resources in your template
Allow SAM CLI IAM role creation [Y/n]: Y  →  ※SAM CLIが必要なIAMロールを自動的に作成することを許可するかどうかを尋ねる項目
#Preserves the state of previously provisioned resources when an operation fails
Disable rollback [y/N]: N  →  ※CloudFormationスタックのデプロイが失敗した場合に、行われた変更をロールバック(元に戻す)するかどうかを選択する
Save arguments to configuration file [Y/n]: Y  →  ※今回のデプロイの設定をsamconfig.tomlという設定ファイルに保存するかどうかを尋ねる項目
SAM configuration file [samconfig.toml]:  →  ※デフォルトでは、samconfig.tomlという名前のファイルが用いられますが、命名変更したい場合
SAM configuration environment [default]:  →  ※デフォルトの設定環境名はdefaultですが、ここで他の名前を指定することで、異なる設定環境を作成(または選択)することができます。
デプロイ完了後、ロールバックが発生せず以下のログが出力されれば問題なし。
Successfully created/updated stack - sam-cloud9-hello-world-cfn in us-west-2
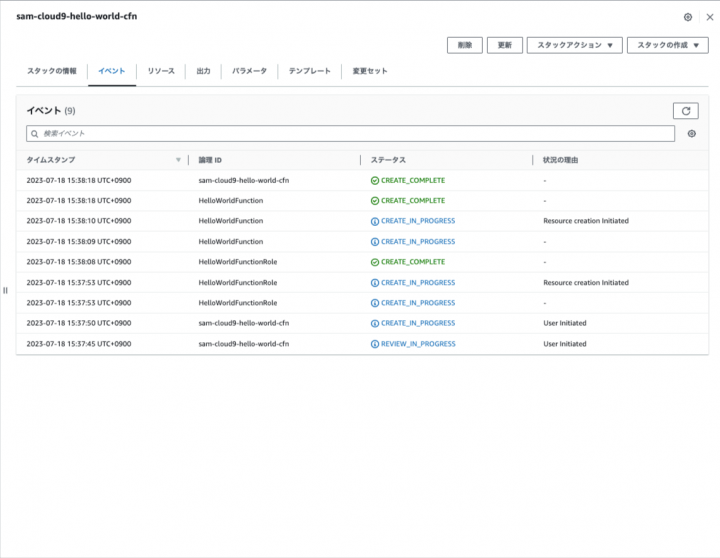
CloudFormationから作成されたスタックを確認する。
「CloudFormation」→「スタック」→「sam-cloud9-hello-world-cfn」(作成したリソース名)→「イベント」タブ→ステータスが「CREATE_COMPLETE」である事を確認する。
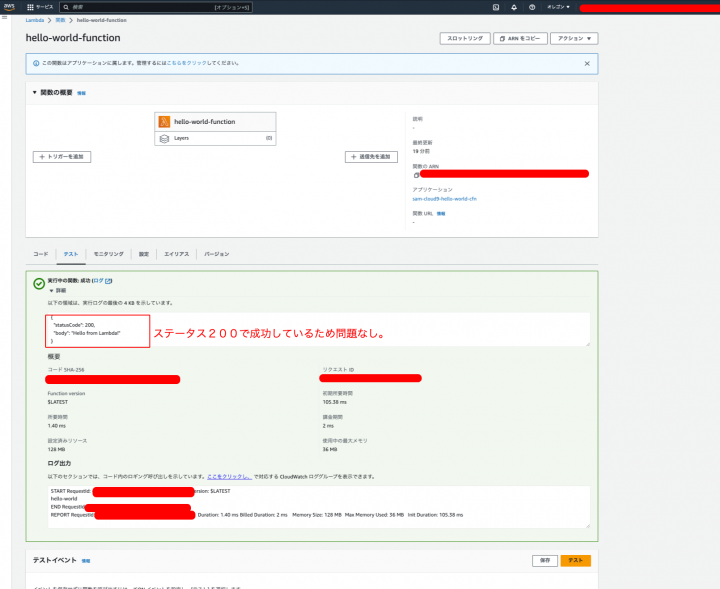
hello-worldのLambda関数が動作するか確認する。
「リソース」タブ→Lambda関数のリンクを開く→「テスト」タブ→「テスト」クリック
以下のように成功ログが出力されれば問題ない。
9.AWS SAMでデプロイしたリソースを削除する。
AWS SAM でのデプロイが便利なのはリソース削除も一括で行えることです。
以下コマンドをターミナルに流してリソースが削除できることを確認します。
sam delete --stack-name sam-cloud9-hello-world-cfn
- Are you sure you want to delete the stack sam-cloud9-hello-world-cfn in the region us-west-2 ? [y/N]:
「リージョンのsam-cloud9-hello-world-cfnスタックを本当に削除しますか?」と聞かれているため削除する場合は「y」を渡します。
Are you sure you want to delete the folder sam-cloud9-hello-world-cfn in S3 which contains the artifacts? [y/N]:
S3内のsam-cloud9-hello-world-cfnフォルダを削除してもよろしいですか?と聞かれているため削除する場合は「y」を渡します。
AWSリソースが削除されていることを確認する。
10.まとめ
最後まで、閲覧頂きありがとうございました。
この記事では、AWS Cloud9環境でPython 3.10.0とAWS SAM を使った開発を始めるための方法をご紹介しました。
AWS SAMを利用すると、Lambda関数を簡単にデプロイできることが説明できたかと思います。
しかしAWS SAMは他にも、開発・検証・本番環境ごとにAWSリソースを分類してデプロイ管理することも可能だったりします。
さらに詳しくは#2の記事で、環境ごとにAWSリソースを分類してデプロイ管理する方法について解説します。