はじめに
Amazon CloudFront の継続的デプロイを軸にして、いろいろ書いてきました。最初は紹介記事でした。
次に、継続的デプロイを AWS CodePipeline に載せて自動化しました。シェルスクリプトをたくさん書いて AWS CodeBuild で動かしたので辛かったです。
その後、シェルスクリプトをステートマシン化しました。あとはこのふたつを元々の CodePipeline に統合することで、やりたいことがすべて達成できそうです。
- Amazon CloudFront の継続的デプロイを AWS Step Functions でやってみた 1
- Amazon CloudFront の継続的デプロイを AWS Step Functions でやってみた 2
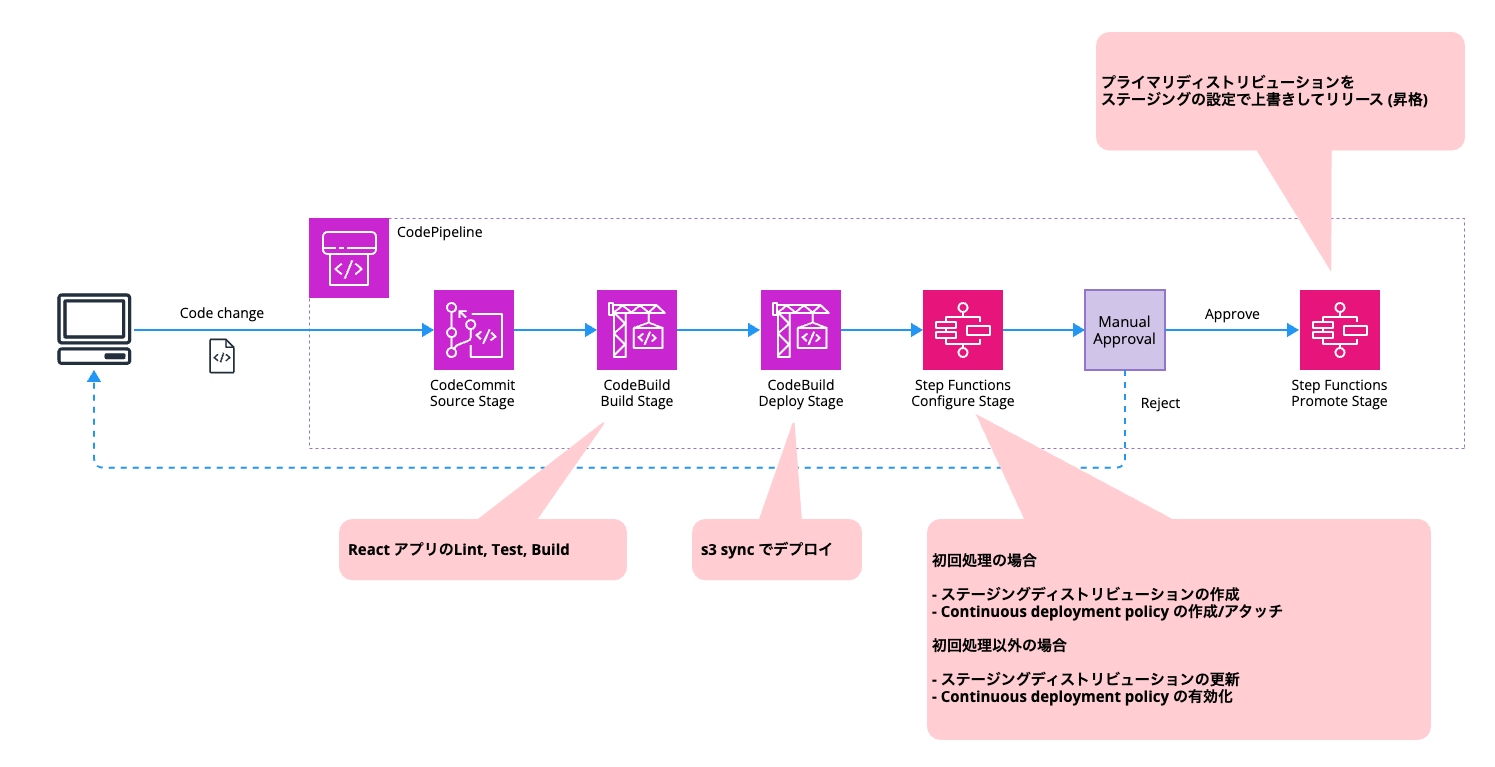
本記事では以下の環境を CDK で構築します。S3 バケットへのデプロイは s3 sync が気軽すぎて引き続き CodeBuild にしてしまいました。
| ステージ | アクション | 説明 |
|---|---|---|
| Source | CodeCommit | リポジトリのコード変更を検知して AWS CodePipeline を起動する |
| Build | CodeBuild | サンプル React アプリを AWS CodeBuild で Lint, Test, Build する |
| Deploy | CodeBuild | s3 sync コマンドを実行してデプロイする |
| Configure | StepFunctions | Amazon CloudFront ステージングを作成または有効化し、Continuous deployment を構成する |
| Approve | ManualApproval | 手動でリリースを承認する |
| Promote | StepFunctions | Amazon CloudFront ディストリビューションを昇格する |
概要
この構成のパイプラインが、
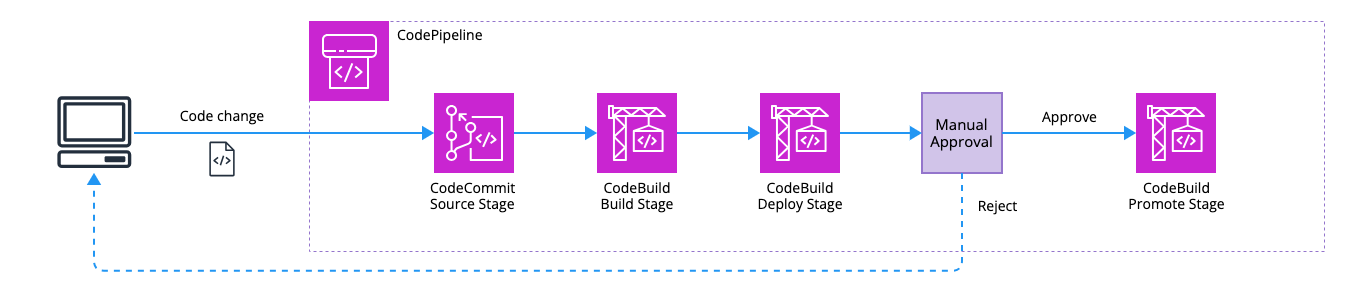
こうなります。
リポジトリはこちらです。
補足
今回 CDK によるリソースの準備では、ステージングと Continuous Deployment Policy のセットアップを行っていません。L2 コンストラクト + エスケープハッチで実現できないか試しはしたのですが、以下の通りなかなかうまくいきませんでした。
- L2 の
Distributionクラスではステージングディストリビューションを作るためのstagingフラグを直接扱えない - ステージングでは CNAME の設定ができないが、CNAME なし + 証明書ありの設定だと以下エラーになった
Error: Must specify at least one domain name to use a certificate with a distribution
ディストリビューションで証明書を使用するには、少なくとも1つのドメイン名を指定する必要があります。
- Continuous Deployment Policy をプライマリディストリビューションにアタッチしようとしたところ、以下のエラーが発生
"Invalid request provided: AWS::CloudFront::Distribution: Continuous deployment policy is not supported during distribution creation.
ディストリビューション作成時の Continuous deployment policy はサポートされていません。
たいていのエラーはエスケープハッチを駆使することで回避できたのですが、最後のエラーだけは初回デプロイ後に変更を加える必要があります。最終的にはこれがネックになりました。
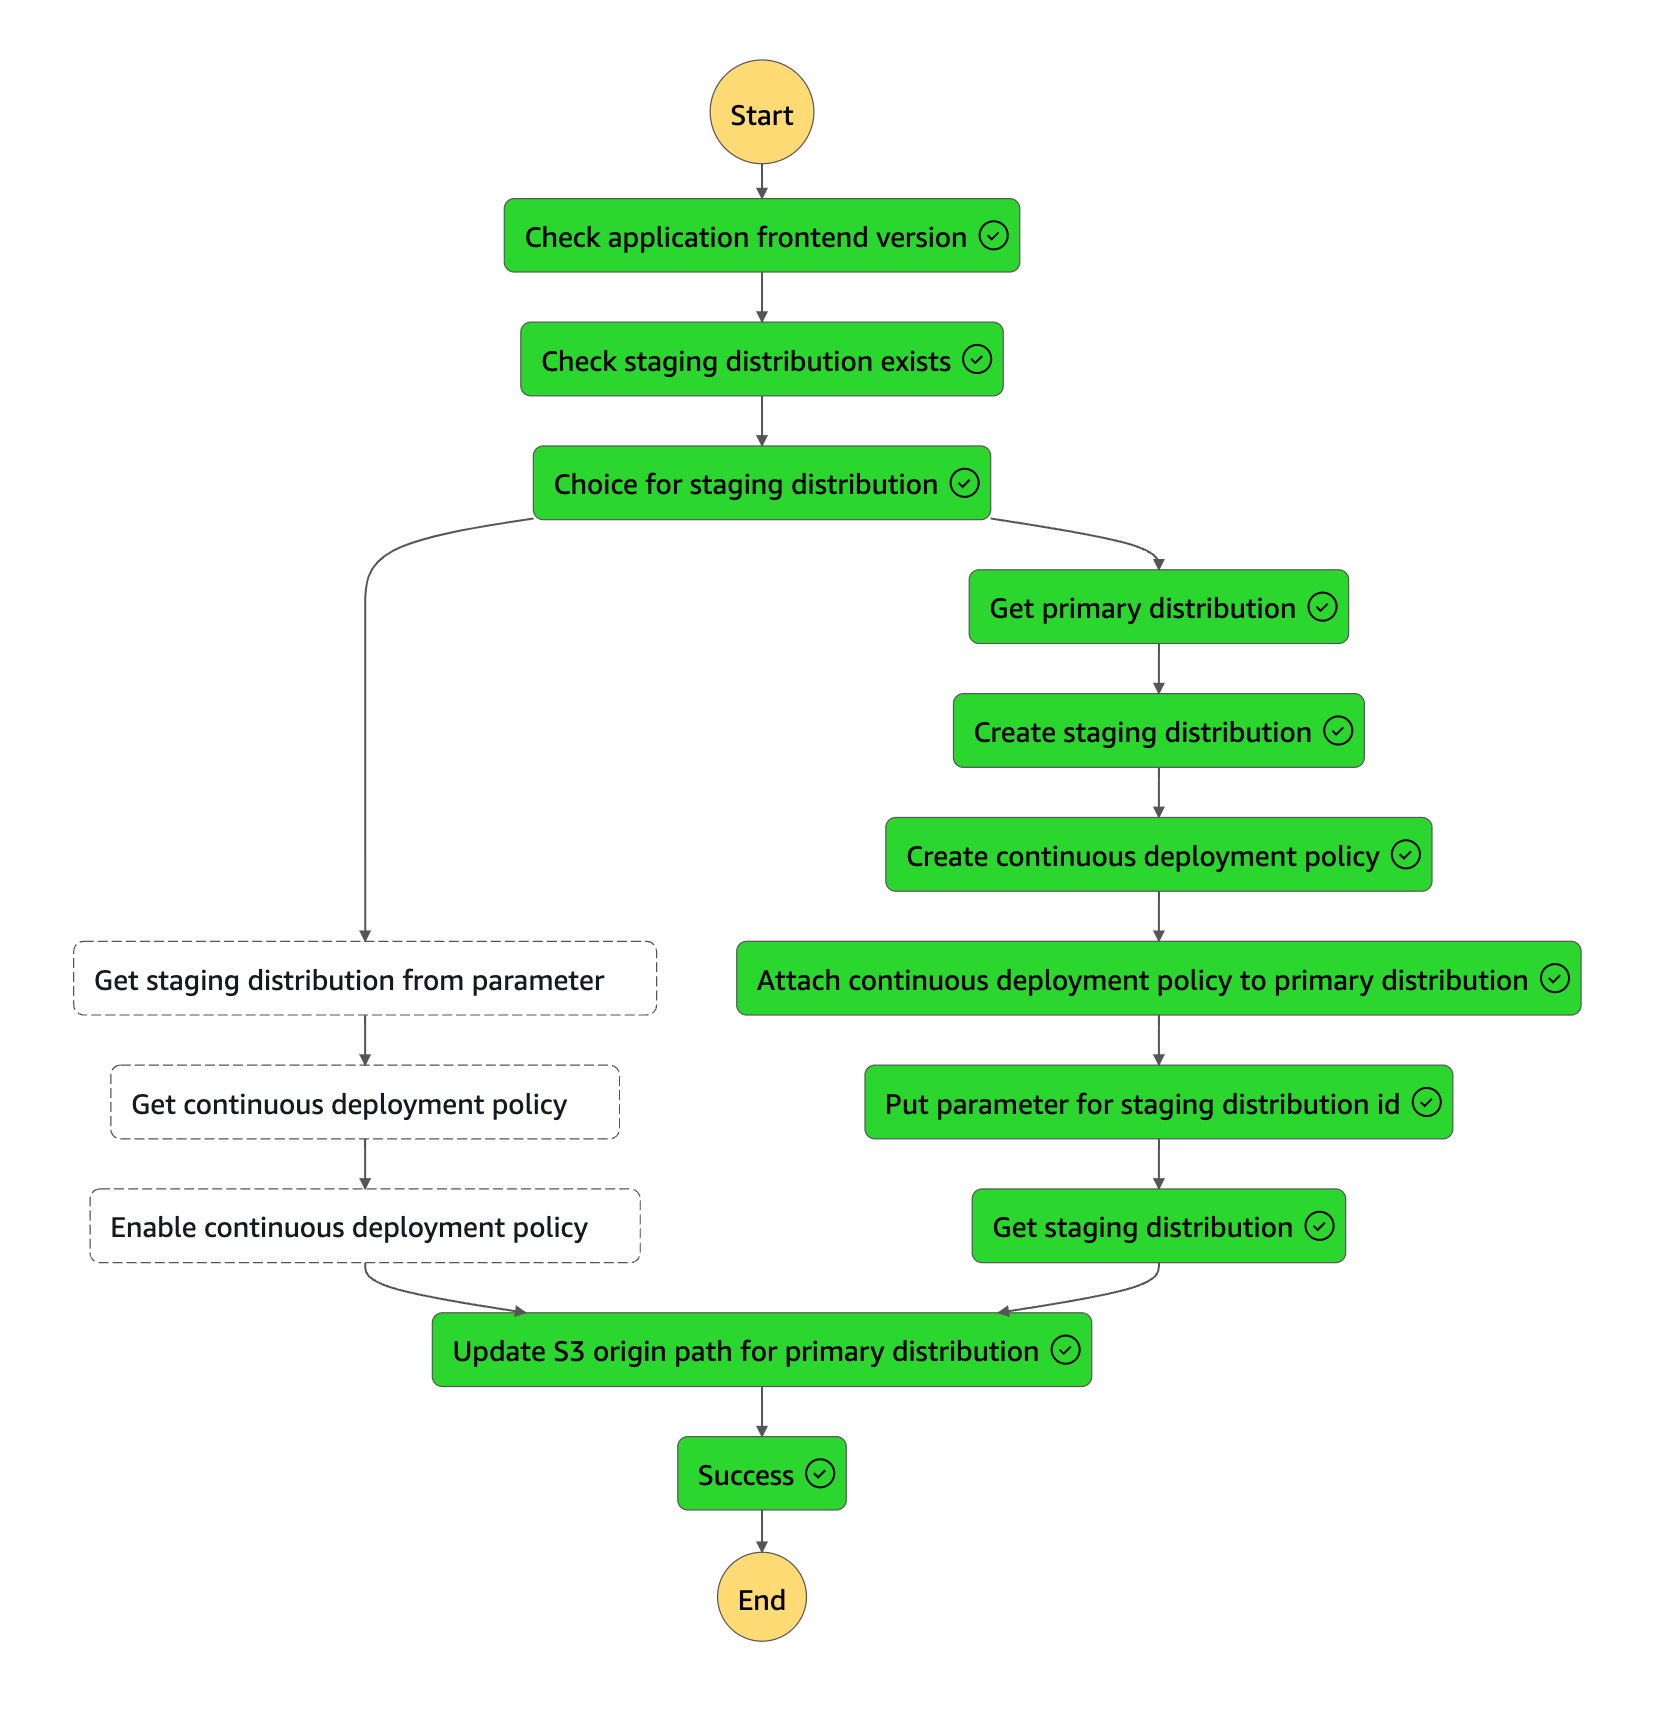
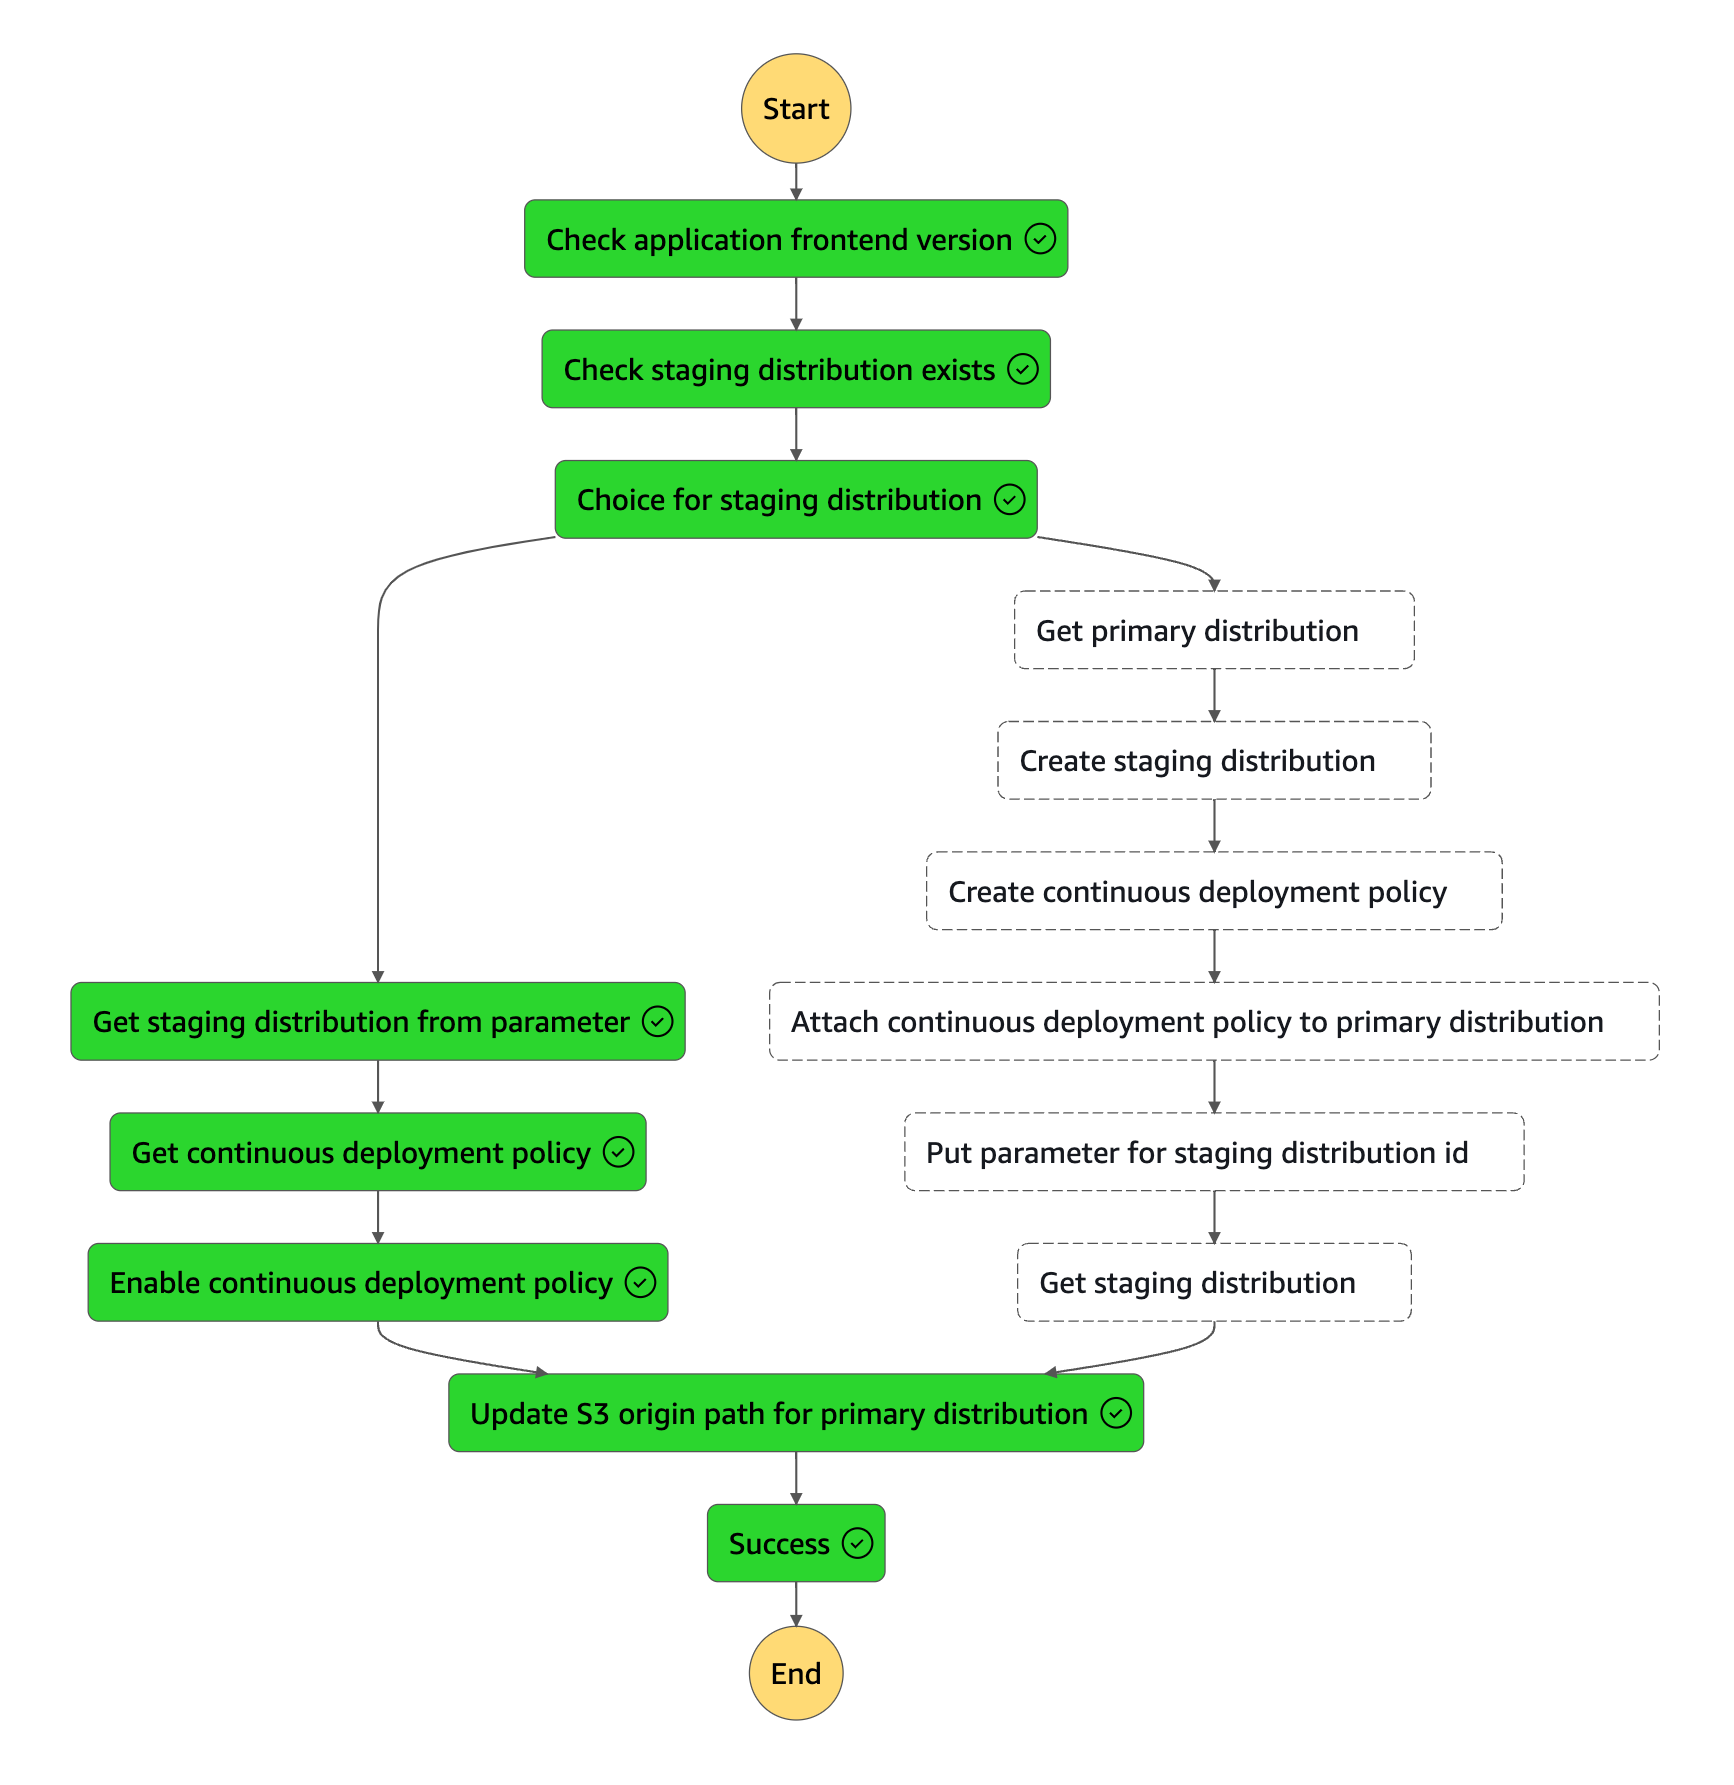
こういった経緯もあり、CloudFront まわりは以前構築したリソース構成から大きく変更しない方針にしました。つまり、パイプライン側でステージングディストリビューションと Continuous Deployment Policy を制御する方式です。前々回のステートマシン設計はこの背景に基づいています。
詳細
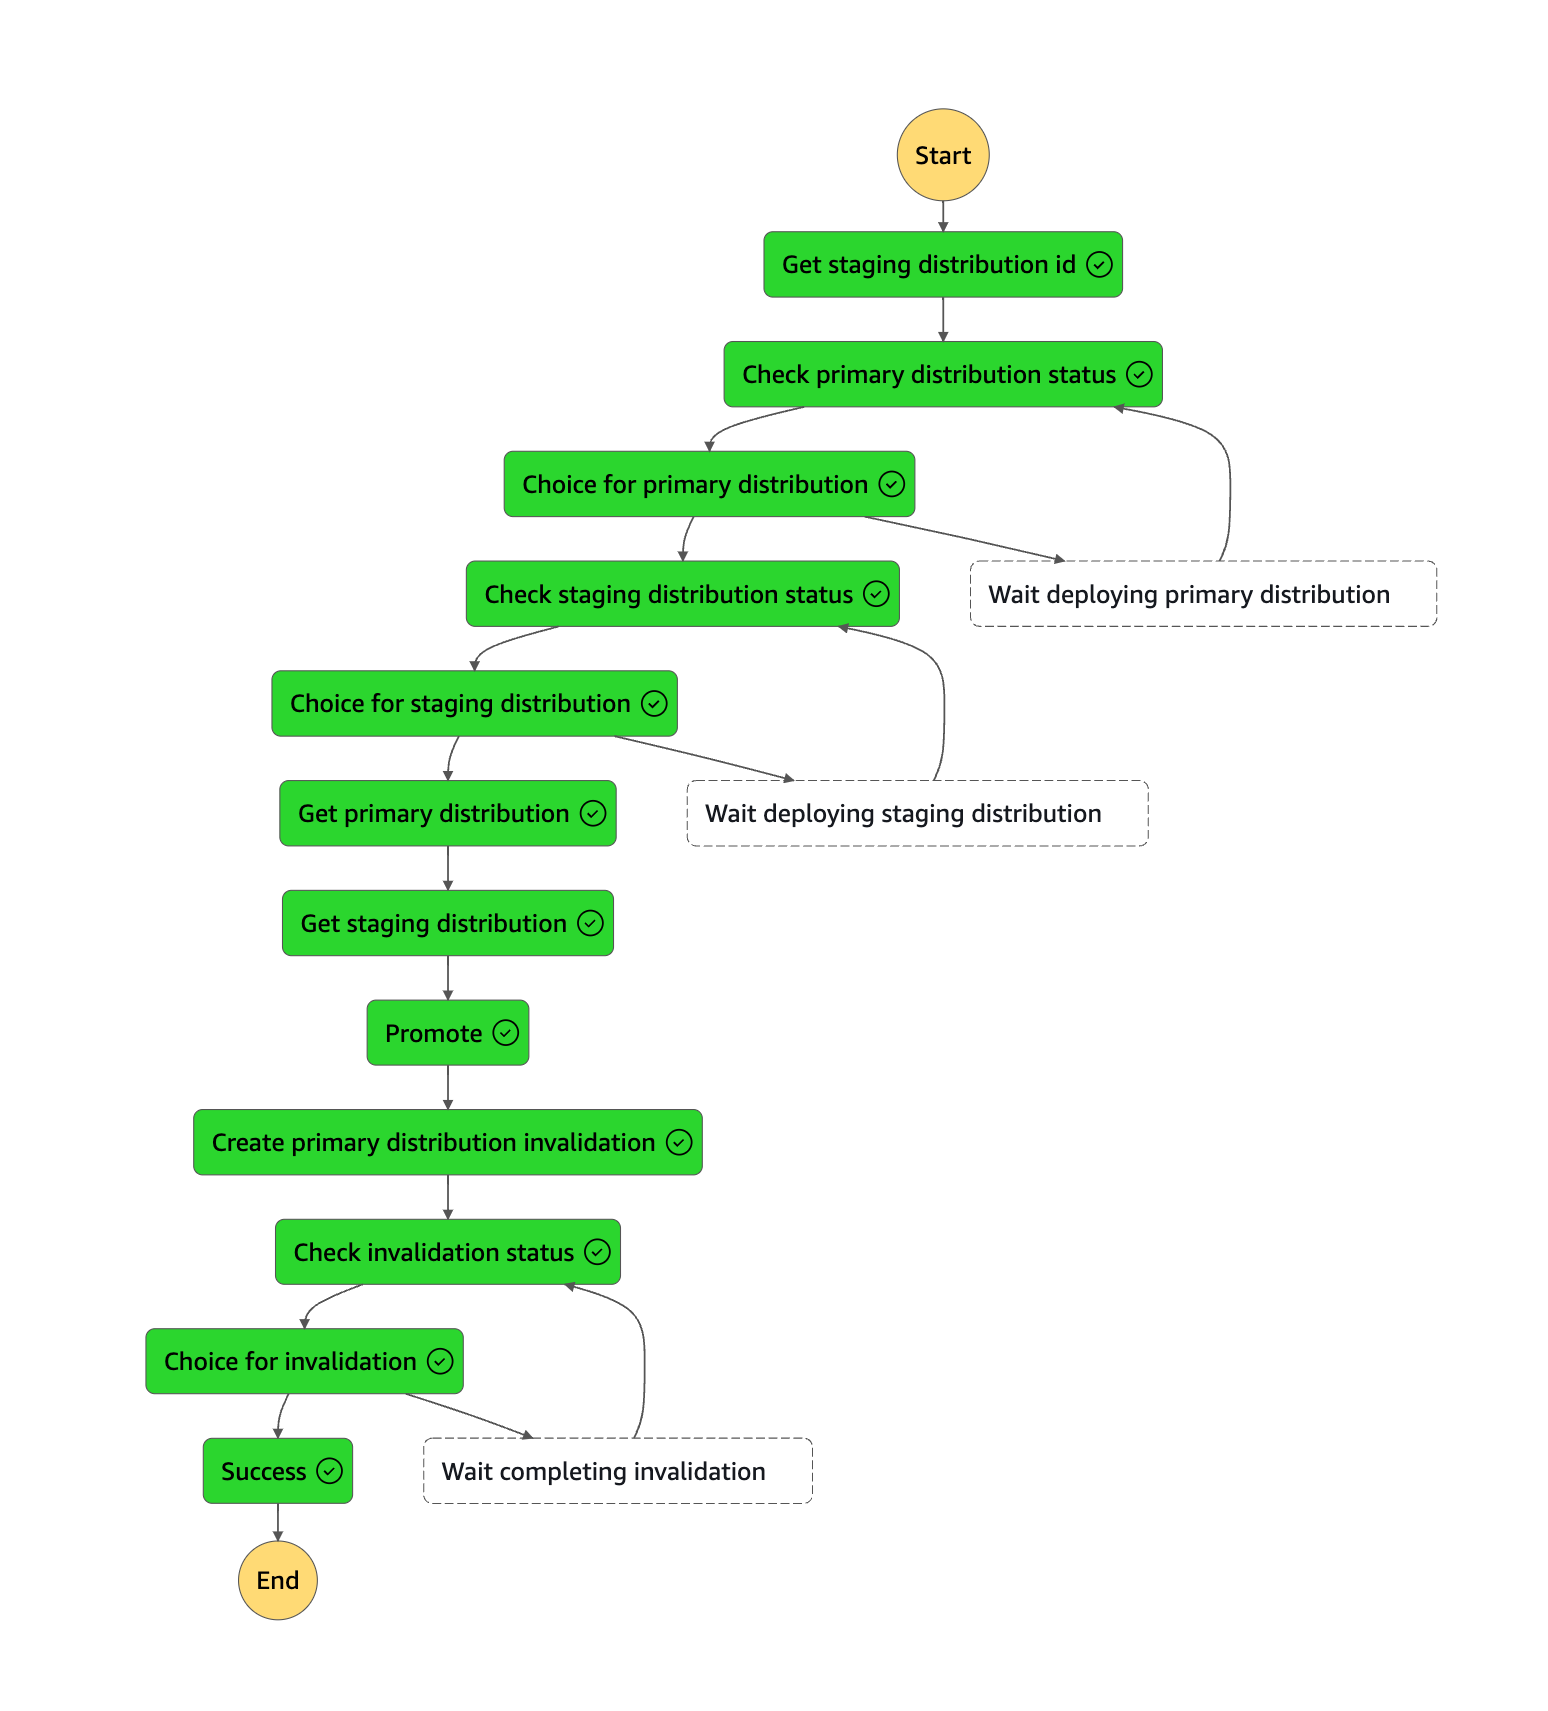
Step Functions 関連の CDK の設定を見ていきます。以下 2 つのステートマシンを作ります。
| ステージ | やること |
|---|---|
| Configure | ステージングを作成または有効化し、Continuous deployment を構成する |
| Promote | 昇格する |
ロールの作成
Configure
まずはステートマシンにアタッチするロールを作成します。
// Create step functions role for cloudfront continuous deployment configuration
const frontendConfigureSfnRole = new iam.Role(this, "FrontendConfigureSfnRole", {
  roleName: `${serviceName}-frontend-configure-sfn-role`,
  assumedBy: new iam.ServicePrincipal("states.amazonaws.com"),
  inlinePolicies: {
    ["FrontendConfigureSfnRoleAdditionalPolicy"]: new iam.PolicyDocument({
      statements: [
        new iam.PolicyStatement({
          effect: iam.Effect.ALLOW,
          actions: ["ssm:GetParameter", "ssm:PutParameter"],
          resources: [`arn:aws:ssm:${this.region}:${this.account}:*`],
        }),
        new iam.PolicyStatement({
          effect: iam.Effect.ALLOW,
          actions: ["s3:GetBucketAcl", "s3:PutBucketAcl"],
          resources: [cloudfrontLogBucket.bucketArn, cloudfrontLogBucket.bucketArn + "/*"],
        }),
        new iam.PolicyStatement({
          effect: iam.Effect.ALLOW,
          actions: [
            "cloudfront:GetDistribution",
            "cloudfront:GetDistributionConfig",
            "cloudfront:CreateDistribution",
            "cloudfront:UpdateDistribution",
            "cloudfront:CopyDistribution",
          ],
          resources: [`arn:aws:cloudfront::${this.account}:distribution/*`],
        }),
        new iam.PolicyStatement({
          effect: iam.Effect.ALLOW,
          actions: [
            "cloudfront:GetContinuousDeploymentPolicy",
            "cloudfront:CreateContinuousDeploymentPolicy",
            "cloudfront:UpdateContinuousDeploymentPolicy",
          ],
          resources: [`arn:aws:cloudfront::${this.account}:continuous-deployment-policy/*`],
        }),
        new iam.PolicyStatement({
          effect: iam.Effect.ALLOW,
          actions: [
            "xray:PutTraceSegments",
            "xray:PutTelemetryRecords",
            "xray:GetSamplingRules",
            "xray:GetSamplingTargets",
          ],
          resources: ["*"],
        }),
      ],
    }),
  },
});
このロールには以下の権限を設定しています。必要に応じてリソースを絞り込めばよいでしょう。
- SSM パラメータストアを読み書きするための権限
- CloudFront がログバケットにアクセスするための権限
- ステージングを準備するための権限
- Continuous Deployment Policy を操作するための権限
- ステートマシンをマネコンで作成した際に設定される X-Ray のデフォルト権限
Promote
Promote に関しても同様です。
// Create step functions role for frontend promote
const frontendPromoteSfnRole = new iam.Role(this, "FrontendPromoteSfnRole", {
  roleName: `${serviceName}-frontend-promote-sfn-role`,
  assumedBy: new iam.ServicePrincipal("states.amazonaws.com"),
  inlinePolicies: {
    ["FrontendPromoteSfnRoleAdditionalPolicy"]: new iam.PolicyDocument({
      statements: [
        new iam.PolicyStatement({
          effect: iam.Effect.ALLOW,
          actions: ["ssm:GetParameter", "ssm:PutParameter"],
          resources: [`arn:aws:ssm:${this.region}:${this.account}:*`],
        }),
        new iam.PolicyStatement({
          effect: iam.Effect.ALLOW,
          actions: ["s3:GetBucketAcl", "s3:PutBucketAcl"],
          resources: [cloudfrontLogBucket.bucketArn, cloudfrontLogBucket.bucketArn + "/*"],
        }),
        new iam.PolicyStatement({
          effect: iam.Effect.ALLOW,
          actions: [
            "cloudfront:GetDistribution",
            "cloudfront:GetDistributionConfig",
            "cloudfront:UpdateDistribution",
            "cloudfront:GetInvalidation",
            "cloudfront:CreateInvalidation",
          ],
          resources: [`arn:aws:cloudfront::${this.account}:distribution/*`],
        }),
        new iam.PolicyStatement({
          effect: iam.Effect.ALLOW,
          actions: [
            "xray:PutTraceSegments",
            "xray:PutTelemetryRecords",
            "xray:GetSamplingRules",
            "xray:GetSamplingTargets",
          ],
          resources: ["*"],
        }),
      ],
    }),
  },
});
- SSM パラメータストアを読み書きするための権限
- CloudFront がログバケットにアクセスするための権限
- ディストリビューションを昇格するための権限
- ディストリビューションのキャッシュを削除するための権限
- ステートマシンをマネコンで作成した際に設定される X-Ray のデフォルト権限
ステートマシンの作成
前々回、前回でステートマシンを作り切っていたので、CDK で作成する際には ASL をファイルで渡すだけで済みました。ロールを渡すのを忘れないようにしましょう。
Configure
// Create step functions state machine for frontend configure
const frontendConfigureSfn = new stepfunctions.StateMachine(this, "FrontendConfigureSfn", {
  stateMachineName: `${serviceName}-frontend-configure-sfn`,
  definitionBody: stepfunctions.DefinitionBody.fromFile("src/sfn/configure.json", {}), // <= ファイルで渡すだけ
  role: frontendConfigureSfnRole,
});
Promote
// Create step functions state machine for frontend promote
const frontendPromoteSfn = new stepfunctions.StateMachine(this, "FrontendPromoteSfn", {
  stateMachineName: `${serviceName}-frontend-promote-sfn`,
  definitionBody: stepfunctions.DefinitionBody.fromFile("src/sfn/promote.json", {}), // <= ファイルで渡すだけ
  role: frontendPromoteSfnRole,
});
パイプラインアクションの作成
各アクションが必要とする権限のロールは、CDK が以下のような形で作ってくれます。
Configure
{
    "Version": "2012-10-17",
    "Statement": [
        {
            "Action": [
                "states:DescribeStateMachine",
                "states:StartExecution"
            ],
            "Resource": "arn:aws:states:<region>:<account>:stateMachine:cfcd-test-frontend-configure-sfn",
            "Effect": "Allow"
        },
        {
            "Action": "states:DescribeExecution",
            "Resource": "arn:aws:states:<region>:<account>:execution:cfcd-test-frontend-configure-sfn:*",
            "Effect": "Allow"
        }
    ]
}
Promote
{
    "Version": "2012-10-17",
    "Statement": [
        {
            "Action": [
                "states:DescribeStateMachine",
                "states:StartExecution"
            ],
            "Resource": "arn:aws:states:<region>:<account>:stateMachine:cfcd-test-frontend-promote-sfn",
            "Effect": "Allow"
        },
        {
            "Action": "states:DescribeExecution",
            "Resource": "arn:aws:states:<region>:<account>:execution:cfcd-test-frontend-promote-sfn:*",
            "Effect": "Allow"
        }
    ]
}
今回は命名を制御したいので、空のロールを作ることで上記ポリシーがインラインで設定されるようにします。
Configure
// Create step functions configure role for frontend
const frontendConfigureActionRole = new iam.Role(this, "FrontendConfigureActionRole", {
  roleName: `${serviceName}-frontend-configure-action-role`,
  assumedBy: new iam.ArnPrincipal(`arn:aws:iam::${this.account}:root`),
});
Promote
// Create step fucntions promote role for frontend
const frontendPromoteActionRole = new iam.Role(this, "FrontendPromoteActionRole", {
  roleName: `${serviceName}-frontend-promote-action-role`,
  assumedBy: new iam.ArnPrincipal(`arn:aws:iam::${this.account}:root`),
});
パイプラインアクションでは StepFunctionInvokeAction を使います。ここでは StateMachineInput が特に重要です。SSM パラメータストアのキーを渡したりしています。
Configure
// Create frontend pipeline action for configure stage
const frontendConfigureAction = new codepipeline_actions.StepFunctionInvokeAction({
  actionName: configureStageName,
  StateMachineInput: codepipeline_actions.StateMachineInput.literal({
    ParameterKeyFrontendVersion: `/${serviceName}/version/frontend`,
    ParameterKeyStagingDistributionId: `/${serviceName}/cloudfront/cfcd-staging`,
    PrimaryDistributionId: primaryDistributionId,
  }),
  stateMachine: frontendConfigureSfn,
  role: frontendConfigureActionRole,
  runOrder: 1,
});
Promote
// Create frontend pipeline action for promote stage
const frontendPromoteAction = new codepipeline_actions.StepFunctionInvokeAction({
  actionName: promoteStageName,
  StateMachineInput: codepipeline_actions.StateMachineInput.literal({
    ParameterKeyStagingDistributionId: `/${serviceName}/cloudfront/cfcd-staging`,
    PrimaryDistributionId: primaryDistributionId,
  }),
  stateMachine: frontendPromoteSfn,
  role: frontendPromoteActionRole,
  runOrder: 1,
});
パイプラインの作成
あとはパイプラインに各ステージをマッピングすれば OK です。
// Create frontend pipeline
const frontendPipeline = new codepipeline.Pipeline(this, "FrontendPipeline", {
  pipelineName: `${serviceName}-frontend-pipeline`,
  pipelineType: codepipeline.PipelineType.V2,
  role: frontendPipelineRole,
  artifactBucket: frontendArtifactBucket,
});
frontendPipeline.addStage({
  stageName: sourceStageName,
  actions: [frontendSourceAction],
});
frontendPipeline.addStage({
  stageName: buildStageName,
  actions: [frontendBuildAction],
});
frontendPipeline.addStage({
  stageName: deployStageName,
  actions: [frontendDeployAction],
});
frontendPipeline.addStage({
  stageName: configureStageName,
  actions: [frontendConfigureAction],
});
frontendPipeline.addStage({
  stageName: approveStageName,
  actions: [frontendApproveAction],
});
frontendPipeline.addStage({
  stageName: promoteStageName,
  actions: [frontendPromoteAction],
});
動かしてみる
では動作確認します。スタックはすでにデプロイされている前提です。以下のような画面です。
React のサンプルアプリに変更を加えます。
import React from "react";
import { Light as SyntaxHighlighter } from "react-syntax-highlighter";
import json from "react-syntax-highlighter/dist/esm/languages/hljs/json";
- import { githubGist } from "react-syntax-highlighter/dist/esm/styles/hljs";
+ import { solarizedDark } from "react-syntax-highlighter/dist/esm/styles/hljs";
import "./App.css";
SyntaxHighlighter.registerLanguage("json", json);
function App() {
return (
<div className="container">
- <SyntaxHighlighter language="json" style={githubGist}>
+ <SyntaxHighlighter language="json" style={solarizedDark}>
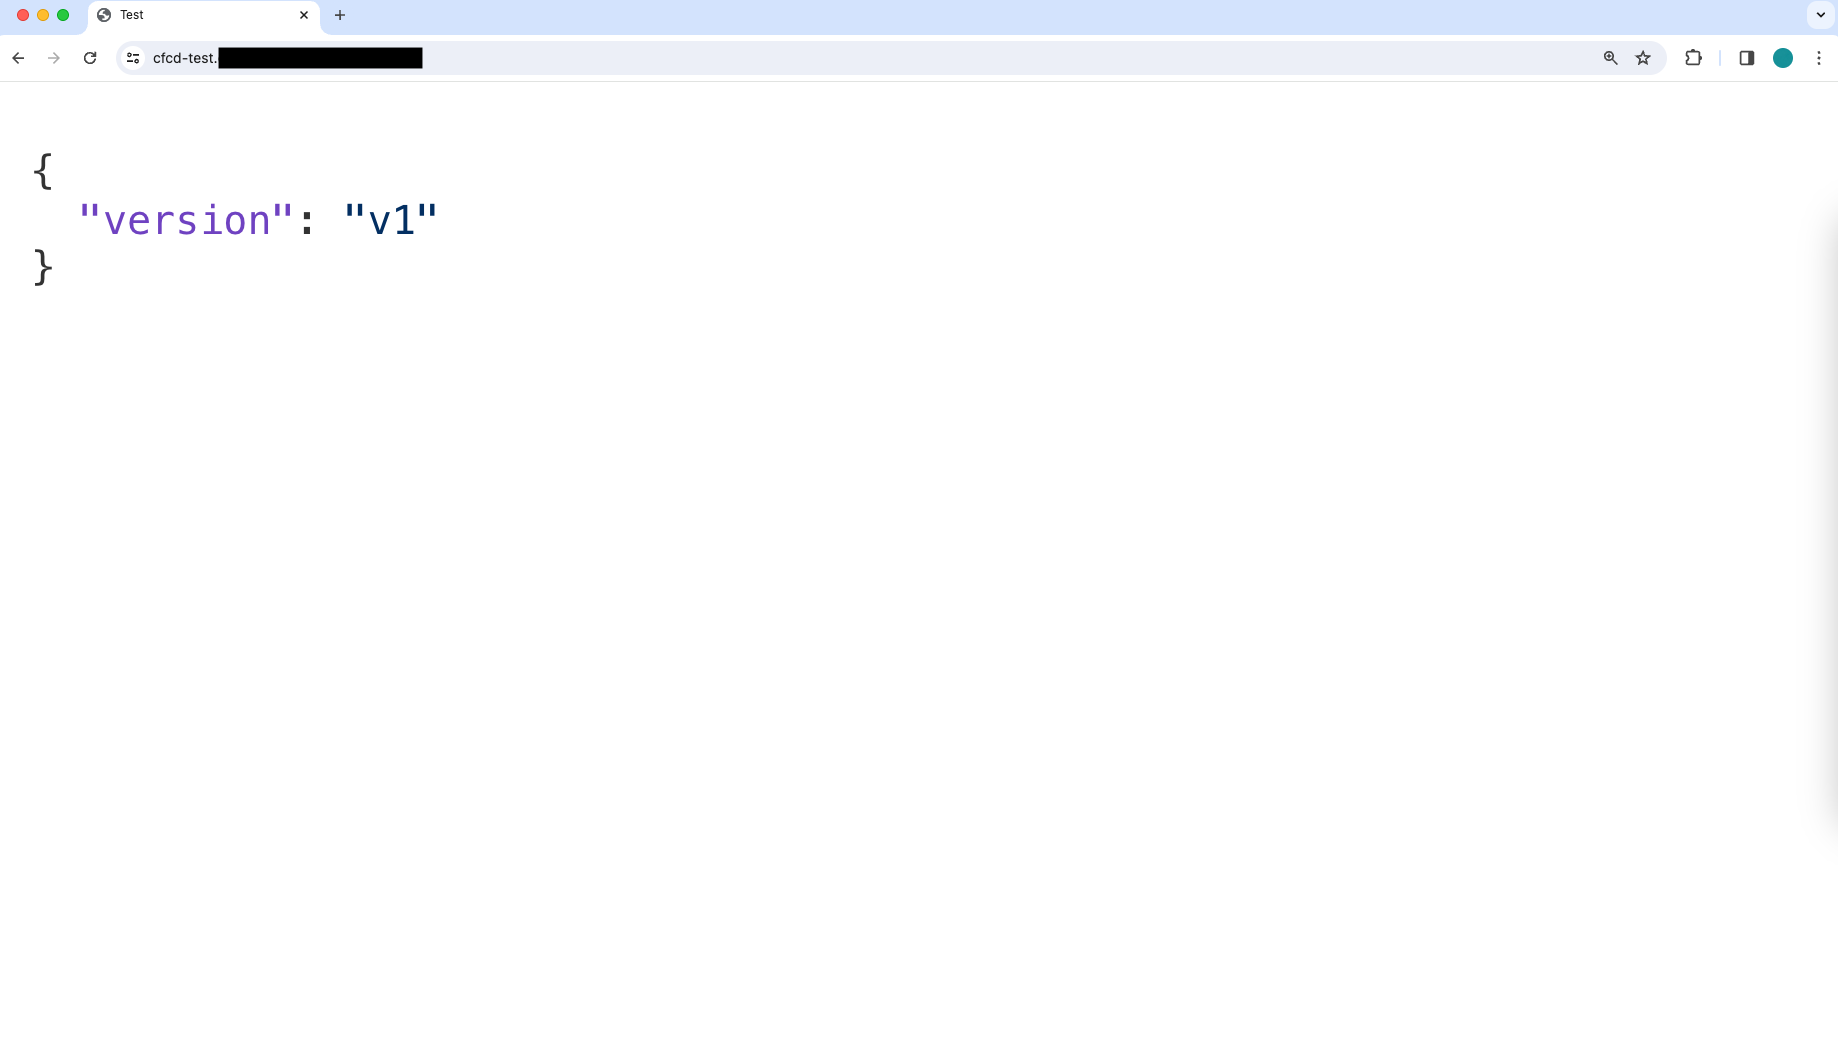
{JSON.stringify({ version: process.env.REACT_APP_VERSION_FRONTEND }, null, 2)}
</SyntaxHighlighter>
</div>
);
}
export default App;
アプリケーションのバージョン情報は SSM パラメータストアで管理しているので、値を変更します。この情報はオリジンパスとして使用され、かつ S3 へのデプロイ時に新しいバージョンのプレフィックスとして設定されます。
$ aws ssm put-parameter --name "/cfcd-test/version/frontend" --value "v2" --type String --overwrite
{
    "Version": 2,
    "Tier": "Standard"
}
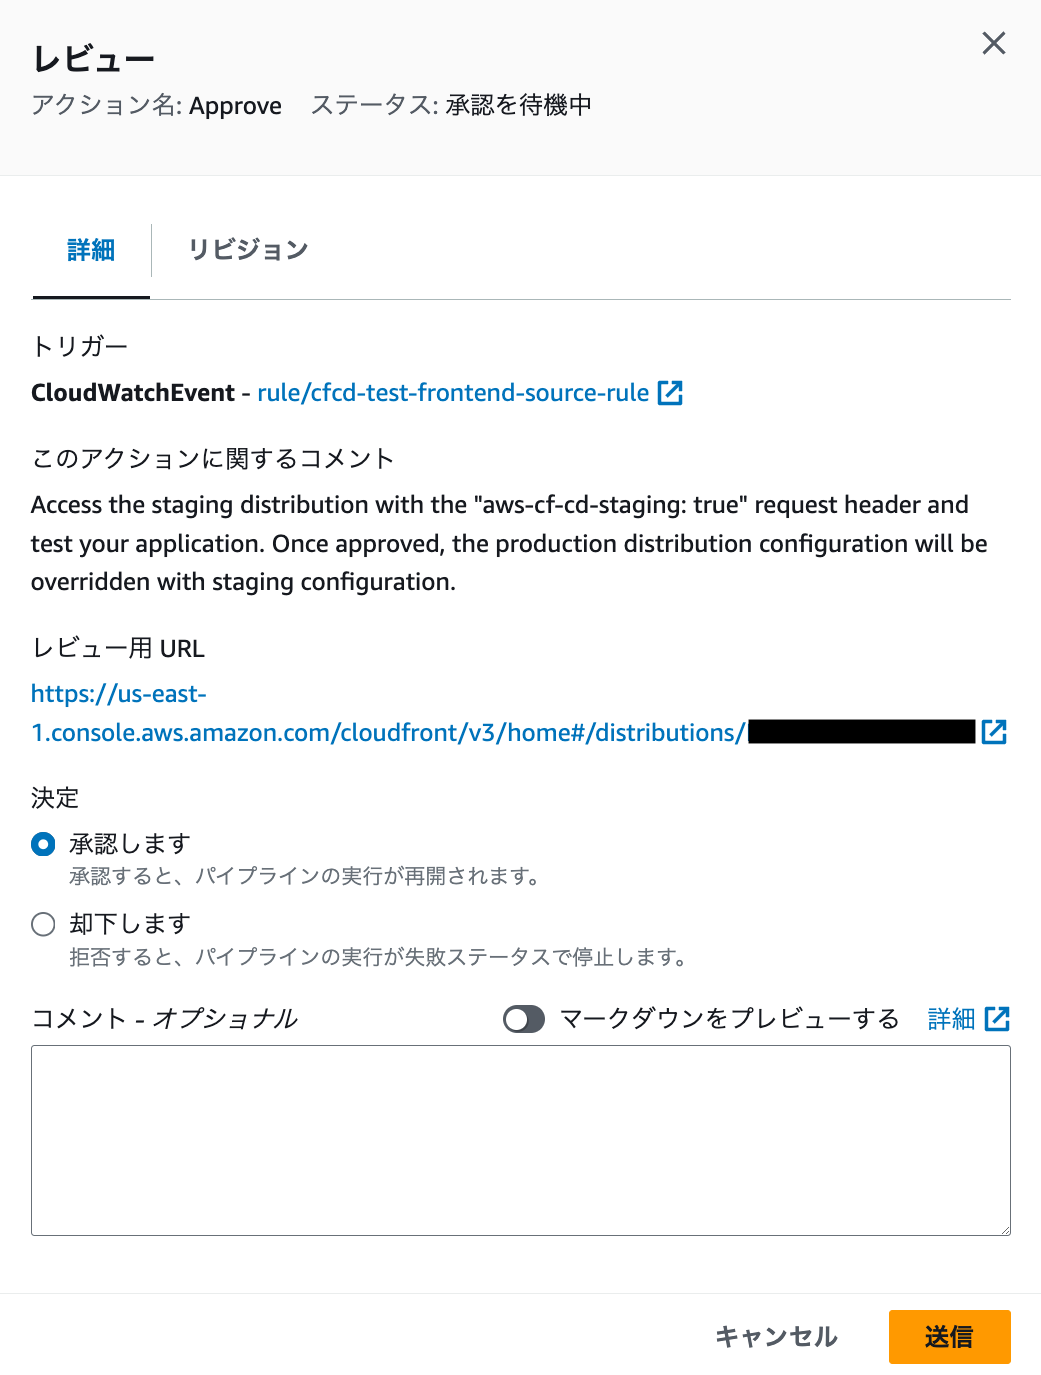
変更を Push します。ステージングに反映され、手動承認ステージで止まるはずです。
git add src/s3/hosting/src/App.js
git commit -m "test: run pipeline"
git push origin main
AWS Step Functions による Configure アクションをパスし、手動承認で止まりました。

初回起動時
2 回目以降起動時
続いて Requestly という Chrome 拡張を使い、ヘッダーを出し分けて動作確認します。
ヘッダーなし (Requestly: Off)
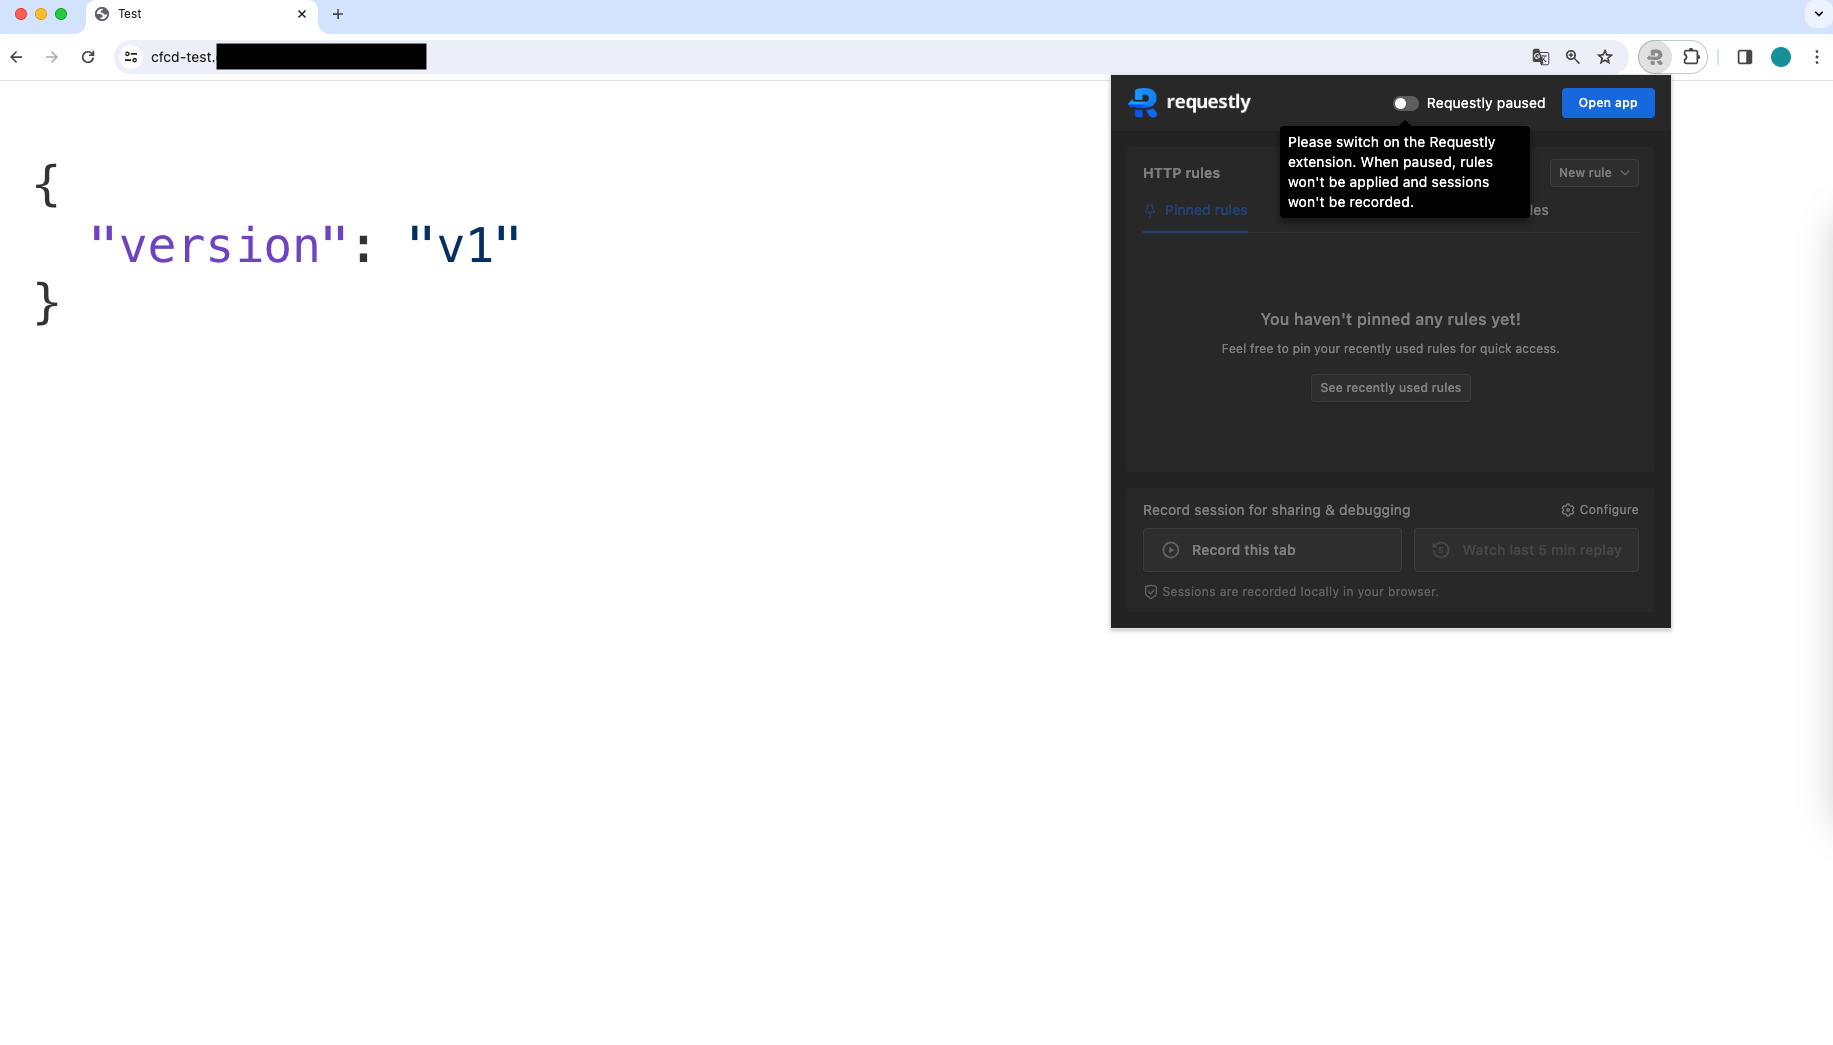
ヘッダーあり (Requestly: On)

ヘッダーの有無でリクエストの向き先が変わっているのがわかります。この状態で開発者はテストを実施し、OK であれば承認して昇格を走らせます。
成功しました!
ヘッダーなし (Requestly: Off) でも v2 になっています。

おわりに
もともと ASL を整備していたのもあると思いますが、AWS CodePipeline と AWS Step Functions の組み合わせの体験がよく、もっといろいろなユースケースをためしてみたくなりました。とはいえ、以下の課題も少し残っています。
- アプリバージョンがパラメータストア管理であり、更新を失念してもパイプラインはそのまま走ってしまう
- S3 へのデプロイを引き続き AWS CodeBuild で妥協している
これらについても最適化できないか、機会があれば検証してみたいと思います。