
DX開発事業部の西田です。
Cloud Vision APIを使うことでトレーニング済みのモデルで画像を解析できます。
画像のテキストを抽出したり、モノやロゴ、顔の検出などなど。
本記事ではCloud Vison APIによって画像から顔を検出しその顔をPillowで加工することによって画像の匿名化加工が可能か検証してみます。
準備
Google Colabノートブックを実行環境としています。
必要なライブラリをインストールし、Google CloudプロジェクトでCloud Vision APIのAPIを有効化、サービスアカウントを作成して認証情報をColabから参照できるようにしておきます。
サービスアカウントには権限「Cloud Vision AI サービス エージェント」を割り当てます。
!pip install --upgrade google-cloud-vision==3.7.2
import os

credentials_path = './credentials.json'
os.environ["GOOGLE_APPLICATION_CREDENTIALS"] = credentials_path
これでCloud Vision APIを利用する準備が整いました。
画像から顔を検出し、検出したランドマークを描画
下記のコードでは以下のようなことをやっています。
- 画像をCloud Vision APIに送信し検出した情報を取得
- 検出した情報を処理し、顔部分のランドマークの座標を取得
- Pillowを使いランドマークに矩形を描画
from google.cloud import vision
import requests
import io
from PIL import Image, ImageDraw
# 画像データから顔を検出
def detect_faces(image_bytes):
MAX_DETECTED_FACES = 50 # 顔検出の最大数
client = vision.ImageAnnotatorClient()
api_image = vision.Image(content=image_bytes)
return client.face_detection(api_image, max_results=MAX_DETECTED_FACES)
# 検出された顔のランドマークに矩形を描画
def draw_face_landmarks(image, annotations):
ANNOTATION_COLOR = "#00FF00"
ANNOTATION_LANDMARK_DIM_PERMIL = 8
ANNOTATION_LANDMARK_DIM_MIN = 4
r_half = min(image.size) * ANNOTATION_LANDMARK_DIM_PERMIL // 1000
r_half = max(r_half, ANNOTATION_LANDMARK_DIM_MIN) // 2
border = max(r_half // 2, 1)
draw = ImageDraw.Draw(image) # 描画オブジェクトの作成
# 顔検出のアノテーションを一つずつ処理
for face in annotations.face_annotations:
v = face.bounding_poly.vertices
r = (v[0].x, v[0].y, v[2].x + 1, v[2].y + 1) # 顔の矩形領域
draw.rectangle(r, outline=ANNOTATION_COLOR, width=border) # 顔の矩形を描画
for landmark in face.landmarks:
x = int(landmark.position.x + 0.5) # ランドマークのx座標
y = int(landmark.position.y + 0.5) # ランドマークのy座標
r = (x - r_half, y - r_half, x + r_half + 1, y + r_half + 1) # ランドマークの矩形領域
draw.rectangle(r, outline=ANNOTATION_COLOR, width=border) # ランドマークの矩形を描画
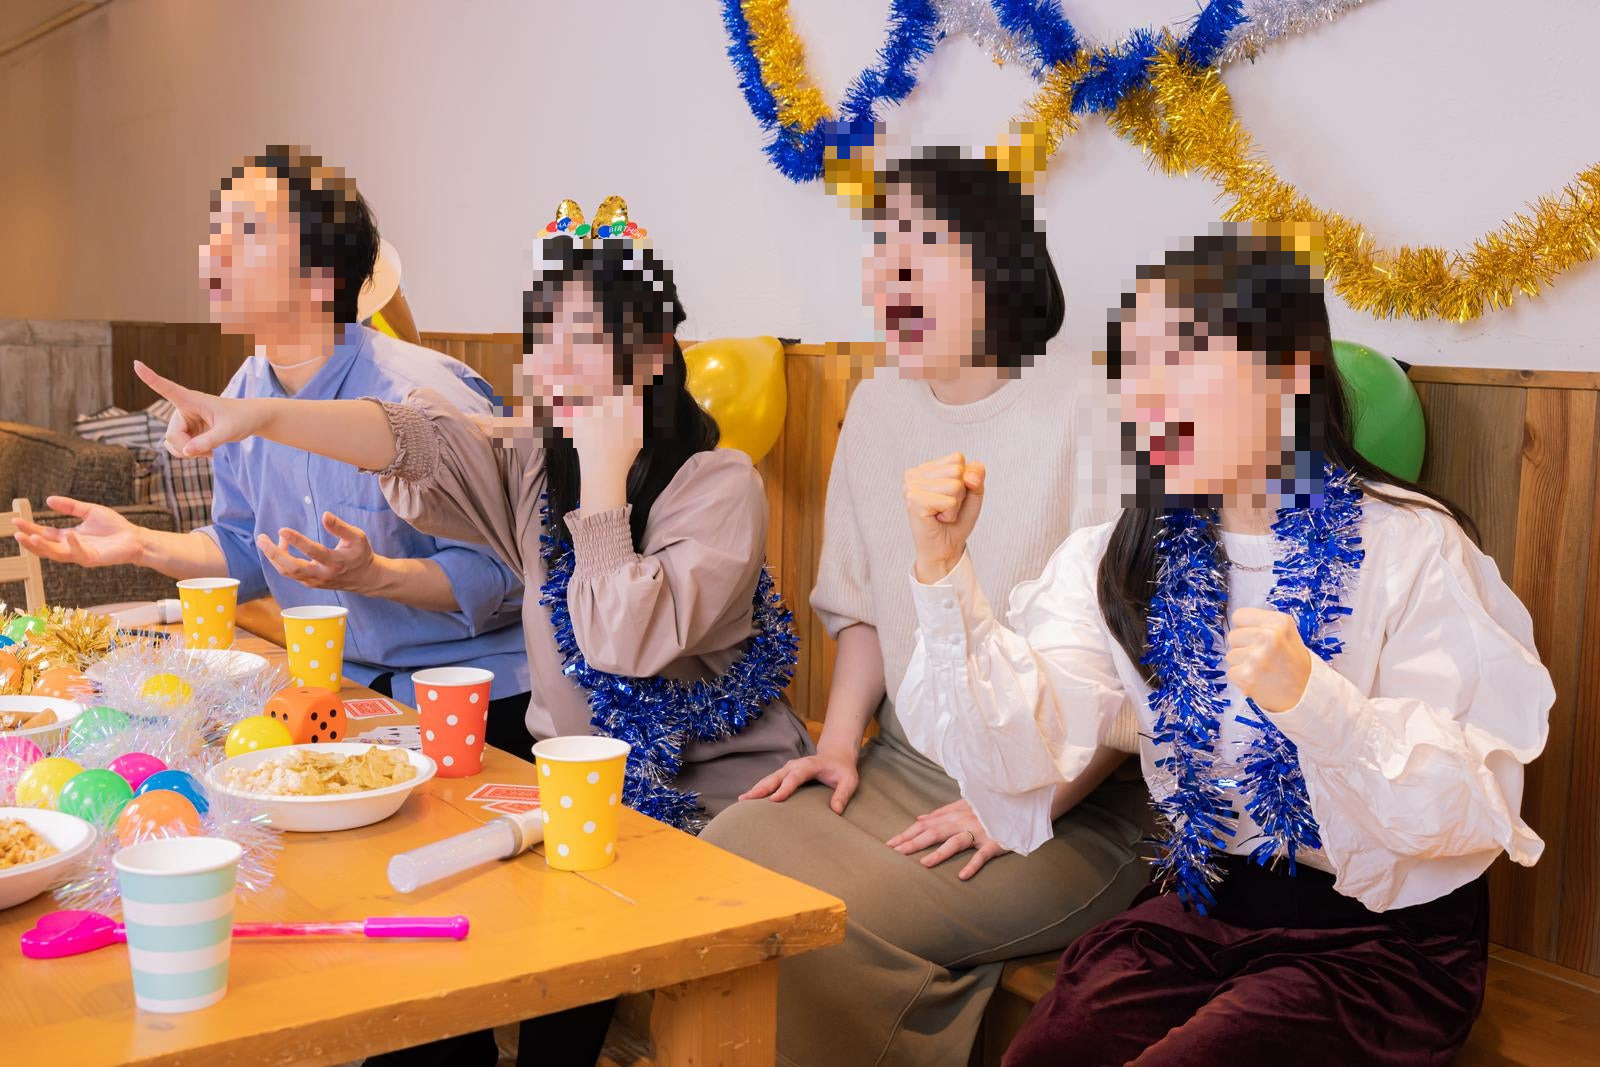
# 「ぱくたそ」の画像を使用( https://www.pakutaso.com/ )
url = "https://user0514.cdnw.net/shared/img/thumb/ppHFKE2824_TP_V.jpg"
image_bytes = requests.get(url).content
annotations = detect_faces(image_bytes)
pil_image = Image.open(io.BytesIO(image_bytes))
draw_face_landmarks(pil_image, annotations)
display(pil_image)

検出された箇所に図形が描画されています。
Cloud Vision APIの検出結果は次のようなデータ構造で返されます。
 {
  bounding_poly {
    vertices {
      x: 493
      y: 239
    }
    vertices {
      x: 672
      y: 239
    }
    vertices {
      x: 672
      y: 447
    }
    vertices {
      x: 493
      y: 447
    }
  }
  fd_bounding_poly {
    vertices {
      x: 515
      y: 287
    }
    vertices {
      x: 654
      y: 287
    }
    vertices {
      x: 654
      y: 425
    }
    vertices {
      x: 515
      y: 425
    }
  }
  landmarks {
    type_: LEFT_EYE
    position {
      x: 540.304931640625
      y: 335.8139343261719
      z: 0.00021076202392578125
    }
  }
  landmarks {
    type_: RIGHT_EYE
    position {
      x: 584.1498413085938
      y: 335.9630126953125
      z: -20.8681697845459
    }
  }
  landmarks {
    type_: LEFT_OF_LEFT_EYEBROW
    position {
      x: 525.3839721679688
      y: 322.7645263671875
      z: 11.186508178710938
    }
  }
  landmarks {
    type_: RIGHT_OF_LEFT_EYEBROW
    position {
      x: 547.14013671875
      y: 327.3902893066406
      z: -15.245319366455078
    }
  }
  landmarks {
    type_: LEFT_OF_RIGHT_EYEBROW
    position {
      x: 568.9879760742188
      y: 323.1532897949219
      z: -25.37285614013672
    }
  }
  landmarks {
    type_: RIGHT_OF_RIGHT_EYEBROW
    position {
      x: 602.741455078125
      y: 323.2921142578125
      z: -25.139575958251953
    }
  }
  landmarks {
    type_: MIDPOINT_BETWEEN_EYES
    position {
      x: 559.5029296875
      y: 337.7127990722656
      z: -20.550424575805664
    }
  }
  landmarks {
    type_: NOSE_TIP
    position {
      x: 554.2532348632812
      y: 367.81231689453125
      z: -32.73008728027344
    }
  }
  〜中略〜
  roll_angle: -4.761883735656738
  pan_angle: -23.883670806884766
  tilt_angle: -3.659132480621338
  detection_confidence: 0.98046875
  landmarking_confidence: 0.3424128592014313
  joy_likelihood: LIKELY
  sorrow_likelihood: VERY_UNLIKELY
  anger_likelihood: VERY_UNLIKELY
  surprise_likelihood: VERY_UNLIKELY
  under_exposed_likelihood: VERY_UNLIKELY
  blurred_likelihood: VERY_UNLIKELY
  headwear_likelihood: VERY_UNLIKELY
}
顔の輪郭を囲う座標情報、顔のパーツの名前と座標、感情分析の結果等が取れています。
モザイク加工
顔の輪郭を囲う座標情報が取れるためそこをモザイクで加工してみます。
# 検出された顔をモザイク加工
def anonymize_faces(image, annotations):
    ANONYMIZATION_PIXELS = 20  # モザイク加工時の一辺あたりのピクセル数

    # 顔検出のアノテーションを一つずつ処理
    for face in annotations.face_annotations:
        v = face.bounding_poly.vertices

        # 顔の範囲を切り出し
        face = image.crop((v[0].x, v[0].y, v[2].x + 1, v[2].y + 1))

        # 切り出した顔のサイズを取得
        face1_w, face1_h = face.size
        # モザイク加工のためのピクセル次元を計算
        pixel_dim = max(face1_w, face1_h) // ANONYMIZATION_PIXELS
        # 縮小後の顔の新しい幅と高さを計算
        face2_w, face2_h = face1_w // pixel_dim, face1_h // pixel_dim
        # 顔を縮小してピクセル化(モザイク加工)
        face = face.resize((face2_w, face2_h), Image.NEAREST)
        # 元のサイズに戻す
        face = face.resize((face1_w, face1_h), Image.NEAREST)

        # モザイク加工した顔を元の画像に貼り付け
        image.paste(face, (v[0].x, v[0].y))


pil_image = Image.open(io.BytesIO(image_bytes))
anonymize_faces(pil_image, annotations)

display(pil_image)
期待通り検出箇所をモザイク加工することができました。
見切れた顔の検出
顔が見切れた画像でも検出できるのか試してみました。
url = "https://user0514.cdnw.net/shared/img/thumb/0I9A8084_TP_V.jpg"
image_bytes = requests.get(url).content

annotations = detect_faces(image_bytes)
print(annotations)

pil_image = Image.open(io.BytesIO(image_bytes))
draw_face_landmarks(pil_image, annotations)

display(pil_image)
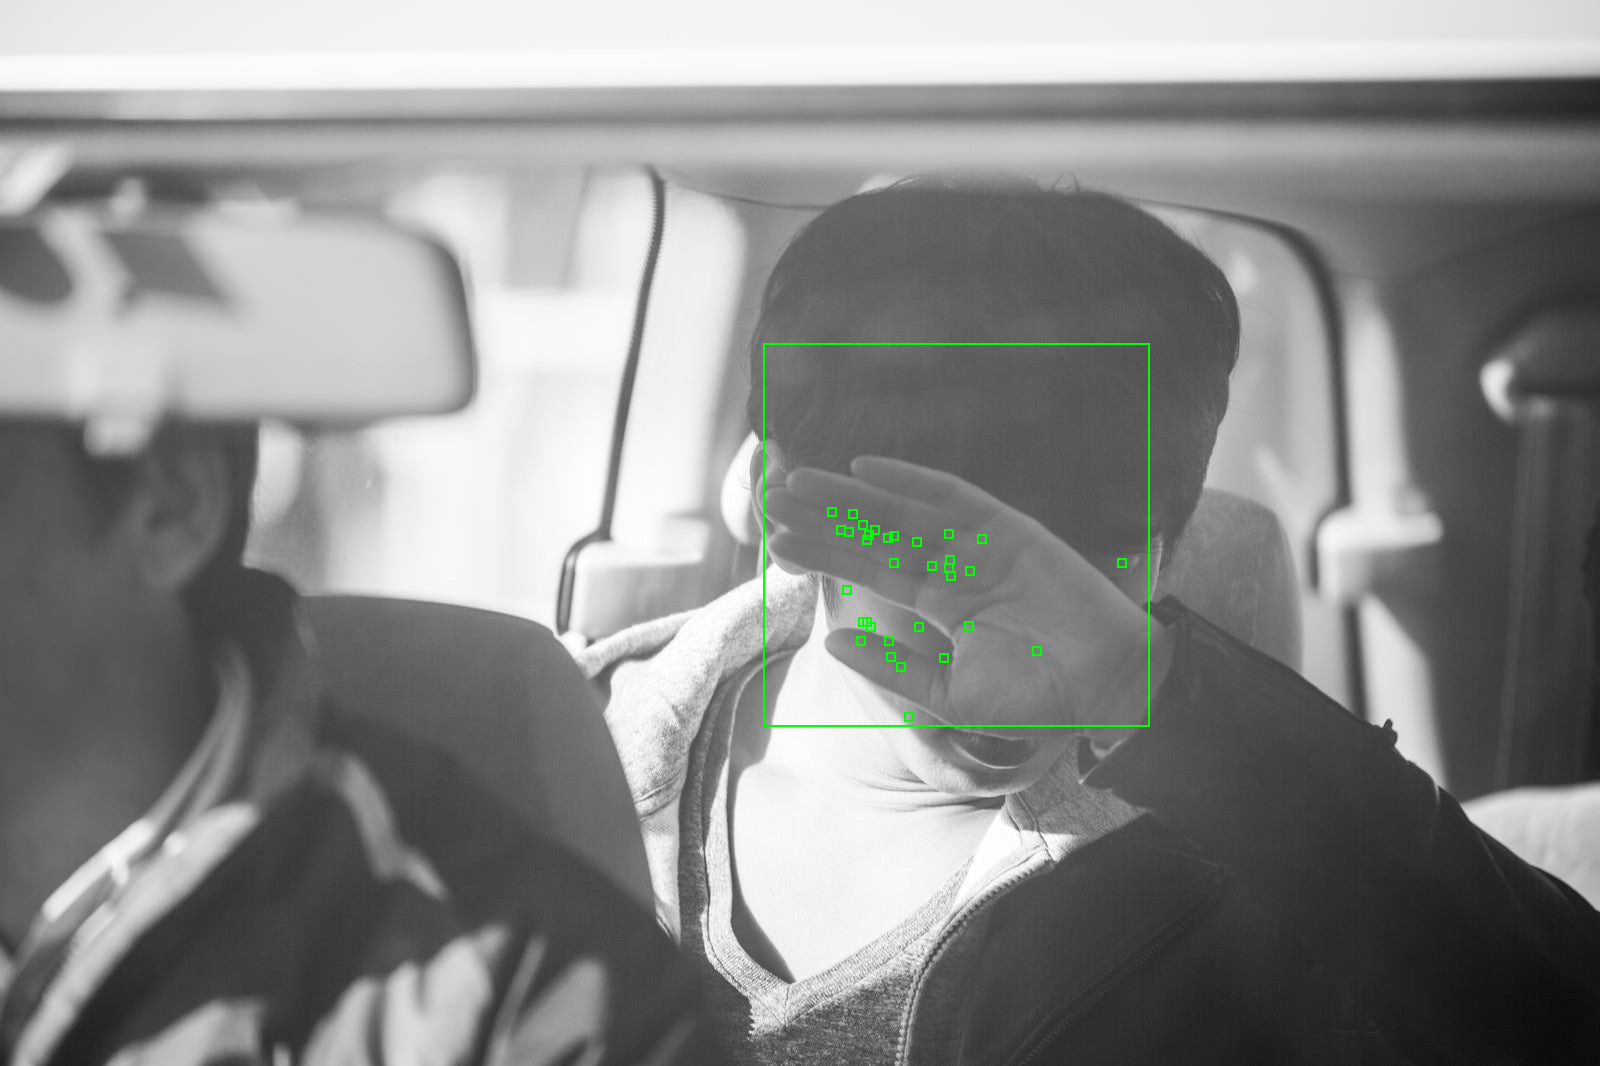
これも検出することはできました。
ただし、detection_confidenceやlandmarking_confidenceの数値が下がったのでCloud Vision AIも顔認識にあまり自信がなかったことがわかります。
ある程度顔が隠れていても検出できるので匿名化という観点で安全側に倒しやすい挙動です。
顔のパーツの一部を特定して加工
顔のパーツの座標も取れているので、よくある目に黒線を引く形の匿名化もできそうです。
import math

# 目にラインを引く
def draw_eye_lines(image, landmarks):
    eye_distance, eye_points = get_face_geometry(landmarks)

    draw = ImageDraw.Draw(image)

    # 目の位置にラインを描画する(左目と右目の位置を取得してラインを引く)
    eye_left = eye_points['LEFT_EYE']
    eye_right = eye_points['RIGHT_EYE']

    # ラインの太さを設定
    line_width = int(math.sqrt((eye_right.x - eye_left.x) ** 2 + (eye_right.y - eye_left.y) ** 2) / 3)

    # 両目の間に太い線を引く
    draw.line((eye_left.x, eye_left.y, eye_right.x, eye_right.y), fill='black', width=line_width)


# 特定の顔のランドマークから目の位置、距離、他の情報を計算する
def get_face_geometry(landmarks):
    # 目のランドマーク(右目の右端と左目の左端)
    landmark_types = ['Type.RIGHT_EYE_RIGHT_CORNER', 'Type.LEFT_EYE_LEFT_CORNER']
    points = {}
    for landmark in landmarks:
        # 特定のランドマークのみ処理
        if str(landmark.type) in landmark_types:
            points[str(landmark.type)] = Point(landmark.position.x, landmark.position.y)

    eye_left = points['Type.LEFT_EYE_LEFT_CORNER']
    eye_right = points['Type.RIGHT_EYE_RIGHT_CORNER']
    eye_distance = math.sqrt((eye_right.x - eye_left.x) ** 2 + (eye_right.y - eye_left.y) ** 2)

    return eye_distance, {'LEFT_EYE': eye_left, 'RIGHT_EYE': eye_right}


# 座標を保持するクラス
class Point:
    def __init__(self, x, y):
        self.x = x
        self.y = y


url = "https://user0514.cdnw.net/shared/img/thumb/ra-menPAR56611_TP_V.jpg"
image_bytes = requests.get(url).content

annotations = detect_faces(image_bytes)
pil_image = Image.open(io.BytesIO(image_bytes))

# 顔検出のアノテーションを一つずつ処理
for face in annotations.face_annotations:
    draw_eye_lines(pil_image, face.landmarks)

display(pil_image)
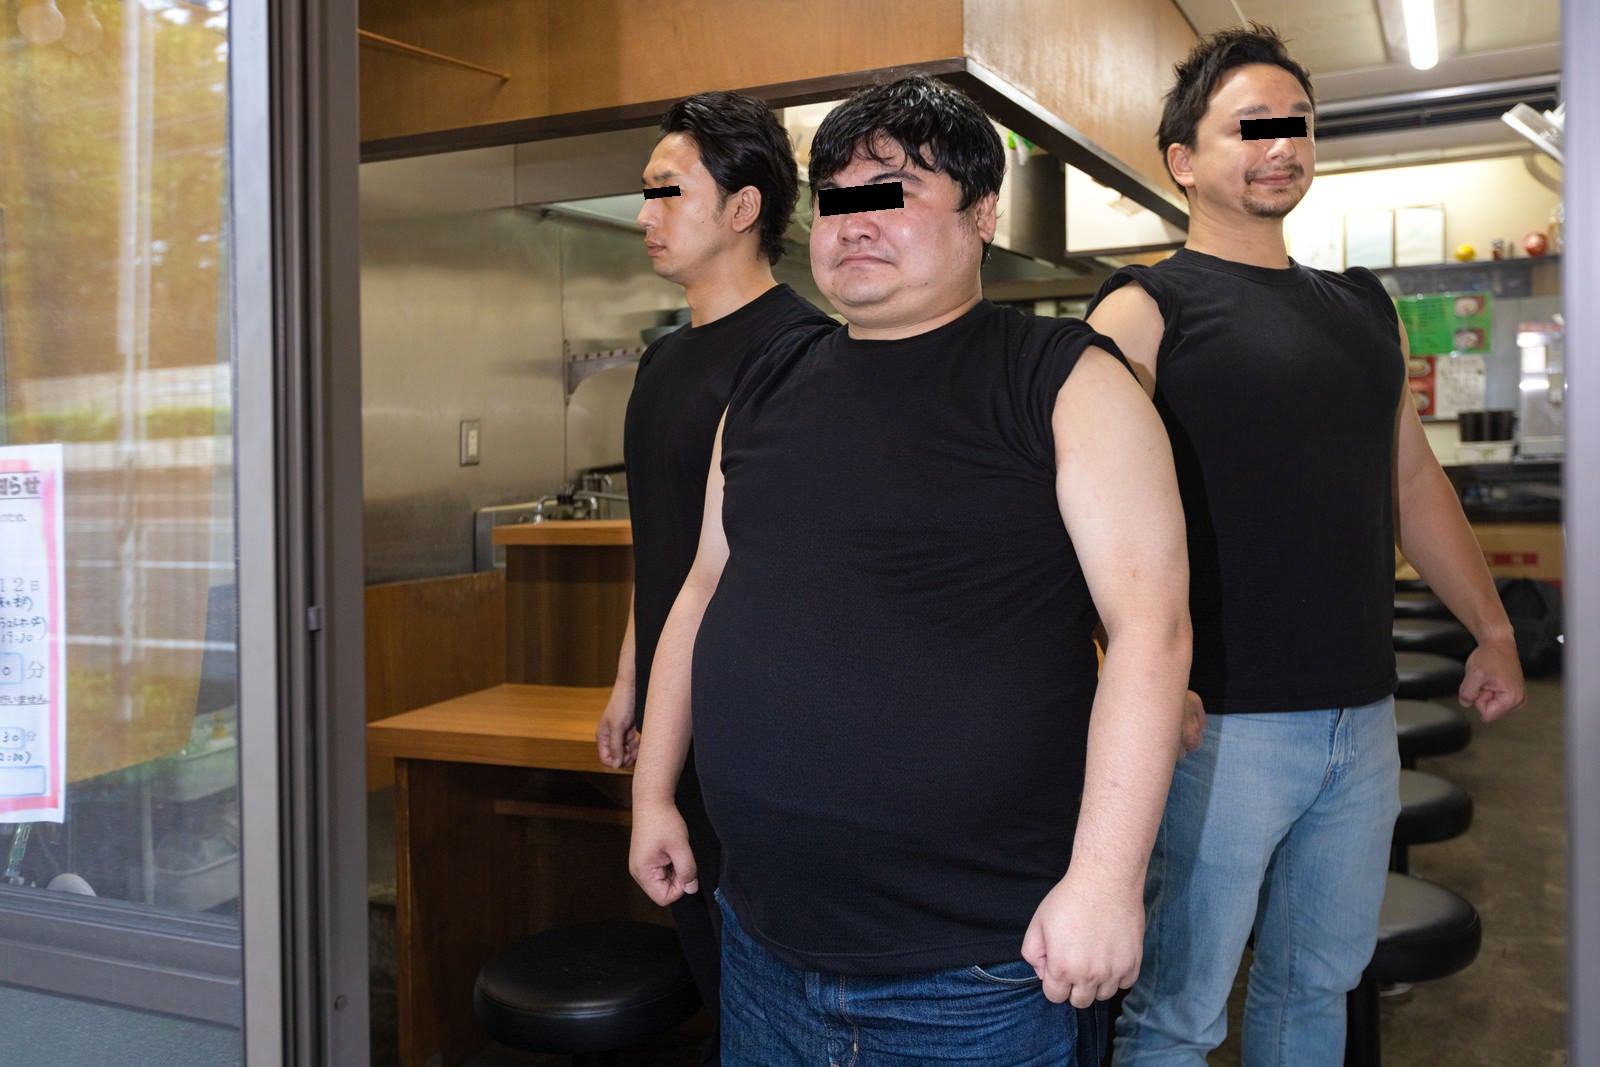
両目尻の座標を特定して黒線を引くことで加工ができました。
Cloud Vison APIを使うことで画像を匿名化して安全に扱うなどのユースケースに利用できることが確認できました。
ノートブックの全ソースコードはこちら。