インフラチームがお届けするブログリレーです!既に公開されている記事もありますので、こちらから他のメンバーの投稿もぜひチェックしてみてください!
はじめに
こんにちは、そしてこんばんは!
クラウドインテグレーション事業部の大嵩です。
今回は、Amazon ElastiCacheの自動スケールで、cronを使用した定期スケジューリング方法についてご紹介します!
やったこと
要望として、レプリカを定時で増やしたいとのことで、cronを使用したスケールポリシーを作成しました!
日時とキャパシティは、以下で設定する前提です。
毎日23:30に合計レプリカが 4台にスケールアウト、毎日25:00に合計レプリカが2台にスケールインするものになります。
| 最小 | 最大 | 周期(JST) |
|---|---|---|
| 3 | 3 | 毎日 23:30 |
| 1 | 1 | 毎日 25:00 |
注意点
ここで、最小/最大を3と1にしているのになぜ4台と2台なんだ。。。と気になる方がいると思います。
それは、プライマリノードがあるためです!
プライマリノードは、書き込み/読み取りのできるノードとなり、今回の自動スケールで増えていくレプリカは、リードレプリカとなります。
そのため、今回はシャード内のレプリカを増やす関係上、プライマリノードをカウントしない数をポリシーに入力します。
実際にポリシーを作成する
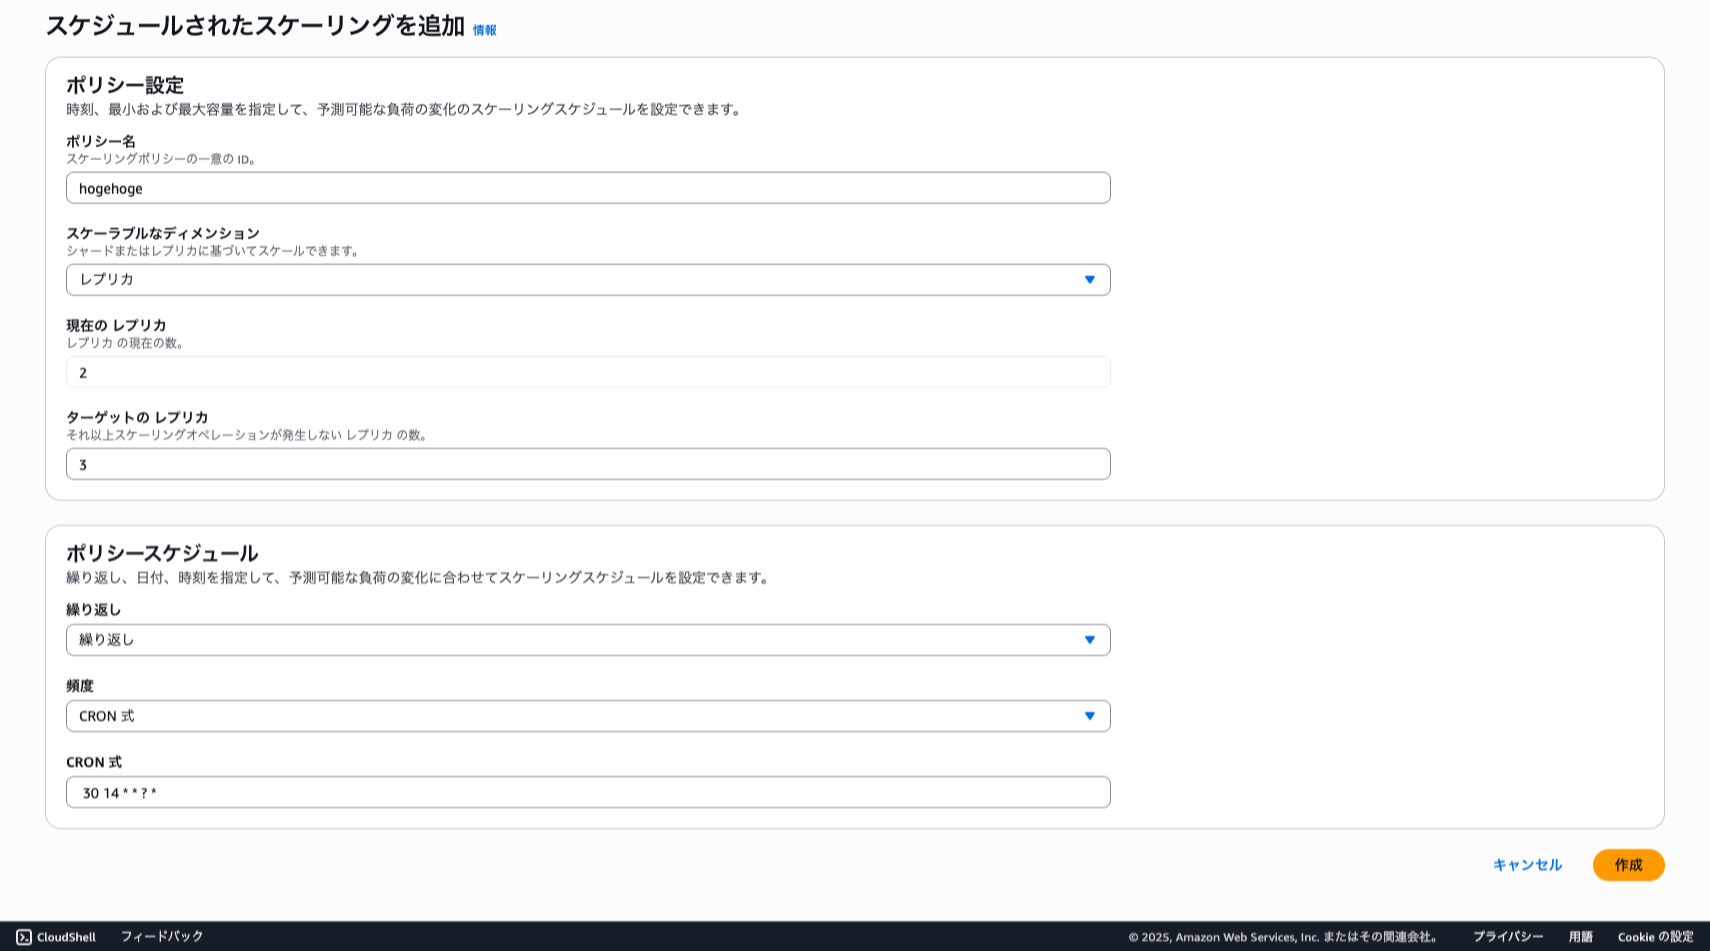
まずはクラスターのページから、「スケジューリングされたスケーリングを追加」を押します!
すると、すぐに設定画面が出てきますので、順に入力していきます!
スケジュールの内容
今回は、下記のように入力してポリシーを作成してみます!
スケールアウト
| 項目 | 設定値 |
|---|---|
| 繰り返し | 繰り返し |
| 頻度 | CRON式 |
| CRON式 | 30 14 * * ? * |
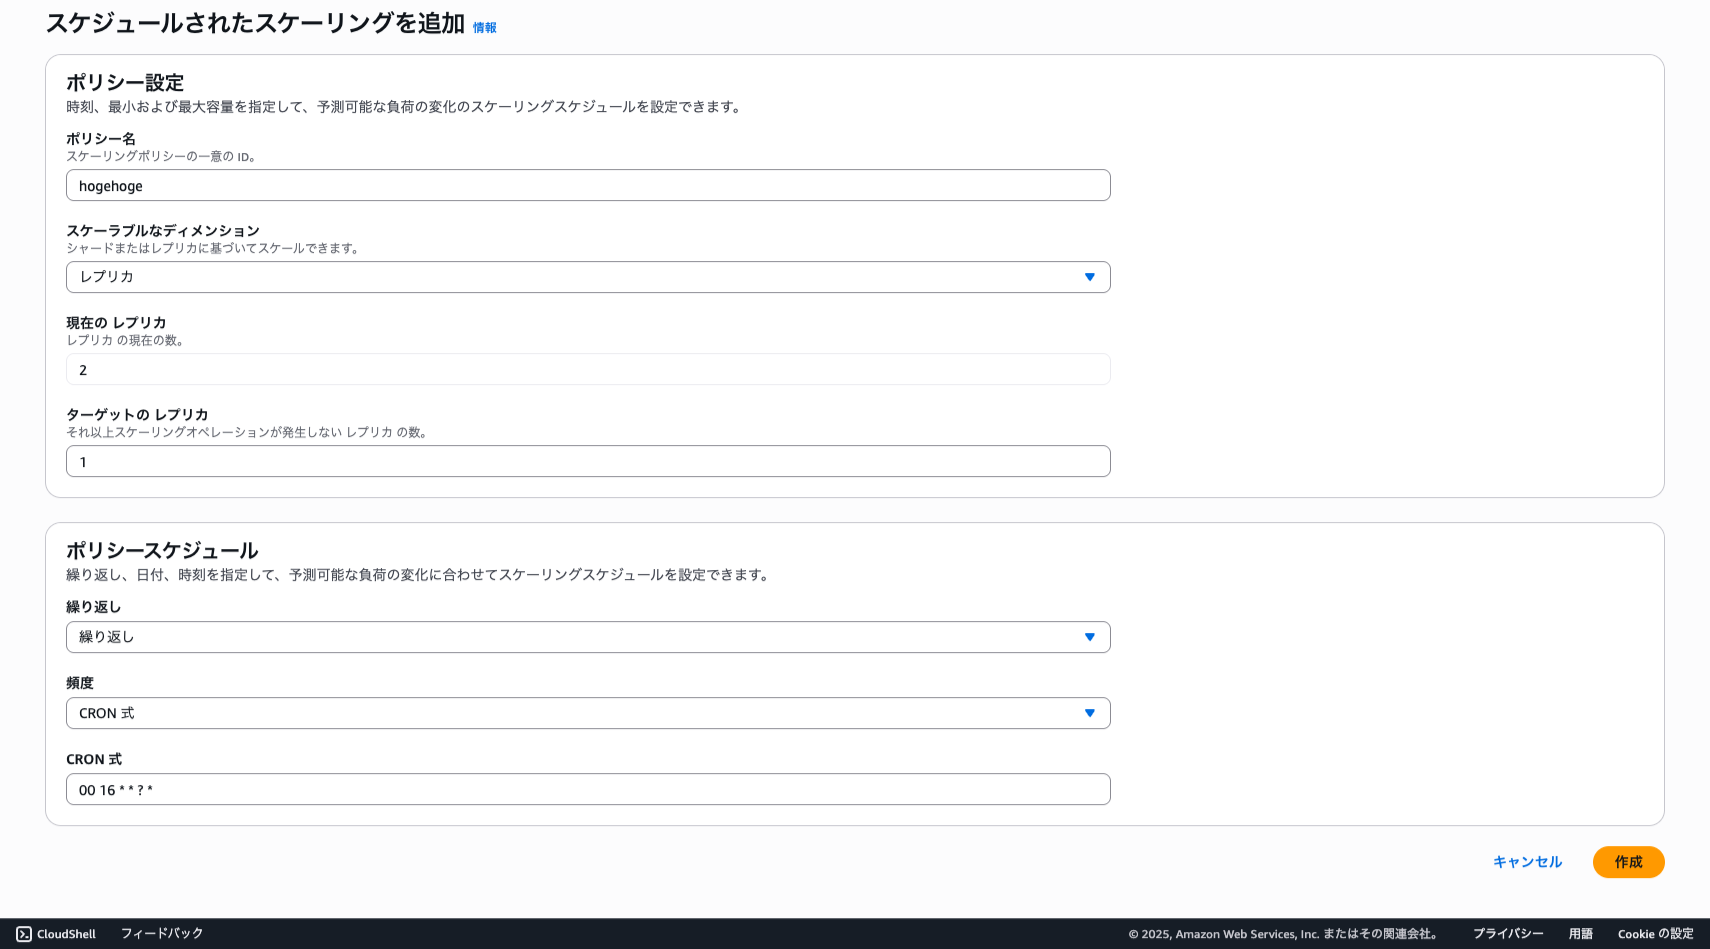
スケールイン
| 項目 | 設定値 |
|---|---|
| 繰り返し | 繰り返し |
| 頻度 | CRON式 |
| CRON式 | 00 16 * * ? * |
実際の画面
スケールアウト
スケールアウトの分は、ターゲットのレプリカを3と入力します。
ここでCRONを入力するときは、タイムゾーンはUTCとなっていますので、時差は9時間として入力します!
スケールイン
スケールイン用のポリシーも、同様に入力します。
注意
なんと、コンソールでCRONを登録できるものの、Amazon ElastiCacheの画面では設定内容を確認できません。。。
そのため、AWS CLIから設定内容を確認する必要があります!
その際、json形式で見づらいですが、下記のような形でテーブル表示することも可能です!
❯ aws application-autoscaling describe-scheduled-actions \
    --service-namespace elasticache \
    --resource-id replication-group/リソース名 \
    --query 'ScheduledActions[*].[ScheduledActionName, Schedule, StartTime, EndTime, ScalableTargetAction.MinCapacity, ScalableTargetAction.MaxCapacity]' \
    --output table
-------------------------------------------------------------------------------------------------------------------
|                                            DescribeScheduledActions                                             |
+---------------------------------------------------------------+----------------------+-------+-------+----+-----+
|  SampleProject-ServiceA-Identifier-everyday-scale-out-policy  |  cron(30 14 * * ? *) |  None |  None |  3 |  3  |
|  SampleProject-ServiceA-Identifier-everyday-scale-in-policy   |  cron(00 16 * * ? *) |  None |  None |  1 |  1  |
+---------------------------------------------------------------+----------------------+-------+-------+----+-----+
イベント履歴を見てみる
では、イベント履歴を見て実際の動きを追ってみましょう!
時間の表示はJSTになっていますが、設定したcron通りにスケールしていることがわかります!
# コマンド
❯ aws application-autoscaling describe-scaling-activities \
    --service-namespace elasticache \
    --resource-id replication-group/リソース名

# 実行結果
[
  {
    "ActivityId": "masked-activity-id",
    "ServiceNamespace": "elasticache",
    "ResourceId": "replication-group/masked-resource-name",
    "ScalableDimension": "elasticache:replication-group:Replicas",
    "Description": "Setting Replicas of ElastiCache cluster to 1.",
    "Cause": "maximum capacity was set to 1",
    "StartTime": "2025-04-11T01:00:42.640000+09:00",
    "EndTime": "2025-04-11T01:06:44.206000+09:00",
    "StatusCode": "Successful",
    "StatusMessage": "Successfully set Replicas of ElastiCache cluster to 1. Change successfully fulfilled by elasticache."
  },
  {
    "ActivityId": "masked-activity-id",
    "ServiceNamespace": "elasticache",
    "ResourceId": "replication-group/masked-resource-name",
    "ScalableDimension": "elasticache:replication-group:Replicas",
    "Description": "Setting min capacity to 1 and max capacity to 1",
    "Cause": "scheduled action name masked-scheduled-action-name was triggered",
    "StartTime": "2025-04-11T01:00:41.814000+09:00",
    "EndTime": "2025-04-11T01:00:41.824000+09:00",
    "StatusCode": "Successful",
    "StatusMessage": "Successfully set min capacity to 1 and max capacity to 1"
  },
  {
    "ActivityId": "masked-activity-id",
    "ServiceNamespace": "elasticache",
    "ResourceId": "replication-group/masked-resource-name",
    "ScalableDimension": "elasticache:replication-group:Replicas",
    "Description": "Setting Replicas of ElastiCache cluster to 3.",
    "Cause": "minimum capacity was set to 3",
    "StartTime": "2025-04-10T23:30:39.003000+09:00",
    "EndTime": "2025-04-10T23:37:56.643000+09:00",
    "StatusCode": "Successful",
    "StatusMessage": "Successfully set Replicas of ElastiCache cluster to 3. Change successfully fulfilled by elasticache."
  },
  {
    "ActivityId": "masked-activity-id",
    "ServiceNamespace": "elasticache",
    "ResourceId": "replication-group/masked-resource-name",
    "ScalableDimension": "elasticache:replication-group:Replicas",
    "Description": "Setting min capacity to 3 and max capacity to 3",
    "Cause": "scheduled action name masked-scheduled-action-name was triggered",
    "StartTime": "2025-04-10T23:30:38.114000+09:00",
    "EndTime": "2025-04-10T23:30:38.120000+09:00",
    "StatusCode": "Successful",
    "StatusMessage": "Successfully set min capacity to 3 and max capacity to 3"
  }
]
スケールアウト
下記の部分では、23:30になるように設定したスケールアウトが動いていることがわかります!
 {
    "ActivityId": "masked-activity-id",
    "ServiceNamespace": "elasticache",
    "ResourceId": "replication-group/masked-resource-name",
    "ScalableDimension": "elasticache:replication-group:Replicas",
    "Description": "Setting Replicas of ElastiCache cluster to 3.",
    "Cause": "minimum capacity was set to 3",
    "StartTime": "2025-04-10T23:30:39.003000+09:00",
    "EndTime": "2025-04-10T23:37:56.643000+09:00",
    "StatusCode": "Successful",
    "StatusMessage": "Successfully set Replicas of ElastiCache cluster to 3. Change successfully fulfilled by elasticache."
  },
  {
    "ActivityId": "masked-activity-id",
    "ServiceNamespace": "elasticache",
    "ResourceId": "replication-group/masked-resource-name",
    "ScalableDimension": "elasticache:replication-group:Replicas",
    "Description": "Setting min capacity to 3 and max capacity to 3",
    "Cause": "scheduled action name masked-scheduled-action-name was triggered",
    "StartTime": "2025-04-10T23:30:38.114000+09:00",
    "EndTime": "2025-04-10T23:30:38.120000+09:00",
    "StatusCode": "Successful",
    "StatusMessage": "Successfully set min capacity to 3 and max capacity to 3"
  }
以下のメッセージから、7分後には完全にスケールが完了していることを確認できます。
レプリカの増加となるため、多少の遅延があるようです。
"StatusMessage": "Successfully set Replicas of ElastiCache cluster to 3. Change successfully fulfilled by elasticache."
スケールイン
下記の部分では、01:00になるように設定したスケールアウトが動いていることがわかります!
  {
    "ActivityId": "masked-activity-id",
    "ServiceNamespace": "elasticache",
    "ResourceId": "replication-group/masked-resource-name",
    "ScalableDimension": "elasticache:replication-group:Replicas",
    "Description": "Setting Replicas of ElastiCache cluster to 1.",
    "Cause": "maximum capacity was set to 1",
    "StartTime": "2025-04-11T01:00:42.640000+09:00",
    "EndTime": "2025-04-11T01:06:44.206000+09:00",
    "StatusCode": "Successful",
    "StatusMessage": "Successfully set Replicas of ElastiCache cluster to 1. Change successfully fulfilled by elasticache."
  },
  {
    "ActivityId": "masked-activity-id",
    "ServiceNamespace": "elasticache",
    "ResourceId": "replication-group/masked-resource-name",
    "ScalableDimension": "elasticache:replication-group:Replicas",
    "Description": "Setting min capacity to 1 and max capacity to 1",
    "Cause": "scheduled action name masked-scheduled-action-name was triggered",
    "StartTime": "2025-04-11T01:00:41.814000+09:00",
    "EndTime": "2025-04-11T01:00:41.824000+09:00",
    "StatusCode": "Successful",
    "StatusMessage": "Successfully set min capacity to 1 and max capacity to 1"
  },
こちらも、同様に6分後には完全に不要なレプリカが削除されていることがわかります!
"StatusMessage": "Successfully set Replicas of ElastiCache cluster to 1. Change successfully fulfilled by elasticache."
まとめ
今回の調査からは下記がわかりました!
- Amazon ElastiCacheのレプリカ数を、決まった時間に自動で増やしたり減らしたりできます。設定はAmazon ElastiCacheの画面から行い、定期的な時間指定にはCRON式(UTC)が使えます。
- 設定する「レプリカ数」は読み取り専用コピーの数だけです(全体の実際の数は「設定数+1台(本体分)」)。スケジュールの詳しい設定内容は、AWS CLIを使わないと確認できません。
- 実際に動いたかは「イベント履歴」でチェックします。レプリカ数が変わるまでには数分かかります。
この記事がどなたかの参考になりますと幸いです!