この記事について
最近、AWSの生成AIサービスを使ったPoC(Proof of Concept:概念実証)の案件に携わることがあり、そこでAWSが提供するgenai-quickstart-pocsを使用し、便利だなと感じたので記事にしました。
genai-quickstart-pocsとは何?
リポジトリのREADMEにはこんな記載がされています。
This repository contains sample code demonstrating various use cases leveraging Amazon Bedrock and Generative AI. Each sample is a separate project with its own directory, and includes a basic Streamlit frontend to help users quickly set up a proof of concept.
ざっくりお伝えするならば、Amazon Bedrockと Generative AIを活用して、様々なユースケースを実証できるサンプルコードを提供してくているリポジトリです。
なんと、このリポジトリを使って37種類もの検証を行うことができます。
37種類のプロジェクトを一挙ご紹介!!
実際に37個のプロジェクトを紹介したいと思います。わかりやすさのため簡単に分類して紹介します。
RAG系
- Amazon-Bedrock-RAG-OpenSearchServerless-POC
- Amazon-Bedrock-Knowledgebases-RAG-POC
- Amazon-Bedrock-Langchain-RAG-POC
- Amazon-Bedrock-RAG-Kendra-POC
- Amazon-Bedrock-Semantic-Cache
Amazon Bedrock KnowledgeBases やLangChainと組み合わせてRAGを実現することができます。
テキスト/画像/動画生成・分析系
- Amazon-Bedrock-Claude3-Image-Analysis-POC
- Amazon-Bedrock-Video-Chapter-Search-POC
- Amazon-Bedrock-Image-Generation-POC
- Amazon-Bedrock-PowerPoint-Generator
- Amazon-Bedrock-Alt-Text-Generator
- Amazon-Bedrock-GenAI-Sentiment-Analysis-POC
Amazon TranscribeとAmazon Bedrockを組み合わせてビデオの生成や、検索ができたり、画像からデータを抽出することができます。パワポの生成ができるサンプルもあります。
チャットボット系
- Amazon-Bedrock-Chat-POC
- Amazon-Bedrock-Speech-to-Text-Chat-POC
- Amazon-Bedrock-CSV-Chatbot-POC
- Amazon-Bedrock-Converse-API-POC
- Amazon-Bedrock-Converse-Stream-API-POC
チャット機能を提供する各種PoCで、音声入力やCSVデータを活用したチャットボットが含まれています。会話の文脈を保持して回答する機能もあり、柔軟な対話型AIを実装できます。
データベースクエリ・SQL生成系
- Amazon-Bedrock-Amazon-Redshift-POC
- Amazon-Bedrock-Amazon-RDS-POC
- Amazon-Bedrock-Amazon-Athena-POC
自然言語の質問をSQLクエリに変換し、Redshift、RDS、Athenaといったデータベースに対してクエリを実行します。データベースの操作を簡単に行えるため、分析やレポート生成に役立ちます。
ドキュメント処理系
- Amazon-Bedrock-Summarization-Long-Document-POC
- Amazon-Bedrock-Document-Generator
- Amazon-Bedrock-Document-Comparison-POC
- Amazon-Bedrock-Intelligent-Document-Processing
- Amazon-Bedrock-Claude3-Long-Form-Output-POC
- Amazon-Bedrock-Text-Extraction-POC
テンプレートを基にしたドキュメント生成や、PDFファイル同士の比較を行うプロジェクトです。ドキュメント処理の効率化に役立ちます。
ストリーミング処理系
- Amazon-Bedrock-Streaming-Response-POC
- Amazon-Bedrock-Claude3-Streaming-Response-POC
ユーザーが選択したLLMに対して、直接ゼロショットのリクエストを入力することができる、かつリアルタイムのストリーミングレスポンスを実現できます。Claude3を使用したレスポンス実装も可能です。
その他
翻訳・言語処理
- Amazon-Bedrock-Translation-POC
Amazon Translateと組み合わせて、テキストを異言語に翻訳することができます。
ミーティング記録・要約
- Amazon-Bedrock-Meeting-Minutes-Summarization-POC
ミーティングの録音を基に、要約とアクションアイテムを生成できます。
非同期処理
- Amazon-Bedrock-Asynchronous-Invocation-POC
非同期で複数のモデルを同時に呼び出し、レスポンスの時間を削減できます。
モデルのカスタマイズ
- Amazon-Bedrock-Model-Customization-POC
モデルのカスタマイズや事前トレーニングを行い、用途に合わせたモデルを実装できます。
モデルの評価
- Amazon-Bedrock-Model-Eval-POC
特定のプロンプトやデータを使ってモデルのパフォーマンスをテストし、その応答の品質や精度を評価できます。
ガードレール
- Amazon-Bedrock-Guardrails-POC
Amazon Bedrockのガードレール機能を試すことができ、不適切なプロンプトや応答を制御できます。
プレイグラウンド
- Amazon-Bedrock-Model-Playground-POC
Amazon Bedrockで利用可能な様々なモデルの回答の結果を比較することができます。
動的プロンプト
- Amazon-Bedrock-GenAI-Dynamic-Prompting-Explained-POC
few-shot promptとdynammic promptの働きを理解することができます。
クイズ生成
- Amazon-Bedrock-Quiz-Generator-POC
名前の通り、クイズを生成してくれます。遊び心があっていいですね。
タスク分類
- Amazon-Bedrock-Task-Classification
ユーザーからの入力内容を解析して、特定のワークフローに自動分類させることができます。入力に基づいた分類とそれに対応するレスポンスが得られるので、タスク処理の自動化に役立ちそうです。
実際に使ってみよう〜Amazon-Bedrock-RAG-Kendra-POC編〜
今回は上記で紹介したものの中でも、Amazon-Bedrock-RAG-Kendra-POCを使い、簡単なRAGチャットアプリを作成してみました。
前提
今回の検証にはPython3.9.13、Streamlit1.30.0を使用しました。
また、実施にあたっては仮想環境venvを使用しました。
事前準備
Kendraのindex作成、データソースを追加
方法は問いませんが、事前にAmazon Kendraのindexを作成し、データソースを追加する必要があります。
必要なライブラリのインストール
$ pip install -r requirements.txt
で必要なライブラリをインストールしてください。
Claudeのモデルアクセスのリクエスト
今回、Amazon Bedrock Claude3モデルが使用可能になっていることを確認してください。使用可能になっていない場合はAmazon Bedrock 基盤モデルへのアクセスをリクエストするを参照し、モデルへのアクセスをリクエストしてください。
コード
amazon-bedrock-rag-kendra-pocのディレクトリ構成は以下のような形になっています。※.envファイルは各自で作成を行なってください。
amazon-bedrock-rag-kendra-poc/

├── app.py

├── kendra_bedrock_query.py

└── requirements.txt
kendra_bedrock_query.py→Kendra検索を行い、その結果をClaudeに渡し、生成AIに渡す役割
app.py→Streamlitで作成するフロントエンドを構築。kendra_bedrock_query.pyから帰ってきた生成AIの回答を表示させる役割
をになっています。
全体のコードは以下の通りです。
【.env】
profile_name = "プロファイル名"
kendra_index = "(作成したKendraのindexのID)"
【Kendra_bedrock_query.py】
一点注意点ですが、KendraSearch関数内の、kendra.queryの引数で指定するAttributeFilterで、_language_codeをja(日本語)に指定しないと日本語のドキュメントに関しては期待する結果が得られないので気をつけましょう。(初歩的な部分ですが、私はこれに気づかず30分以上時間を費やしました、、)
        AttributeFilter={
            "EqualsTo": {
                "Key": "_language_code",
                "Value": {
                    "StringValue": "ja"
                }
import boto3
import os
from dotenv import load_dotenv
import json
import urllib
from botocore.client import Config

# .envに記載の環境情報読み込み
load_dotenv()
# AWSCLIに設定のprofileを元に、boto3のセッションを確立
boto3_session = boto3.Session(
    region_name="ap-northeast-1", profile_name=os.getenv('profile_name'))
# Bedrock clientの初期化
bedrock = boto3_session.client('bedrock-runtime', 'ap-northeast-1',
                               endpoint_url='https://bedrock-runtime.ap-northeast-1.amazonaws.com')


def kendraSearch(question):
    """
    Primary function that performs a kendra search, using the retrieve API and passes the kendra response into the
    invoke LLM function.
    :param question: The question the user inputs within app.py or the frontend
    :return: Returns the final response of the LLM that was created by the invokeLLM function
    """
    # kendra clientの初期化
    kendra = boto3_session.client('kendra')
    # kendraの、queryメソッドで検索
    kendra_response = kendra.query(
        IndexId=os.getenv('kendra_index'),  # Put INDEX in .env file
        QueryText=question,
        PageNumber=1,
        PageSize=10,
        AttributeFilter={
            "EqualsTo": {
                "Key": "_language_code",
                "Value": {
                    "StringValue": "ja"
                }
            }
        })

    print(kendra_response)
    # Kendra検索結果を署名付きURLに変換
    signed_urls = generateSignedUrls(kendra_response)
    print(signed_urls)

    # ユーザーの質問、Kendraのレスポンス、署名付きURLを元にLLMを呼び出す
    return invokeLLM(question, kendra_response, signed_urls)


# 署名付きURLを返却する関数
def generateSignedUrls(kendra_response):
    """
    Generate signed URLs for documents found in Kendra search results.
    :param kendra_response: The response from the Kendra query
    :return: A list of signed URLs for the documents
    """
    # S3clientの初期化
    s3_client = boto3_session.client(
        's3', region_name='ap-northeast-1', config=Config(signature_version="s3v4"))
    signed_urls = []

    for result in kendra_response.get('ResultItems', []):
        # ドキュメントURIにS3パスが存在するかのチェック
        if 'DocumentURI' in result and "s3.ap-northeast-1.amazonaws.com" in result['DocumentURI']:
            s3_url = result['DocumentURI']
            try:
                print(f"DocumentURI: {s3_url}")

                # プロトコル部分(https://)を削除
                s3_path = s3_url.replace("https://", "")

                #パスを、バケット名とオブジェクトのキーに分割
                parts = s3_path.split('/', 1)
                if len(parts) == 2:
                    bucket_name = parts[0].split('.')[0]
                    object_key_encoded = parts[1]

                    # キー名が日本語の場合、すでにエンコードされているため、一度デコードする(署名付きURLの生成がうまくいかないため)
                    # 参照:https://github.com/aws-samples/generative-ai-use-cases-jp/pull/294/commits/d3463e0ec42bf2ccf3e83070d21fbedc74b9634b
                    object_key = urllib.parse.unquote(object_key_encoded)

                    print(f"Decoded Object Key: {object_key}")
                    print(f"Bucket Name: {bucket_name}")
                    print(f"Object Key: {object_key}")

                    # 署名付きURLの生成
                    signed_url = s3_client.generate_presigned_url(
                        'get_object',
                        Params={'Bucket': bucket_name, 'Key': object_key},
                        ExpiresIn=3600  # URL valid for 1 hour
                    )
                    signed_urls.append({
                        "document_name": result.get('DocumentTitle', 'Unknown Document').get('Text'),
                        "signed_url": signed_url
                    })
                    print(f"signed_urls: {signed_urls}")
                else:
                    print(f"Unexpected S3 path format: {s3_url}")
            except Exception as e:
                print(f"Error generating signed URL: {e}")

    return signed_urls


def invokeLLM(question, kendra_response, signed_urls):
    """
    This function takes in the question from the user, along with the Kendra responses as context to generate an answer
    for the user on the frontend.
    :param question: The question the user is asking that was asked via the frontend input text box.
    :param kendra_response: The response from the Kendra document retrieve query, used as context to generate a better
    answer.
    :return: Returns the final answer that will be provided to the end-user of the application who asked the original
    question.
    """
    # 参照させるドキュメント
    document_references = "\n".join(
        [f"Document: {doc['document_name']}, URL: {doc['signed_url']}" for doc in signed_urls])
    print(document_references)
    # プロンプト
    prompt_data = f"""\n\nHuman:
【指示】:
- 以下の「質問」と「検索結果」に基づいて、ユーザーの質問に正確に回答してください。
- 質問の回答の際には、その情報が見つかったソース(ドキュメント名)をリンク形式で示してください。
- ドキュメント名と署名付きURLは、次の形式で記載してください:
  - 「情報源: [ドキュメント名](署名付きURL)」
- 署名付きURLが複数ある場合は、それらを全てリンク形式で含めてください。
- 検索結果に回答が含まれていない場合は、「該当する情報は見つかりませんでした」と明示してください。


###
Question: {question}

Context: {kendra_response}

Documents:
{document_references}

###

\n\nAssistant:

"""
    # モデルに渡すパラメータ調整
    prompt = {
        "anthropic_version": "bedrock-2023-05-31",
        "max_tokens": 4096,
        "temperature": 0.5,
        "messages": [
            {
                "role": "user",
                "content": [
                    {
                        "type": "text",
                        "text": prompt_data
                    }
                ]
            }
        ]
    }
    # プロンプトをJSON形式に整形
    json_prompt = json.dumps(prompt)
    # モデル呼び出し
    response = bedrock.invoke_model(body=json_prompt, modelId="anthropic.claude-3-5-sonnet-20240620-v1:0",
                                    accept="application/json", contentType="application/json")
    # レスポンス取得
    response_body = json.loads(response.get('body').read())
    answer = response_body['content'][0]['text']
    # 質問の回答と署名付きURLを返却
    return answer, signed_urls
【app.py】
フロントエンドはほぼサンプル実装そのままですが、一部修正を加えました。
import streamlit as st
from kendra_bedrock_query import kendraSearch

st.title(f""":black[Kendra-Bedrock-RAG検証]""")

# configuring values for session state
if "messages" not in st.session_state:
    st.session_state.messages = []
# writing the message that is stored in session state
for message in st.session_state.messages:
    with st.chat_message(message["role"]):
        st.markdown(message["content"])
# # adding some special effects from the UI perspective
st.balloons()
# evaluating st.chat_input and determining if a question has been input
if question := st.chat_input("質問を入力してください"):
    # with the user icon, write the question to the front end
    with st.chat_message("user"):
        st.markdown(question)
    # append the question and the role (user) as a message to the session state
    st.session_state.messages.append({"role": "user",
                                      "content": question})
    # respond as the assistant with the answer
    with st.chat_message("assistant"):
        # making sure there are no messages present when generating the answer
        message_placeholder = st.empty()
        # putting a spinning icon to show that the query is in progress
        with st.status("Determining the best possible answer!", expanded=False) as status:
            # passing the question into the kendra search function, which later invokes the llm
            answer, signed_urls = kendraSearch(question)

            # Prepare the response content
            response_content = answer + "\n\n"
            if signed_urls:
                response_content += "関連する情報源:\n"
                for item in signed_urls:
                    document_name = item['document_name']
                    signed_url = item['signed_url']
                    # Add the document link using markdown
                    response_content += f"- [{document_name}]({signed_url})\n"

            # writing the answer and links to the front end
            message_placeholder.markdown(response_content)
            # showing a completion message to the front end
            status.update(label="Question Answered...",
                          state="complete", expanded=False)
    # appending the results to the session state
    st.session_state.messages.append({"role": "assistant",
                                      "content": response_content})
※Kendraのqueryメソッドから返却されるデータソースのドキュメントURLを使用し、署名付きURLを生成し、さらにそれを
response_content += f"- [{document_name}]({signed_url})\n"
message_placeholder.markdown(response_content)
でマークダウン形式で表示できるようにしています。
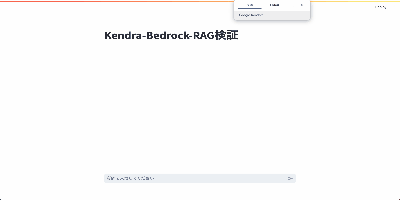
動作確認
上記コードを記載した上で
ターミナルで
$streamlit run app.py
を実行します。
![]()
すると、こんな画面が立ち上がります。
st.balloons()をつけることで風船のエフェクトをつけることができるようです。
実際に質問を入力してみましょう。
今回は事前にKendraのindex内に登録されているAWSのドキュメントに関する質問をしてみます。
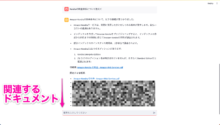
参照元のドキュメントと合わせて回答が返却されることを確認できました。
以上のような形で、簡単にRAGチャットを実装することができました。
所感
生成AIを使ったPoCを行う場合、「準備にそこまで時間をかけたくない」「スピード感を持って実施したい」ニーズは一定数あると思います。そんなニーズに応える非常に便利なリポジトリだなと感じました。今回私が検証で使用したのもそんな動機からでした。実際使用してみて、便利さを享受できました。
また、一人の生成AI学習者目線としても、「生成AIを使ったアプリケーションをお手軽に少し触ってみる」、という使い方や、「生成AIアプリケーションがどういった形で実装されているかなどをコードリーディングを通して学習」したりできるため、非常に便利な教材だと感じています。
興味を持った方は、一度使ってみてはいかがでしょうか。